你是否曾经遇到过这样的问题:WPF应用运行一段时间后,内存占用越来越高,最终导致程序卡顿甚至崩溃?特别是在工业级应用中,这种问题更是致命的。今天我们就来彻底解决这个让无数开发者头疼的内存泄漏难题!
🚨 问题分析:事件订阅的隐形杀手
在WPF开发中,最常见的内存泄漏源头就是事件订阅。当你写下这样的代码时:
C#// 危险代码:容易造成内存泄漏
public class DeviceMonitor
{
    public DeviceMonitor(DeviceService service)
    {
        service.DataUpdated += OnDataUpdated; // 强引用陷阱!
    }

    private void OnDataUpdated(object sender, EventArgs e)
    {
        // 处理逻辑
    }
}
问题核心:即使 DeviceMonitor 对象不再使用,只要 DeviceService 还在运行,它就会持有对 DeviceMonitor 的强引用,导致垃圾回收器无法回收内存。
在工业监控系统中,这种问题尤其严重:
- 💀 长时间运行的服务进程
- 💀 大量的设备数据订阅
- 💀 频繁创建和销毁的监控界面
💡 解决方案:WeakEventManager救世主登场
WeakEventManager 是WPF提供的弱事件模式实现,它使用弱引用来订阅事件,避免了强引用导致的内存泄漏。
你是否在开发复杂业务流程时遇到过这样的困扰:代码中充斥着大量的if-else判断,业务状态难以维护,流程控制逻辑混乱不堪?特别是在工业控制、游戏开发、工作流系统中,状态管理往往成为项目的技术难点。
**今天,我将通过一个完整的WinForm工业设备控制系统,带你掌握C#状态机编程的精髓。**这不仅是一个编程模式的学习,更是解决复杂业务逻辑的利器。无论你是初学者还是有经验的开发者,这篇文章都会让你对状态机有全新的认识。
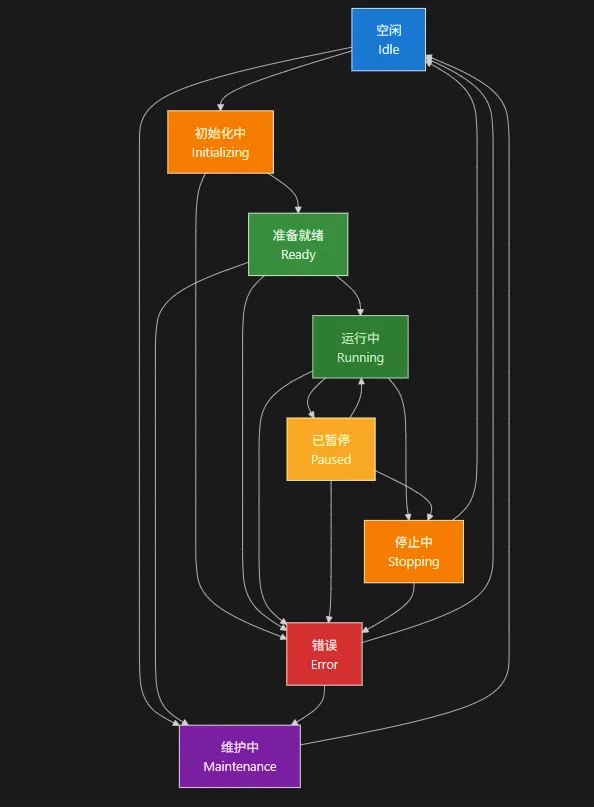
🎯 问题分析:为什么需要状态机?
传统代码的痛点
在没有状态机的情况下,我们通常会这样写代码:
C#// 传统方式:充满条件判断的混乱代码
public void StartMachine()
{
    if (currentStatus == "idle")
    {
        if (isInitialized)
        {
            currentStatus = "running";
        }
        else
        {
            MessageBox.Show("请先初始化设备");
        }
    }
    else if (currentStatus == "error")
    {
        MessageBox.Show("设备故障,无法启动");
    }
    // ... 更多复杂的条件判断
}
这种代码存在以下问题:
- 维护困难:业务逻辑散落在各个方法中
- 扩展性差:添加新状态需要修改多处代码
- 容易出错:状态转换逻辑容易遗漏或冲突
- 测试复杂:难以覆盖所有状态组合
💡 解决方案:优雅的状态机模式
状态机模式通过状态转换表将复杂的业务逻辑结构化,让代码变得清晰、可维护、易扩展。
🔥 核心设计思想
你是否曾经为了实现实时通信功能而苦恼?聊天室、在线游戏、实时数据推送...这些场景都离不开WebSocket技术。作为C#开发者,我们经常需要构建WebSocket服务器,但市面上的教程要么过于简单,要么缺乏完整的生产级代码。
今天这篇文章,我将带你从零开始构建一个功能完整、界面精美、代码健壮的WebSocket服务器应用。不仅包含核心的WebSocket处理逻辑,还提供了WinForms可视化管理界面,让你能够实时监控连接状态、管理客户端、广播消息。
本文将解决的核心问题:
- 如何构建生产级WebSocket服务器
- 如何处理多客户端并发连接
- 如何避免UI线程死锁问题
- 如何优雅地关闭服务器资源
💡 问题分析:WebSocket开发的常见痛点
🔍 技术难点梳理
在C#中开发WebSocket服务器,开发者通常会遇到以下问题:
- 并发处理复杂:多个客户端同时连接,如何保证线程安全?
- 资源管理困难:连接异常断开时,如何正确释放资源?
- UI线程阻塞:异步操作导致界面卡死,用户体验极差
- 状态同步问题:客户端连接状态与UI显示不同步
这些问题在实际项目中经常出现,往往让开发者花费大量时间调试。
🛠️ 解决方案架构设计
📐 整体架构
我们采用分层架构设计,将功能模块化:
C#WebSocketServer/
├── WebSocketServerCore.cs    // 核心服务器逻辑
├── ClientConnection.cs       // 客户端连接管理
├── Form1.cs                 // UI逻辑控制
├── Form1.Designer.cs        // 界面设计
└── Program.cs               // 程序入口
🔑 核心特性
- 异步处理:全程使用async/await避免阻塞
- 线程安全:ConcurrentDictionary管理客户端连接
- 优雅关闭:支持超时控制和资源释放
- 实时监控:可视化界面实时显示连接状态
💻 代码实战:核心模块实现
Industrial IoT Era: Are You Still Struggling with Legacy Serial Devices Unable to Connect to Networks?
Are you still experiencing headaches because old serial devices can't directly access the network? Are you working late into the night due to complex protocol conversions? Today, I'll use a complete C# project to teach you step-by-step how to build a high-performance Serial-to-Ethernet converter, transforming traditional devices into smart terminals in seconds!
This is not just a simple conversion tool, but a complete industrial-grade solution featuring multi-client management, asynchronous data processing, real-time status monitoring, and other enterprise-level functions. Whether you're an embedded engineer or a .NET developer, this article will open up a new world of industrial connectivity for you!
🎯 Problem Analysis: Real Pain Points in Industrial Settings
Challenges of Traditional Serial Devices
In factory automation, numerous PLCs, sensors, instruments, and other devices still use RS232/RS485 serial communication. These devices face core problems:
- Distance Limitations: Serial communication typically doesn't exceed 15 meters
- Single Point Connection: One serial port can only connect to one device
- Maintenance Difficulties: Complex wiring, time-consuming troubleshooting
- Poor Scalability: Cannot directly connect to modern network systems
Shortcomings of Existing Solutions
While serial servers on the market can solve basic needs, they have obvious drawbacks:
- High Costs: Industrial-grade products often cost thousands of dollars
- Limited Functionality: Lack flexible data processing capabilities
- Integration Difficulties: Hard to seamlessly integrate with existing systems
💡 Solution: Smart Converter Built with C#
Core Architecture Design
Our solution adopts a Producer-Consumer pattern, implementing efficient bidirectional data conversion through concurrent queues:
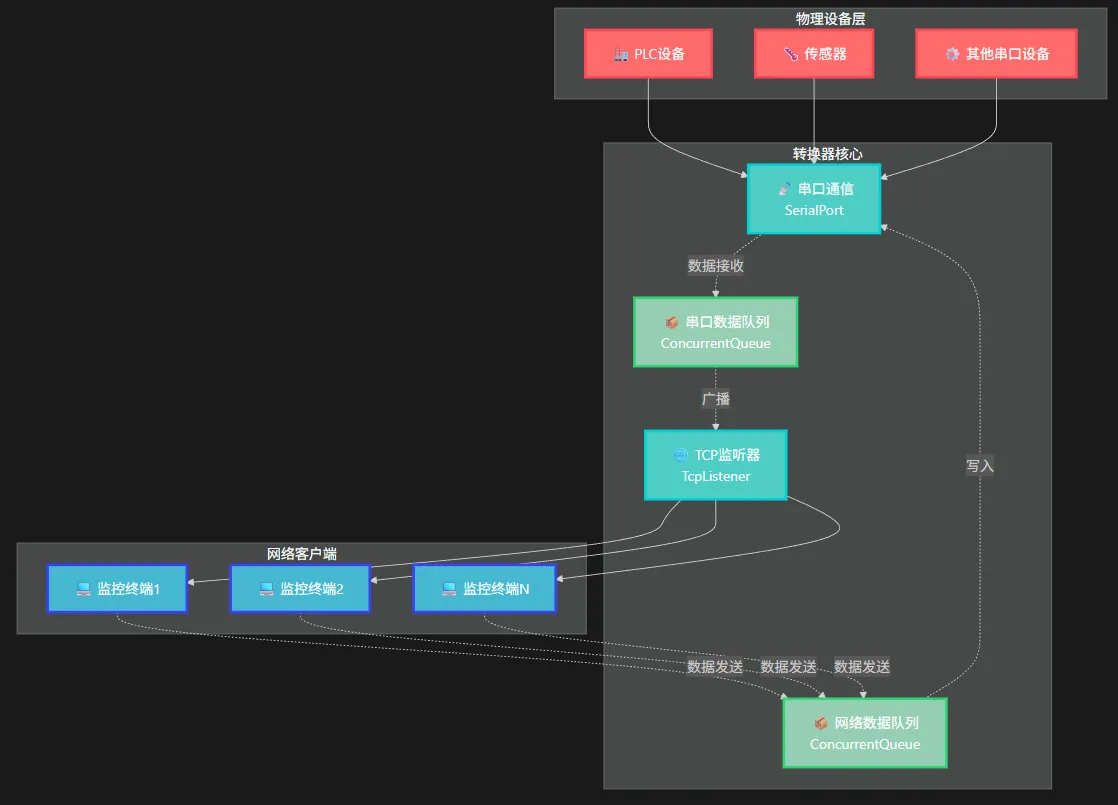
Technical Highlights
- Asynchronous Non-blocking: Task-based asynchronous programming model
- Thread Safety: Using ConcurrentQueue and SemaphoreSlim
- Multi-client Support: Support multiple network devices connecting simultaneously
- Real-time Monitoring: Complete status display and logging
作为一名C#开发者,你是否曾经在排查网络问题时手忙脚乱?服务器端口是否开放、网络连接是否正常、防火墙配置是否生效... 这些问题让多少程序员深夜难眠。
今天,通过一个完整的端口扫描器项目,带你掌握C#网络编程的核心技术,从此告别网络问题排查的痛苦!
🎯 项目概览:我们要做什么?
我们要开发一个功能完整的Windows Forms端口扫描器,它具备以下核心功能:
- 多线程并发扫描:高效处理大量端口检测
- 实时进度显示:用户体验友好
- 智能服务识别:自动识别常见网络服务
- 结果导出功能:支持多种格式保存
- 优雅的取消机制:随时中断扫描任务
💡 核心技术解析
🔥 技术亮点1:异步多线程架构
C#private async Task ScanPortsAsync(string target, int startPort, int endPort,
    int threadCount, int timeout, CancellationToken cancellationToken)
{
    var semaphore = new SemaphoreSlim(threadCount, threadCount);
    var tasks = new List<Task>();

    for (int port = startPort; port <= endPort; port++)
    {
        if (cancellationToken.IsCancellationRequested)
            break;

        int currentPort = port;
        var task = Task.Run(async () =>
        {
            await semaphore.WaitAsync(cancellationToken);
            try
            {
                await ScanPortAsync(target, currentPort, timeout, cancellationToken);
            }
            finally
            {
                semaphore.Release();
            }
        }, cancellationToken);

        tasks.Add(task);
    }

    await Task.WhenAll(tasks);
}