
目录
🎯 你是否也遇到过这些"噩梦"场景?
在工控软件开发里,有一类问题几乎折磨过每一个做上位机的开发者——
UI 点了"启动"按钮,设备那边不知道收没收到;任务执行到一半,界面卡死了;回传的数据不知道该往哪塞;多个任务并发时,状态乱成一锅粥……
这些问题的根源,往往不是某个 Bug,而是架构上从一开始就没有把"任务"这个概念抽象出来。大家习惯性地在按钮 Click 事件里写业务逻辑,在 Timer 回调里直接操作 UI,代码越堆越高,维护成本也越来越离谱。
据一些团队的内部统计,在缺乏任务抽象的工控项目里,超过 40% 的 Bug 来自任务状态管理混乱,而重构这类代码平均需要消耗 2~3 个迭代周期。
读完本文,你将掌握:
- 一套可复用的任务通用模型(下发 → 执行 → 回传)
- 渐进式的三种实现方案,从简单到生产级逐步演进
- 可直接落地的完整代码模板,开箱即用
🔍 问题深度剖析:为什么"任务"需要被单独抽象?
上位机开发的特殊性
和普通桌面应用不同,WPF 上位机软件有几个典型特征:UI 线程与设备通信线程天然分离、任务执行时间不确定、设备响应存在延迟甚至超时、多任务并发是常态。
很多开发者最初的写法大概是这样的:
csharp// ❌ 反面教材:把所有逻辑堆在按钮事件里
private async void BtnStart_Click(object sender, RoutedEventArgs e)
{
    // 发送指令
    _serialPort.Write(new byte[] { 0x01, 0x02 }, 0, 2);
    // 等待响应(阻塞式,噩梦开始)
    await Task.Delay(500);
    // 直接更新UI
    lblStatus.Content = "执行中...";
    // 还有一堆业务逻辑...
}
这种写法的问题显而易见:没有超时处理、没有状态管理、没有取消机制、UI 和业务逻辑高度耦合。一旦设备不响应,整个界面就僵在那里。
核心矛盾:三个世界的协调问题
WPF 上位机里存在三个"世界":UI 世界(主线程,负责呈现)、业务世界(任务调度,负责协调)、设备世界(通信线程,负责 I/O)。
这三个世界之间的数据流动和状态同步,就是"任务"需要解决的核心问题。没有清晰的任务模型,这三个世界就会相互入侵,最终变成谁都说不清楚的"意大利面条"。
💡 核心要点提炼:任务通用模型的设计哲学
在设计这套模型之前,先明确几个关键原则:
单一职责:一个任务对象只描述"做什么",不关心"怎么通信"。状态可观测:任务的每个状态变化都应该是可追踪的。可取消、可超时:任务必须支持主动取消和超时自动终止。结果强类型:回传数据不能是 object,必须是明确的类型。
基于这些原则,任务模型的核心结构可以用以下枚举和接口来描述:
csharp// 任务状态枚举
public enum TaskStatus
{
    Pending,    // 等待下发
    Dispatched, // 已下发到设备
    Executing,  // 设备执行中
    Completed,  // 执行完成
    Failed,     // 执行失败
    Cancelled   // 已取消
}

// 任务结果基类
public class TaskResult<T>
{
    public bool IsSuccess { get; init; }
    public T? Data { get; init; }
    public string? ErrorMessage { get; init; }
    public TimeSpan Elapsed { get; init; }

    public static TaskResult<T> Success(T data, TimeSpan elapsed)
        => new() { IsSuccess = true, Data = data, Elapsed = elapsed };

    public static TaskResult<T> Failure(string error)
        => new() { IsSuccess = false, ErrorMessage = error };
}
🚀 解决方案一:基础任务模型(快速上手版)
这个版本适合单设备、任务量不大、对实时性要求一般的场景,比如点胶机、小型 PLC 控制台等。
任务基类设计
csharp/// <summary>
/// 设备任务基类,所有具体任务继承此类
/// </summary>
public abstract class DeviceTaskBase<TResult>
{
    public Guid TaskId { get; } = Guid.NewGuid();
    public string TaskName { get; protected set; } = string.Empty;
    public TaskStatus Status { get; private set; } = TaskStatus.Pending;
    public DateTime CreatedAt { get; } = DateTime.Now;

    // 状态变更事件,供 UI 层订阅
    public event Action<TaskStatus>? StatusChanged;

    protected void UpdateStatus(TaskStatus newStatus)
    {
        Status = newStatus;
        StatusChanged?.Invoke(newStatus);
    }

    /// <summary>
    /// 构建下发给设备的字节流(子类实现)
    /// </summary>
    public abstract byte[] BuildCommand();

    /// <summary>
    /// 解析设备回传的原始数据(子类实现)
    /// </summary>
    public abstract TaskResult<TResult> ParseResponse(byte[] rawData);
}
具体任务实现示例
以"读取传感器温度"为例:
csharppublic class ReadTemperatureTask : DeviceTaskBase<double>
{
    private readonly byte _sensorId;

    public ReadTemperatureTask(byte sensorId)
    {
        _sensorId = sensorId;
        TaskName = $"读取传感器[{sensorId}]温度";
    }

    // 构建 Modbus RTU 风格的读取指令
    public override byte[] BuildCommand()
        => new byte[] { 0x01, 0x03, 0x00, _sensorId, 0x00, 0x01 };

    public override TaskResult<double> ParseResponse(byte[] rawData)
    {
        if (rawData == null || rawData.Length < 4)
            return TaskResult<double>.Failure("响应数据长度不足");

        // 解析温度值(假设高低字节合并,精度0.1°C)
        int raw = (rawData[2] << 8) | rawData[3];
        double temperature = raw * 0.1;
        return TaskResult<double>.Success(temperature, TimeSpan.Zero);
    }
}
任务执行器
csharppublic class SimpleTaskExecutor(IDeviceCommunicator communicator)
{
    public async Task<TaskResult<TResult>> ExecuteAsync<TResult>(
        DeviceTaskBase<TResult> task,
        CancellationToken cancellationToken = default,
        int timeoutMs = 3000)
    {
        var sw = Stopwatch.StartNew();

        try
        {
            task.SetStatus(DeviceTaskStatus.Dispatched);
            var command = task.BuildCommand();
            await communicator.SendAsync(command, cancellationToken);

            task.SetStatus(DeviceTaskStatus.Executing);
            using var timeoutCts = CancellationTokenSource.CreateLinkedTokenSource(cancellationToken);
            timeoutCts.CancelAfter(timeoutMs);

            var response = await communicator.ReceiveAsync(timeoutCts.Token);
            sw.Stop();

            var result = task.ParseResponse(response);
            task.SetStatus(result.IsSuccess ? DeviceTaskStatus.Completed : DeviceTaskStatus.Failed);

            return result.IsSuccess
                ? TaskResult<TResult>.Success(result.Data!, sw.Elapsed)
                : result;
        }
        catch (OperationCanceledException)
        {
            task.SetStatus(DeviceTaskStatus.Cancelled);
            return TaskResult<TResult>.Failure("任务已取消或超时");
        }
        catch (Exception ex)
        {
            task.SetStatus(DeviceTaskStatus.Failed);
            return TaskResult<TResult>.Failure($"执行异常:{ex.Message}");
        }
    }
}
踩坑预警:CancellationTokenSource.CreateLinkedTokenSource 用完一定要 Dispose,否则在高频任务场景下会有内存泄漏。上面用了 using 语句,这个习惯要养成。
⚡ 解决方案二:带队列的任务调度模型(中级版)
当设备需要串行执行多个任务(比如机械臂的动作序列),或者 UI 上有多个操作可能同时触发任务时,就需要引入任务队列。
csharppublic class TaskQueueScheduler : IDisposable
{
    private readonly Channel<IQueuedTask> _taskChannel;
    private readonly SimpleTaskExecutor _executor;
    private readonly Dispatcher _dispatcher;
    private readonly CancellationTokenSource _cts = new();

    public ObservableCollection<TaskViewModel> TaskHistory { get; } = [];

    public TaskQueueScheduler(SimpleTaskExecutor executor, Dispatcher dispatcher)
    {
        _executor = executor;
        _dispatcher = dispatcher;

        _taskChannel = Channel.CreateBounded<IQueuedTask>(new BoundedChannelOptions(50)
        {
            FullMode = BoundedChannelFullMode.Wait,
            SingleReader = true,
            SingleWriter = false
        });

        _ = Task.Run(ConsumeLoopAsync);
    }

    public async Task<TaskResult<TResult>> EnqueueAsync<TResult>(DeviceTaskBase<TResult> task)
    {
        var completion = new TaskCompletionSource<TaskResult<TResult>>(TaskCreationOptions.RunContinuationsAsynchronously);

        var queued = new QueuedTask<TResult>(task, _executor, _cts.Token, completion);
        await _taskChannel.Writer.WriteAsync(queued);

        await _dispatcher.InvokeAsync(() => TaskHistory.Add(new TaskViewModel(task, _dispatcher)));

        return await completion.Task;
    }

    private async Task ConsumeLoopAsync()
    {
        try
        {
            await foreach (var queued in _taskChannel.Reader.ReadAllAsync(_cts.Token))
            {
                await queued.ExecuteAsync();
            }
        }
        catch (OperationCanceledException)
        {
        }
    }

    public void Dispose()
    {
        _cts.Cancel();
        _taskChannel.Writer.TryComplete();
        _cts.Dispose();
    }

    private interface IQueuedTask
    {
        Task ExecuteAsync();
    }

    private sealed class QueuedTask<TResult>(
        DeviceTaskBase<TResult> task,
        SimpleTaskExecutor executor,
        CancellationToken cancellationToken,
        TaskCompletionSource<TaskResult<TResult>> completion) : IQueuedTask
    {
        public async Task ExecuteAsync()
        {
            try
            {
                var result = await executor.ExecuteAsync(task, cancellationToken);
                completion.TrySetResult(result);
            }
            catch (Exception ex)
            {
                completion.TrySetResult(TaskResult<TResult>.Failure(ex.Message));
            }
        }
    }
}
这里用了 System.Threading.Channels,它是 .NET 里专门为生产者-消费者模式设计的高性能队列,比 ConcurrentQueue + ManualResetEvent 的组合简洁太多,强烈推荐。
🏭 解决方案三:带回传通知的响应式任务模型(生产级)
在真实项目里,设备的回传往往不是"请求-响应"模式,而是主动上报。比如 CNC 机床会持续上报当前坐标,视觉系统会在检测完成后主动推送结果。这时候就需要把任务模型和响应式流结合起来。
csharppublic abstract class ReactiveDeviceTask<TProgress, TFinalResult> : DeviceTaskBase<TFinalResult>, IObservable<TProgress>
{
    private readonly object _gate = new();
    private readonly List<IObserver<TProgress>> _observers = [];

    public IDisposable Subscribe(IObserver<TProgress> observer)
    {
        lock (_gate)
        {
            _observers.Add(observer);
        }

        return new Unsubscriber(_observers, observer, _gate);
    }

    public IDisposable Subscribe(Action<TProgress> onNext)
    {
        return Subscribe(new DelegateObserver(onNext));
    }

    public void OnProgressReceived(TProgress progress)
    {
        List<IObserver<TProgress>> snapshot;
        lock (_gate)
        {
            snapshot = [.. _observers];
        }

        foreach (var observer in snapshot)
        {
            observer.OnNext(progress);
        }
    }

    public void CompleteProgress()
    {
        List<IObserver<TProgress>> snapshot;
        lock (_gate)
        {
            snapshot = [.. _observers];
        }

        foreach (var observer in snapshot)
        {
            observer.OnCompleted();
        }
    }

    public void ErrorProgress(Exception ex)
    {
        List<IObserver<TProgress>> snapshot;
        lock (_gate)
        {
            snapshot = [.. _observers];
        }

        foreach (var observer in snapshot)
        {
            observer.OnError(ex);
        }
    }

    private sealed class Unsubscriber(List<IObserver<TProgress>> observers, IObserver<TProgress> observer, object gate) : IDisposable
    {
        public void Dispose()
        {
            lock (gate)
            {
                _ = observers.Remove(observer);
            }
        }
    }

    private sealed class DelegateObserver(Action<TProgress> onNext) : IObserver<TProgress>
    {
        public void OnCompleted()
        {
        }

        public void OnError(Exception error)
        {
        }

        public void OnNext(TProgress value)
        {
            onNext(value);
        }
    }
}

public class MachineMonitoringTask : ReactiveDeviceTask<CoordinateData, MachineReport>
{
    public MachineMonitoringTask()
    {
        TaskName = "CNC坐标监控任务";
    }

    public override byte[] BuildCommand()
        => [0x55, 0x01, 0x00, 0x01];

    public override TaskResult<MachineReport> ParseResponse(byte[] rawData)
    {
        if (rawData.Length < 2)
        {
            return TaskResult<MachineReport>.Failure("监控结果数据无效");
        }

        return TaskResult<MachineReport>.Success(
            new MachineReport("监控正常结束", DateTime.Now),
            TimeSpan.Zero);
    }
}
踩坑预警:Subject<T> 不是线程安全的。如果设备通信层在多个线程里调用 OnProgressReceived,需要换用 ConcurrentSubject 或在推送前加锁。另外,ObserveOn(SynchronizationContext.Current!) 这里的 ! 是空值断言,在 WPF 主线程初始化 ViewModel 时是安全的,但如果 ViewModel 是在后台线程创建的,这里会有 NPE 风险。
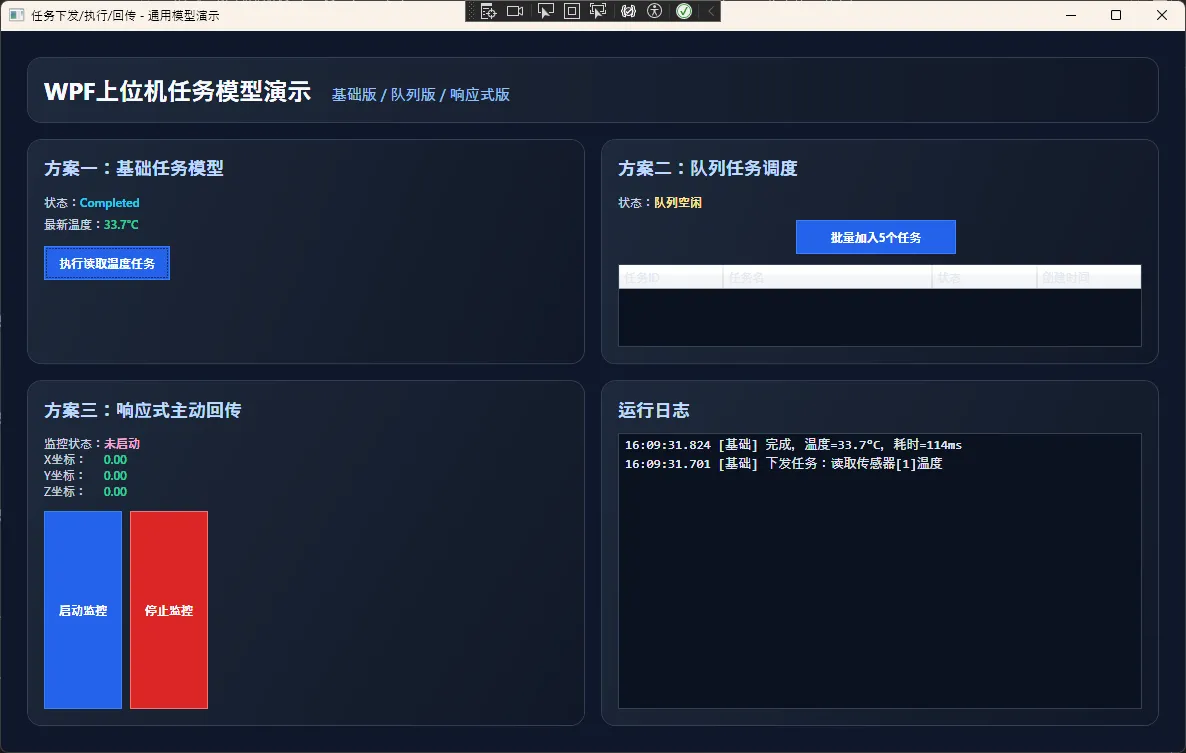
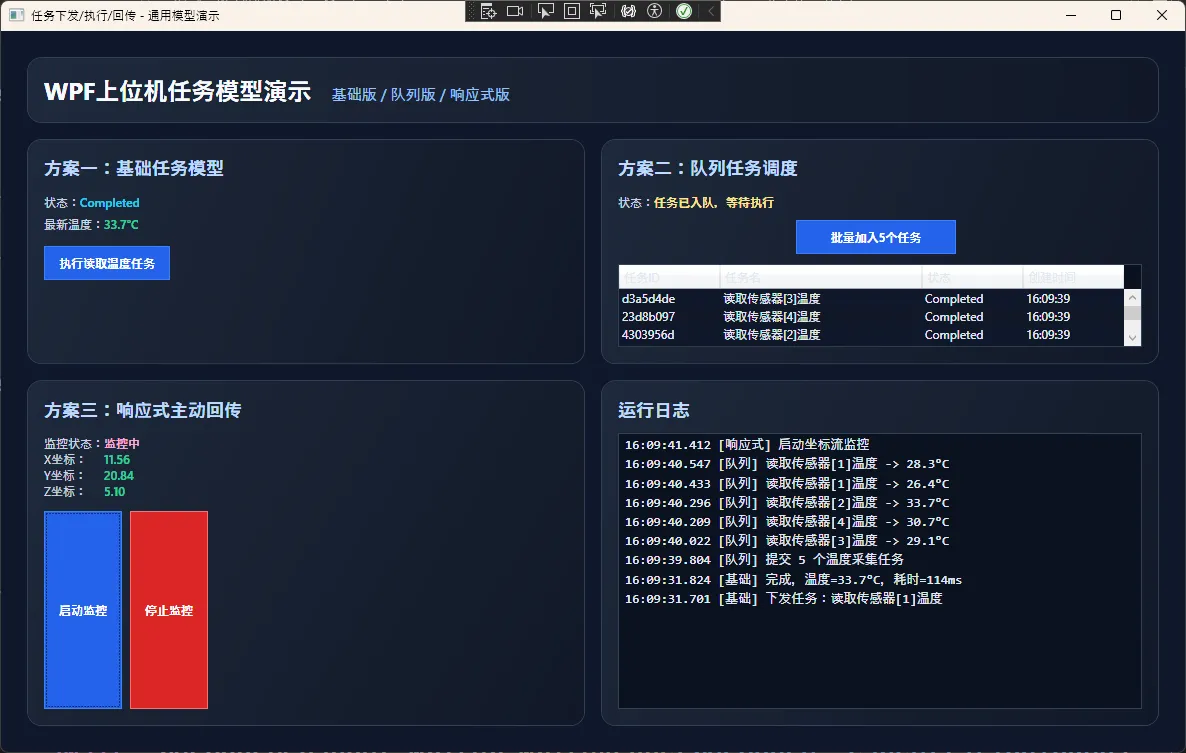
👨💻 UI
xml<Window x:Class="AppWpf202609.MainWindow"
        xmlns="http://schemas.microsoft.com/winfx/2006/xaml/presentation"
        xmlns:x="http://schemas.microsoft.com/winfx/2006/xaml"
        xmlns:d="http://schemas.microsoft.com/expression/blend/2008"
        xmlns:mc="http://schemas.openxmlformats.org/markup-compatibility/2006"
        xmlns:local="clr-namespace:AppWpf202609"
        mc:Ignorable="d"
        Title="任务下发/执行/回传 - 通用模型演示"
        Width="1200"
        Height="760"
        MinWidth="1060"
        MinHeight="680"
        WindowStartupLocation="CenterScreen"
        Background="#0F172A">
    <Window.Resources>
        <LinearGradientBrush x:Key="CardBrush" StartPoint="0,0" EndPoint="1,1">
            <GradientStop Color="#1E293B" Offset="0" />
            <GradientStop Color="#111827" Offset="1" />
        </LinearGradientBrush>

        <Style TargetType="Border" x:Key="CardStyle">
            <Setter Property="Background" Value="{StaticResource CardBrush}" />
            <Setter Property="CornerRadius" Value="14" />
            <Setter Property="Padding" Value="16" />
            <Setter Property="Margin" Value="8" />
            <Setter Property="BorderBrush" Value="#334155" />
            <Setter Property="BorderThickness" Value="1" />
        </Style>

        <Style TargetType="Button">
            <Setter Property="Foreground" Value="White" />
            <Setter Property="Background" Value="#2563EB" />
            <Setter Property="BorderBrush" Value="#3B82F6" />
            <Setter Property="BorderThickness" Value="1" />
            <Setter Property="Padding" Value="14,8" />
            <Setter Property="Margin" Value="0,0,8,0" />
            <Setter Property="Cursor" Value="Hand" />
            <Setter Property="FontWeight" Value="SemiBold" />
        </Style>

        <Style TargetType="TextBlock">
            <Setter Property="Foreground" Value="#E2E8F0" />
        </Style>
    </Window.Resources>

    <Grid Margin="18">
        <Grid.RowDefinitions>
            <RowDefinition Height="Auto" />
            <RowDefinition Height="2*" />
            <RowDefinition Height="3*" />
        </Grid.RowDefinitions>
        <Grid.ColumnDefinitions>
            <ColumnDefinition Width="*" />
            <ColumnDefinition Width="*" />
        </Grid.ColumnDefinitions>

        <Border Grid.Row="0" Grid.ColumnSpan="2" Style="{StaticResource CardStyle}">
            <StackPanel Orientation="Horizontal" VerticalAlignment="Center">
                <TextBlock Text="WPF上位机任务模型演示" FontSize="24" FontWeight="Bold" Foreground="#F8FAFC" />
                <TextBlock Text="   基础版 / 队列版 / 响应式版" FontSize="15" Foreground="#93C5FD" VerticalAlignment="Bottom" Margin="8,0,0,2" />
            </StackPanel>
        </Border>

        <Border Grid.Row="1" Grid.Column="0" Style="{StaticResource CardStyle}">
            <Grid>
                <Grid.RowDefinitions>
                    <RowDefinition Height="Auto" />
                    <RowDefinition Height="Auto" />
                    <RowDefinition Height="*" />
                </Grid.RowDefinitions>

                <TextBlock Text="方案一:基础任务模型" FontSize="18" FontWeight="Bold" Foreground="#BFDBFE" />

                <StackPanel Grid.Row="1" Margin="0,14,0,14">
                    <StackPanel Orientation="Horizontal">
                        <TextBlock Text="状态:" Foreground="#CBD5E1" />
                        <TextBlock Text="{Binding BasicStatus}" FontWeight="SemiBold" Foreground="#22D3EE" />
                    </StackPanel>
                    <StackPanel Orientation="Horizontal" Margin="0,6,0,0">
                        <TextBlock Text="最新温度:" Foreground="#CBD5E1" />
                        <TextBlock Text="{Binding LatestTemperature, StringFormat={}{0:F1}°C}" FontWeight="SemiBold" Foreground="#34D399" />
                    </StackPanel>
                </StackPanel>

                <StackPanel Grid.Row="2" Orientation="Horizontal" VerticalAlignment="Top">
                    <Button Content="执行读取温度任务" Click="RunBasicTask_Click" />
                </StackPanel>
            </Grid>
        </Border>

        <Border Grid.Row="1" Grid.Column="1" Style="{StaticResource CardStyle}">
            <Grid>
                <Grid.RowDefinitions>
                    <RowDefinition Height="Auto" />
                    <RowDefinition Height="Auto" />
                    <RowDefinition Height="*" />
                </Grid.RowDefinitions>

                <TextBlock Text="方案二:队列任务调度" FontSize="18" FontWeight="Bold" Foreground="#BFDBFE" />

                <StackPanel Grid.Row="1" Margin="0,14,0,10" Orientation="Horizontal">
                    <TextBlock Text="状态:" Foreground="#CBD5E1" />
                    <TextBlock Text="{Binding QueueStatus}" FontWeight="SemiBold" Foreground="#FDE68A" />
                </StackPanel>

                <Grid Grid.Row="2">
                    <Grid.RowDefinitions>
                        <RowDefinition Height="Auto" />
                        <RowDefinition Height="*" />
                    </Grid.RowDefinitions>

                    <Button Content="批量加入5个任务" Width="160" Click="AddQueueTasks_Click" />

                    <DataGrid Grid.Row="1"
                              Margin="0,10,0,0"
                              AutoGenerateColumns="False"
                              ItemsSource="{Binding QueueHistory}"
                              HeadersVisibility="Column"
                              IsReadOnly="True"
                              RowBackground="#0F172A"
                              AlternatingRowBackground="#111827"
                              GridLinesVisibility="None"
                              Foreground="#E2E8F0"
                              Background="#0B1220"
                              BorderBrush="#334155">
                        <DataGrid.Columns>
                            <DataGridTextColumn Header="任务ID" Binding="{Binding TaskIdShort}" Width="*" />
                            <DataGridTextColumn Header="任务名" Binding="{Binding TaskName}" Width="2*" />
                            <DataGridTextColumn Header="状态" Binding="{Binding Status}" Width="*" />
                            <DataGridTextColumn Header="创建时间" Binding="{Binding CreatedAt, StringFormat=HH:mm:ss}" Width="*" />
                        </DataGrid.Columns>
                    </DataGrid>
                </Grid>
            </Grid>
        </Border>

        <Border Grid.Row="2" Grid.Column="0" Style="{StaticResource CardStyle}">
            <Grid>
                <Grid.RowDefinitions>
                    <RowDefinition Height="Auto" />
                    <RowDefinition Height="Auto" />
                    <RowDefinition Height="*" />
                </Grid.RowDefinitions>

                <TextBlock Text="方案三:响应式主动回传" FontSize="18" FontWeight="Bold" Foreground="#BFDBFE" />

                <Grid Grid.Row="1" Margin="0,14,0,12">
                    <Grid.ColumnDefinitions>
                        <ColumnDefinition Width="Auto" />
                        <ColumnDefinition Width="*" />
                    </Grid.ColumnDefinitions>
                    <Grid.RowDefinitions>
                        <RowDefinition Height="Auto" />
                        <RowDefinition Height="Auto" />
                        <RowDefinition Height="Auto" />
                        <RowDefinition Height="Auto" />
                    </Grid.RowDefinitions>

                    <TextBlock Text="监控状态:" Foreground="#CBD5E1" />
                    <TextBlock Grid.Column="1" Text="{Binding MonitorStatus}" FontWeight="SemiBold" Foreground="#F9A8D4" />

                    <TextBlock Grid.Row="1" Text="X坐标:" Foreground="#CBD5E1" />
                    <TextBlock Grid.Row="1" Grid.Column="1" Text="{Binding CurrentX, StringFormat=F2}" Foreground="#34D399" FontWeight="SemiBold" />

                    <TextBlock Grid.Row="2" Text="Y坐标:" Foreground="#CBD5E1" />
                    <TextBlock Grid.Row="2" Grid.Column="1" Text="{Binding CurrentY, StringFormat=F2}" Foreground="#34D399" FontWeight="SemiBold" />

                    <TextBlock Grid.Row="3" Text="Z坐标:" Foreground="#CBD5E1" />
                    <TextBlock Grid.Row="3" Grid.Column="1" Text="{Binding CurrentZ, StringFormat=F2}" Foreground="#34D399" FontWeight="SemiBold" />
                </Grid>

                <StackPanel Grid.Row="2" Orientation="Horizontal">
                    <Button Content="启动监控" Click="StartReactive_Click" />
                    <Button Content="停止监控" Background="#DC2626" BorderBrush="#F87171" Click="StopReactive_Click" />
                </StackPanel>
            </Grid>
        </Border>

        <Border Grid.Row="2" Grid.Column="1" Style="{StaticResource CardStyle}">
            <Grid>
                <Grid.RowDefinitions>
                    <RowDefinition Height="Auto" />
                    <RowDefinition Height="*" />
                </Grid.RowDefinitions>

                <TextBlock Text="运行日志" FontSize="18" FontWeight="Bold" Foreground="#BFDBFE" />

                <ListBox Grid.Row="1"
                         Margin="0,12,0,0"
                         ItemsSource="{Binding Logs}"
                         Background="#0B1220"
                         Foreground="#E2E8F0"
                         BorderBrush="#334155"
                         FontFamily="Consolas"
                         FontSize="13" />
            </Grid>
        </Border>
    </Grid>
</Window>
📊 三种方案对比
| 维度 | 基础版 | 队列版 | 响应式版 |
|---|---|---|---|
| 实现复杂度 | 低 | 中 | 高 |
| 适用任务量 | 低频(<10次/秒) | 中频(<100次/秒) | 高频/持续推送 |
| 取消支持 | ✅ | ✅ | ✅ |
| 并发控制 | 手动 | 队列自动串行 | 流式并发 |
| UI 绑定友好度 | 一般 | 好 | 极好 |
| 学习成本 | 低 | 中 | 高(需了解 Rx.NET) |
测试环境参考:.NET 10 + WPF,Intel i7-12700,32GB RAM,串口模拟器(虚拟 COM 口)。实际性能数据因硬件和通信协议差异较大,以上对比为相对量级参考。
🎯 三句话总结
任务模型的本质,是在 UI 世界和设备世界之间建立一座"翻译官",让双方都只说自己的语言。 基础版解决了"有没有"的问题,队列版解决了"乱不乱"的问题,响应式版解决了"快不快"的问题。选哪个,取决于你的设备通信模式,而不是技术炫耀的欲望。
🌱 学习路径建议
如果这套模型对你有启发,后续可以沿着这条路继续深挖:System.Threading.Channels 深度使用 → Rx.NET 响应式编程 → IHostedService 后台服务托管 → 基于 MediatR 的命令总线模式。每一步都能让你的上位机架构更上一层楼。
💬 互动话题
你在项目里是怎么处理"任务下发后设备无响应"这个场景的?是无限重试、固定超时,还是有更优雅的方案?欢迎在评论区聊聊你的实践经验。
另一个值得思考的问题:当上位机需要同时管理 10 台以上设备,每台设备都有独立的任务队列时,你会怎么设计任务调度器? 这是个很有意思的架构题。
#C#开发 #WPF #上位机 #工控软件 #设计模式 #任务调度 #架构设计
相关信息
我用夸克网盘给你分享了「AppWpf202609.zip」,点击链接或复制整段内容,打开「夸克APP」即可获取。
/78303YdH3p:/
链接:https://pan.quark.cn/s/5ed450d012ae
提取码:RaaY
本文作者:技术老小子
本文链接:
版权声明:本博客所有文章除特别声明外,均采用 BY-NC-SA 许可协议。转载请注明出处!