目录
作为一名C#开发者,你是否遇到过这样的困扰:用户在表单中按Tab键切换控件时,焦点跳转顺序混乱不堪?明明希望用户从姓名输入框跳到电话号码框,结果却跳到了页面底部的取消按钮?或者某些控件根本无法通过Tab键访问?
这些问题看似细微,却直接影响用户体验,尤其是对于数据录入频繁的业务系统。今天我们就来彻底解决这个问题,掌握TabIndex和TabStop这两个关键属性,让你的WinForm应用拥有丝滑般的焦点切换体验。
🔍 问题分析:为什么焦点切换如此重要?
用户体验痛点
在实际开发中,不合理的焦点切换会导致:
- 录入效率低下:用户需要频繁使用鼠标定位
- 操作流程混乱:逻辑顺序与Tab顺序不一致
- 无障碍访问困难:键盘用户无法正常操作
- 专业性质疑:给用户留下"不专业"的印象
技术原理解析
WinForm中的焦点切换机制基于两个核心属性:
- TabIndex:决定控件的Tab顺序(数值越小优先级越高)
- TabStop:决定控件是否参与Tab导航(true/false)
💡 解决方案:5个实战技巧让焦点切换更优雅
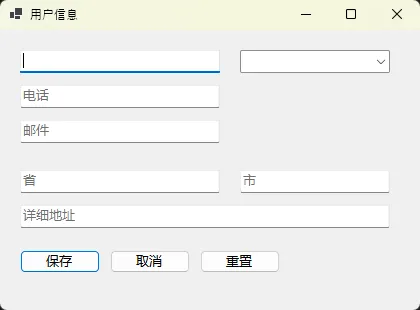
🎯 技巧一:建立清晰的TabIndex规划
应用场景:表单控件众多,需要建立合理的导航顺序
c#namespace AppWinformTab
{
    public partial class Form1 : Form
    {
        private TextBox txtName;
        private TextBox txtPhone;
        private TextBox txtEmail;
        private ComboBox cmbDepartment;

        private TextBox txtProvince;
        private TextBox txtCity;
        private TextBox txtAddress;

        private Button btnSave;
        private Button btnCancel;
        private Button btnReset;

        public Form1()
        {
            InitializeComponent();

            // 初始化控件并设置位置与大小(简单示例)
            this.txtName = new TextBox() { Left = 20, Top = 20, Width = 200, Name = "txtName", PlaceholderText = "姓名" };
            this.txtPhone = new TextBox() { Left = 20, Top = 55, Width = 200, Name = "txtPhone", PlaceholderText = "电话" };
            this.txtEmail = new TextBox() { Left = 20, Top = 90, Width = 200, Name = "txtEmail", PlaceholderText = "邮件" };
            this.cmbDepartment = new ComboBox() { Left = 240, Top = 20, Width = 150, Name = "cmbDepartment" };
            this.cmbDepartment.Items.AddRange(new object[] { "技术", "产品", "运营", "市场" });

            this.txtProvince = new TextBox() { Left = 20, Top = 140, Width = 200, Name = "txtProvince", PlaceholderText = "省" };
            this.txtCity = new TextBox() { Left = 240, Top = 140, Width = 150, Name = "txtCity", PlaceholderText = "市" };
            this.txtAddress = new TextBox() { Left = 20, Top = 175, Width = 370, Name = "txtAddress", PlaceholderText = "详细地址" };

            this.btnSave = new Button() { Left = 20, Top = 220, Width = 80, Text = "保存", Name = "btnSave" };
            this.btnCancel = new Button() { Left = 110, Top = 220, Width = 80, Text = "取消", Name = "btnCancel" };
            this.btnReset = new Button() { Left = 200, Top = 220, Width = 80, Text = "重置", Name = "btnReset" };

            // 按钮事件(示例)
            this.btnSave.Click += BtnSave_Click;
            this.btnCancel.Click += BtnCancel_Click;
            this.btnReset.Click += BtnReset_Click;

            // 添加控件到表单
            this.Controls.AddRange(new Control[] {
                txtName, txtPhone, txtEmail, cmbDepartment,
                txtProvince, txtCity, txtAddress,
                btnSave, btnCancel, btnReset
            });

            // 表单属性
            this.Text = "用户信息";
            this.StartPosition = FormStartPosition.CenterScreen;
            this.ClientSize = new System.Drawing.Size(420, 280);

            SetupTabOrder();
        }


        private void SetupTabOrder()
        {
            // 主要信息区域 (0-9)
            txtName.TabIndex = 0;
            txtPhone.TabIndex = 1;
            txtEmail.TabIndex = 2;
            cmbDepartment.TabIndex = 3;

            // 地址信息区域 (10-19)
            txtProvince.TabIndex = 10;
            txtCity.TabIndex = 11;
            txtAddress.TabIndex = 12;

            // 操作按钮区域 (90-99)
            btnSave.TabIndex = 90;
            btnCancel.TabIndex = 91;
            btnReset.TabIndex = 92;

            // 设置 AcceptButton / CancelButton
            this.AcceptButton = btnSave;   // 回车触发保存
            this.CancelButton = btnCancel; // Esc 触发取消
        }

        private void BtnSave_Click(object sender, EventArgs e)
        {
            MessageBox.Show("保存成功", "提示", MessageBoxButtons.OK, MessageBoxIcon.Information);
        }

        private void BtnCancel_Click(object sender, EventArgs e)
        {
            this.Close();
        }

        private void BtnReset_Click(object sender, EventArgs e)
        {
            txtName.Text = "";
            txtPhone.Text = "";
            txtEmail.Text = "";
            cmbDepartment.SelectedIndex = -1;
            txtProvince.Text = "";
            txtCity.Text = "";
            txtAddress.Text = "";
            txtName.Focus();
        }
    }
}
💡 最佳实践:
- 使用区间分组:基础信息0-9,扩展信息10-19,按钮90-99
- 预留空隙:便于后期插入新控件
- 逻辑优先:按用户操作流程设置顺序
🚀 技巧二:动态控制TabStop优化用户体验
应用场景:根据业务逻辑动态控制哪些控件参与Tab导航
c#using System;
using System.Linq;
using System.Windows.Forms;

namespace AppWinformTab
{
    public enum UserRole
    {
        Viewer,
        Editor
    }

    public static class SmartTabManager
    {
        // 禁用只读或不可用控件的 Tab 导航,递归子控件
        public static void DisableTabForReadOnlyControls(Control parent)
        {
            foreach (Control control in parent.Controls)
            {
                if (control is TextBox textBox)
                {
                    textBox.TabStop = !textBox.ReadOnly;
                }
                else if (control is ComboBox comboBox)
                {
                    comboBox.TabStop = comboBox.Enabled;
                }
                else if (control is CheckBox checkBox)
                {
                    checkBox.TabStop = checkBox.Enabled;
                }

                if (control.HasChildren)
                {
                    DisableTabForReadOnlyControls(control);
                }
            }
        }

        // 根据用户角色设置哪些控件可 Tab
        public static void SetTabOrderByUserRole(Form form, UserRole role)
        {
            // 先默认禁用所有输入控件的 TabStop(但不改变可视状态)
            foreach (var ctl in form.Controls.Cast<Control>())
            {
                if (ctl is TextBox || ctl is ComboBox || ctl is Button || ctl is CheckBox)
                {
                    ctl.TabStop = false;
                }
            }

            switch (role)
            {
                case UserRole.Viewer:
                    // 观察者只能访问带 "Query" 名称的按钮
                    form.Controls.OfType<Button>()
                        .Where(btn => btn.Name.Contains("Query"))
                        .ToList()
                        .ForEach(btn => btn.TabStop = true);
                    break;

                case UserRole.Editor:
                    // 编辑者可以访问所有输入控件(非只读/可用)
                    EnableAllInputControls(form);
                    break;
            }
        }

        private static void EnableAllInputControls(Control parent)
        {
            foreach (Control control in parent.Controls)
            {
                if (control is TextBox textBox)
                {
                    textBox.TabStop = !textBox.ReadOnly && textBox.Enabled;
                }
                else if (control is ComboBox comboBox)
                {
                    comboBox.TabStop = comboBox.Enabled;
                }
                else if (control is Button button)
                {
                    button.TabStop = button.Enabled;
                }
                else if (control is CheckBox checkBox)
                {
                    checkBox.TabStop = checkBox.Enabled;
                }

                if (control.HasChildren)
                    EnableAllInputControls(control);
            }
        }
    }
}
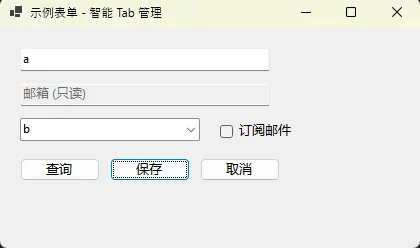
⚠️ 常见坑点:
- Label控件默认TabStop为false,这是正确的
- Panel和GroupBox不要设置TabStop为true
- 隐藏控件会自动跳过Tab导航
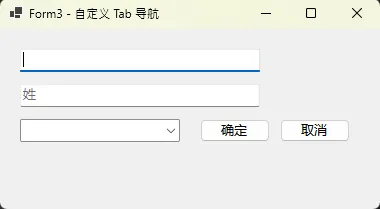
🎨 技巧三:创建自定义Tab导航组件
应用场景:复杂表单需要更精细的焦点控制
c#using System;
using System.Collections.Generic;
using System.Windows.Forms;

namespace AppWinformTab
{
    public class TabNavigationManager
    {
        private List<Control> _tabSequence;
        private int _currentIndex;

        public TabNavigationManager()
        {
            _tabSequence = new List<Control>();
            _currentIndex = -1;
        }

        // 添加控件到导航序列(会订阅 KeyDown)
        public void AddControl(Control control)
        {
            if (control == null) return;
            _tabSequence.Add(control);
            control.KeyDown += Control_KeyDown;
        }

        private void Control_KeyDown(object sender, KeyEventArgs e)
        {
            // 处理 Tab 和 Enter 导航
            if (e.KeyCode == Keys.Tab)
            {
                e.Handled = true;
                e.SuppressKeyPress = true;
                if (e.Shift)
                    MoveToPrevious();
                else
                    MoveToNext();
            }
            else if (e.KeyCode == Keys.Enter)
            {
                e.Handled = true;
                e.SuppressKeyPress = true;
                MoveToNext();
            }
        }

        private void MoveToNext()
        {
            if (_tabSequence.Count == 0) return;
            _currentIndex = (_currentIndex + 1) % _tabSequence.Count;
            FocusCurrentControl();
        }

        private void MoveToPrevious()
        {
            if (_tabSequence.Count == 0) return;
            _currentIndex = _currentIndex <= 0 ? _tabSequence.Count - 1 : _currentIndex - 1;
            FocusCurrentControl();
        }

        private void FocusCurrentControl()
        {
            if (_currentIndex < 0 || _currentIndex >= _tabSequence.Count) return;
            var control = _tabSequence[_currentIndex];

            // 跳过不可见或不可用控件,尝试下一个(避免死循环)
            for (int i = 0; i < _tabSequence.Count; i++)
            {
                if (control.Visible && control.Enabled)
                {
                    control.Focus();
                    if (control is TextBox textBox)
                        textBox.SelectAll();
                    return;
                }
                // 移动到下一个候选
                _currentIndex = (_currentIndex + 1) % _tabSequence.Count;
                control = _tabSequence[_currentIndex];
            }
        }
    }
}
🔧 技巧四:可视化设计器快速设置TabOrder
应用场景:大量控件需要快速设置Tab顺序
在Visual Studio设计器中的操作步骤:
c#public static class TabOrderHelper
{
    public static void SetTabOrderByLocation(Control parent)
    {
        var controls = parent.Controls
            .Cast<Control>()
            .Where(c => c.TabStop)
            .OrderBy(c => c.Top)
            .ThenBy(c => c.Left)
            .ToList();

        for (int i = 0; i < controls.Count; i++)
        {
            controls[i].TabIndex = i;
        }
    }

    // 根据控件名称排序
    public static void SetTabOrderByName(Control parent)
    {
        var controls = parent.Controls
            .Cast<Control>()
            .Where(c => c.TabStop)
            .OrderBy(c => c.Name)
            .ToList();

        for (int i = 0; i < controls.Count; i++)
        {
            controls[i].TabIndex = i;
        }
    }
}
🎯 技巧五:处理特殊场景的焦点切换
应用场景:DataGridView、用户控件等特殊控件的焦点管理
c#public class SpecialControlTabHandler
{
    // DataGridView的Tab处理
    public static void SetupDataGridViewTab(DataGridView dgv)
    {
        dgv.KeyDown += (sender, e) =>
        {
            if (e.KeyCode == Keys.Tab && dgv.CurrentCell != null)
            {
                // 在最后一行最后一列时Tab到下一个控件
                if (dgv.CurrentCell.RowIndex == dgv.Rows.Count - 1 &&
                    dgv.CurrentCell.ColumnIndex == dgv.Columns.Count - 1)
                {
                    e.Handled = true;
                    SendKeys.Send("{TAB}");
                }
            }
        };
    }

    // UserControl内部Tab循环
    public static void EnableInternalTabCycle(UserControl userControl)
    {
        var controls = GetTabOrderedControls(userControl);

        if (controls.Count > 0)
        {
            var firstControl = controls.First();
            var lastControl = controls.Last();

            lastControl.KeyDown += (sender, e) =>
            {
                if (e.KeyCode == Keys.Tab && !e.Shift)
                {
                    e.Handled = true;
                    firstControl.Focus();
                }
            };

            firstControl.KeyDown += (sender, e) =>
            {
                if (e.KeyCode == Keys.Tab && e.Shift)
                {
                    e.Handled = true;
                    lastControl.Focus();
                }
            };
        }
    }

    private static List<Control> GetTabOrderedControls(Control parent)
    {
        return parent.Controls
            .Cast<Control>()
            .Where(c => c.TabStop && c.CanFocus)
            .OrderBy(c => c.TabIndex)
            .ToList();
    }
}
🏆 最佳实践总结
📋 Tab顺序设计原则
- 从左到右,从上到下:符合用户阅读习惯
- 逻辑分组:相关控件TabIndex连续
- 按钮置后:操作按钮放在输入控件之后
- 预留间隔:便于后期维护和扩展
🎯 结尾总结
掌握TabIndex与TabStop的使用技巧,是提升WinForm应用用户体验的关键一步。通过本文的5个实战技巧,我们学会了:
- 建立清晰的TabIndex规划 - 用区间分组法组织控件导航顺序
- 动态控制TabStop - 根据业务逻辑智能调整可访问控件
- 自定义导航组件 - 为复杂表单创建更精细的焦点控制
记住这句话:优秀的软件不仅功能强大,更要细节完美。一个流畅的Tab导航,往往能让用户对你的应用留下专业、贴心的印象。
💬 互动时间:
你在项目中遇到过哪些特殊的焦点切换需求?有没有自己独特的解决方案?欢迎在评论区分享你的经验!
🔥 觉得这些技巧实用?请转发给更多C#开发同行,让我们一起提升.NET生态的整体开发水平!
本文作者:技术老小子
本文链接:
版权声明:本博客所有文章除特别声明外,均采用 BY-NC-SA 许可协议。转载请注明出处!
目录