
Press Ctrl+ and K to search
目录
在Python GUI开发中,Tkinter作为标准库深受Windows开发者青睐。然而,很多初学者在使用Tkinter时,往往只知道pack()和grid()布局管理器,却忽略了功能强大的place布局管理器。
place布局管理器提供了像素级精确定位的能力,让你可以像使用Photoshop一样自由控制界面元素的位置和大小。这在开发需要精确布局的上位机界面、数据可视化应用或自定义控件时显得尤为重要。
本文将从实战角度深入解析place布局管理器的使用技巧,帮助你掌握这个被低估的布局利器。
🔍 问题分析:为什么需要place布局管理器
传统布局方式的局限性
在实际Windows应用开发中,pack()和grid()布局管理器虽然简单易用,但存在明显局限:
pack()布局的问题:
- 只能沿着一个方向填充(上下或左右)
- 难以实现复杂的层叠效果
- 无法精确控制元素间距
grid()布局的问题:
- 受表格结构限制,难以实现不规则布局
- 跨行跨列操作复杂
- 无法实现浮动效果
place布局的优势
精确定位:支持绝对位置和相对位置定位
灵活布局:不受网格限制,可实现任意布局
层叠控制:支持元素重叠和层级管理
响应式设计:支持相对大小和位置调整
💡 解决方案:place布局核心参数详解
📍 位置控制参数
place布局提供了多种位置控制方式:
Python# 绝对位置定位(像素为单位)
widget.place(x=100, y=50)

# 相对位置定位(相对于父容器的比例)
widget.place(relx=0.5, rely=0.3)

# 混合定位(相对位置 + 偏移量)
widget.place(relx=0.5, rely=0.5, x=10, y=-20)
参数说明:
- x, y:绝对像素位置
- relx, rely:相对位置(0.0-1.0)
- 可以同时使用,实现更灵活的定位
📏 尺寸控制参数
Python# 绝对尺寸(像素)
widget.place(width=200, height=100)

# 相对尺寸(相对于父容器)
widget.place(relwidth=0.8, relheight=0.6)

# 组合使用
widget.place(relwidth=0.5, height=100)
⚓ 锚点控制参数
锚点(anchor)决定了元素以哪个点作为定位基准:
Pythonimport tkinter as tk

# 不同锚点效果
widget.place(x=100, y=100, anchor='nw')  # 西北角
widget.place(x=100, y=100, anchor='center')  # 中心点
widget.place(x=100, y=100, anchor='se')  # 东南角
锚点选项:
- n, s, e, w:北、南、东、西
- ne, nw, se, sw:东北、西北、东南、西南
- center:中心点
🚀 代码实战:从基础到进阶
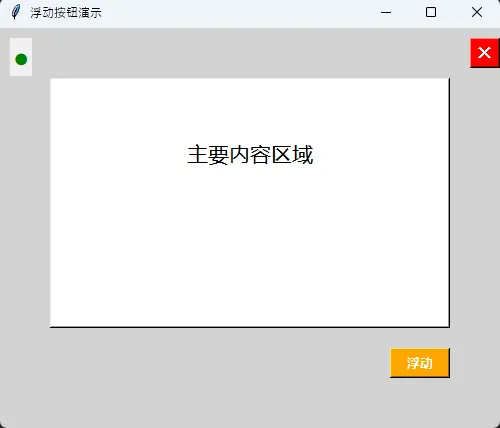
基础示例:创建浮动按钮
Pythonimport tkinter as tk
from tkinter import ttk

class FloatingButtonDemo:
    def __init__(self):
        self.root = tk.Tk()
        self.root.title("浮动按钮演示")
        self.root.geometry("500x400")
        self.root.config(bg='lightgray')

        self.create_widgets()

    def create_widgets(self):
        # 主要内容区域
        main_frame = tk.Frame(self.root, bg='white', relief='raised', bd=2)
        main_frame.place(x=50, y=50, width=400, height=250)

        # 标题
        title_label = tk.Label(main_frame, text="主要内容区域",
                              font=('微软雅黑', 16), bg='white')
        title_label.place(relx=0.5, rely=0.3, anchor='center')

        # 浮动按钮 - 右下角
        float_btn = tk.Button(self.root, text="浮动", bg='orange',
                             fg='white', font=('微软雅黑', 10, 'bold'))
        float_btn.place(x=450, y=350, width=60, height=30, anchor='se')

        # 左上角状态指示器
        status_indicator = tk.Label(self.root, text="●", fg='green',
                                   font=('Arial', 20))
        status_indicator.place(x=10, y=10)

        # 右上角关闭按钮
        close_btn = tk.Button(self.root, text="✕", bg='red', fg='white',
                             font=('Arial', 12, 'bold'))
        close_btn.place(relx=1.0, y=10, width=30, height=30, anchor='ne')

    def run(self):
        self.root.mainloop()

# 运行演示
if __name__ == "__main__":
    demo = FloatingButtonDemo()
    demo.run()
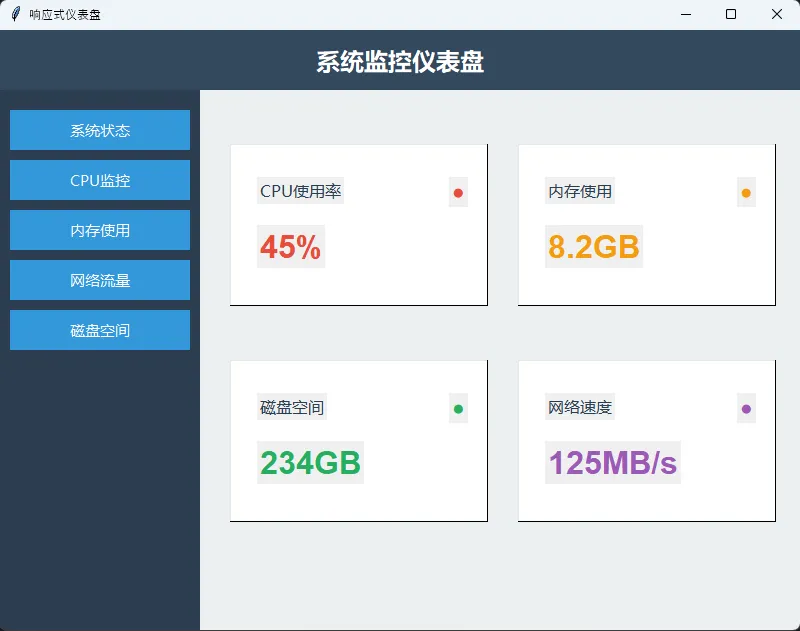
进阶示例:响应式仪表盘布局
Pythonimport tkinter as tk
from tkinter import ttk
import math

class DashboardDemo:
    def __init__(self):
        self.root = tk.Tk()
        self.root.title("响应式仪表盘")
        self.root.geometry("800x600")
        self.root.config(bg='#2c3e50')

        # 绑定窗口大小变化事件
        self.root.bind('<Configure>', self.on_window_resize)

        self.create_widgets()

    def create_widgets(self):
        # 顶部标题栏
        self.header = tk.Frame(self.root, bg='#34495e', height=60)
        self.header.place(relwidth=1.0, y=0)

        title = tk.Label(self.header, text="系统监控仪表盘",
                        font=('微软雅黑', 18, 'bold'),
                        fg='white', bg='#34495e')
        title.place(relx=0.5, rely=0.5, anchor='center')

        # 侧边栏
        self.sidebar = tk.Frame(self.root, bg='#2c3e50', width=200)
        self.sidebar.place(x=0, y=60, relheight=1.0, height=-60)

        # 主内容区域
        self.main_area = tk.Frame(self.root, bg='#ecf0f1')
        self.main_area.place(x=200, y=60, relwidth=1.0, width=-200,
                            relheight=1.0, height=-60)

        self.create_sidebar_widgets()
        self.create_main_content()

    def create_sidebar_widgets(self):
        # 侧边栏菜单项
        menu_items = ['系统状态', 'CPU监控', '内存使用', '网络流量', '磁盘空间']

        for i, item in enumerate(menu_items):
            btn = tk.Button(self.sidebar, text=item, bg='#3498db',
                           fg='white', font=('微软雅黑', 11),
                           relief='flat', cursor='hand2')
            btn.place(x=10, y=20 + i*50, width=180, height=40)

    def create_main_content(self):
        # 数据卡片
        cards_data = [
            {'title': 'CPU使用率', 'value': '45%', 'color': '#e74c3c'},
            {'title': '内存使用', 'value': '8.2GB', 'color': '#f39c12'},
            {'title': '磁盘空间', 'value': '234GB', 'color': '#27ae60'},
            {'title': '网络速度', 'value': '125MB/s', 'color': '#9b59b6'}
        ]

        # 创建响应式卡片布局
        for i, card in enumerate(cards_data):
            row = i // 2
            col = i % 2

            card_frame = tk.Frame(self.main_area, bg='white', relief='raised', bd=1)
            # 使用相对位置实现响应式布局
            card_frame.place(relx=0.05 + col*0.48, rely=0.1 + row*0.4,
                           relwidth=0.43, relheight=0.3)

            # 卡片标题
            title_label = tk.Label(card_frame, text=card['title'],
                                  font=('微软雅黑', 12), fg='#2c3e50')
            title_label.place(relx=0.1, rely=0.2)

            # 数值显示
            value_label = tk.Label(card_frame, text=card['value'],
                                  font=('Arial', 24, 'bold'), fg=card['color'])
            value_label.place(relx=0.1, rely=0.5)

            # 状态指示器
            indicator = tk.Label(card_frame, text="●", fg=card['color'],
                               font=('Arial', 16))
            indicator.place(relx=0.85, rely=0.2)

    def on_window_resize(self, event):
        # 窗口大小改变时的处理(这里可以添加动态调整逻辑)
        if event.widget == self.root:
            # 可以在这里添加响应式调整代码
            pass

    def run(self):
        self.root.mainloop()

# 运行演示
if __name__ == "__main__":
    dashboard = DashboardDemo()
    dashboard.run()
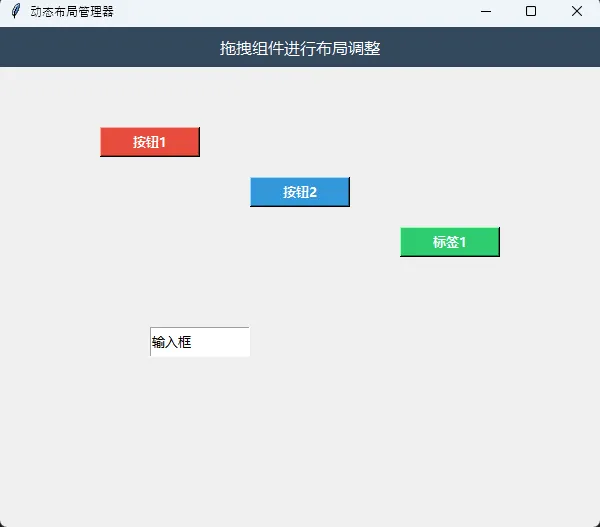
高级技巧:动态布局管理器
Pythonimport tkinter as tk
from tkinter import ttk

class DynamicLayoutManager:
    """动态布局管理器 - 实现拖拽和动态调整"""

    def __init__(self):
        self.root = tk.Tk()
        self.root.title("动态布局管理器")
        self.root.geometry("600x500")
        self.root.config(bg='#f0f0f0')

        self.dragging = None
        self.drag_start_x = 0
        self.drag_start_y = 0

        self.create_widgets()

    def create_widgets(self):
        # 工具栏
        toolbar = tk.Frame(self.root, bg='#34495e', height=40)
        toolbar.place(relwidth=1.0, y=0)

        tk.Label(toolbar, text="拖拽组件进行布局调整",
                fg='white', bg='#34495e',
                font=('微软雅黑', 12)).place(relx=0.5, rely=0.5, anchor='center')

        # 可拖拽的组件
        self.create_draggable_widgets()

    def create_draggable_widgets(self):
        # 创建多个可拖拽的组件
        widgets_config = [
            {'text': '按钮1', 'bg': '#e74c3c', 'pos': (100, 100)},
            {'text': '按钮2', 'bg': '#3498db', 'pos': (250, 150)},
            {'text': '标签1', 'bg': '#2ecc71', 'pos': (400, 200)},
            {'text': '输入框', 'bg': '#f39c12', 'pos': (150, 300)}
        ]

        for config in widgets_config:
            if '输入框' in config['text']:
                widget = tk.Entry(self.root, font=('微软雅黑', 10))
                widget.insert(0, config['text'])
            else:
                widget = tk.Button(self.root, text=config['text'],
                                 bg=config['bg'], fg='white',
                                 font=('微软雅黑', 10, 'bold'))

            widget.place(x=config['pos'][0], y=config['pos'][1],
                        width=100, height=30)

            # 绑定拖拽事件
            self.bind_drag_events(widget)

    def bind_drag_events(self, widget):
        """为组件绑定拖拽事件"""
        widget.bind('<Button-1>', self.start_drag)
        widget.bind('<B1-Motion>', self.on_drag)
        widget.bind('<ButtonRelease-1>', self.end_drag)
        widget.bind('<Enter>', lambda e: widget.config(cursor='fleur'))
        widget.bind('<Leave>', lambda e: widget.config(cursor=''))

    def start_drag(self, event):
        """开始拖拽"""
        self.dragging = event.widget
        self.drag_start_x = event.x
        self.drag_start_y = event.y

        # 突出显示正在拖拽的组件
        if hasattr(self.dragging, 'config'):
            try:
                self.dragging.config(relief='raised', bd=3)
            except:
                pass

    def on_drag(self, event):
        """拖拽过程中"""
        if self.dragging:
            # 计算新位置
            x = self.dragging.winfo_x() + event.x - self.drag_start_x
            y = self.dragging.winfo_y() + event.y - self.drag_start_y

            # 边界检查
            max_x = self.root.winfo_width() - self.dragging.winfo_width()
            max_y = self.root.winfo_height() - self.dragging.winfo_height()

            x = max(0, min(x, max_x))
            y = max(40, min(y, max_y))  # 40是工具栏高度

            # 更新位置
            self.dragging.place(x=x, y=y)

    def end_drag(self, event):
        """结束拖拽"""
        if self.dragging:
            # 恢复组件样式
            try:
                self.dragging.config(relief='flat', bd=1)
            except:
                pass

            # 显示最终位置信息
            x, y = self.dragging.winfo_x(), self.dragging.winfo_y()
            print(f"组件位置: x={x}, y={y}")

            self.dragging = None

    def run(self):
        self.root.mainloop()

# 运行演示
if __name__ == "__main__":
    layout_manager = DynamicLayoutManager()
    layout_manager.run()
🎨 最佳实践与性能优化
1. 布局管理器混用策略
Python# ❌ 错误做法:在同一容器中混用不同布局管理器
frame = tk.Frame(root)
button1 = tk.Button(frame, text="按钮1")
button2 = tk.Button(frame, text="按钮2")

button1.pack()      # 使用pack
button2.place(x=100, y=50)  # 混用place - 会导致冲突

# ✅ 正确做法:使用中间容器隔离
main_frame = tk.Frame(root)
main_frame.pack(fill='both', expand=True)

# 在不同的子容器中使用不同布局管理器
pack_area = tk.Frame(main_frame)
pack_area.pack(side='left', fill='y')

place_area = tk.Frame(main_frame)
place_area.pack(side='right', fill='both', expand=True)

# 现在可以在各自区域使用对应的布局管理器
tk.Button(pack_area, text="Pack按钮").pack(pady=5)
tk.Button(place_area, text="Place按钮").place(x=50, y=50)
2. 响应式设计技巧
Pythonclass ResponsiveLayout:
    def __init__(self, root):
        self.root = root
        self.root.bind('<Configure>', self.on_resize)

    def on_resize(self, event):
        if event.widget == self.root:
            width = self.root.winfo_width()
            height = self.root.winfo_height()

            # 根据窗口大小调整布局
            if width < 600:
                self.switch_to_mobile_layout()
            else:
                self.switch_to_desktop_layout()

    def switch_to_mobile_layout(self):
        # 移动端布局 - 垂直排列
        for i, widget in enumerate(self.widgets):
            widget.place(relx=0.1, y=50 + i*60, relwidth=0.8, height=50)

    def switch_to_desktop_layout(self):
        # 桌面端布局 - 网格排列
        for i, widget in enumerate(self.widgets):
            row, col = divmod(i, 3)
            widget.place(relx=0.1 + col*0.3, rely=0.1 + row*0.3,
                        relwidth=0.25, relheight=0.2)
3. 性能优化要点
避免频繁的place调用:
Python# ❌ 低效做法
def animate_widget(widget):
    for i in range(100):
        widget.place(x=i, y=50)
        widget.update()  # 每次都刷新

# ✅ 高效做法
def animate_widget_optimized(widget):
    positions = [(i, 50) for i in range(100)]

    def move_step(index=0):
        if index < len(positions):
            x, y = positions[index]
            widget.place(x=x, y=y)
            widget.after(16, lambda: move_step(index + 1))  # 60fps

    move_step()
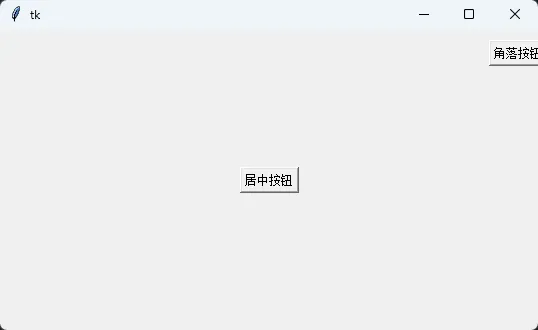
🛠️ 实用工具函数
Pythonclass PlaceHelper:
    """place布局辅助工具类"""

    @staticmethod
    def center_widget(widget, parent=None):
        """居中显示组件"""
        widget.place(relx=0.5, rely=0.5, anchor='center')

    @staticmethod
    def corner_widget(widget, corner='ne', margin=10):
        """将组件放置在角落"""
        corners = {
            'ne': {'relx': 1.0, 'y': margin, 'anchor': 'ne'},
            'nw': {'x': margin, 'y': margin, 'anchor': 'nw'},
            'se': {'relx': 1.0, 'rely': 1.0, 'anchor': 'se'},
            'sw': {'x': margin, 'rely': 1.0, 'anchor': 'sw'}
        }

        if corner in corners:
            pos = corners[corner]
            if 'x' not in pos:
                pos['x'] = -margin if corner.startswith('s') else margin
            if 'y' not in pos:
                pos['y'] = -margin if corner.endswith('e') else margin

            widget.place(**pos)

    @staticmethod
    def create_overlay(parent, widget, opacity=0.8):
        """创建覆盖层效果"""
        overlay = tk.Frame(parent, bg='black')
        overlay.place(relx=0, rely=0, relwidth=1, relheight=1)
        overlay.configure(bg=f'#{int(255*opacity):02x}{int(255*opacity):02x}{int(255*opacity):02x}')

        widget.place(relx=0.5, rely=0.5, anchor='center')
        overlay.lift()
        widget.lift()

# 使用示例
if __name__ == "__main__":
    root = tk.Tk()
    root.geometry("400x300")

    # 测试辅助函数
    center_btn = tk.Button(root, text="居中按钮")
    PlaceHelper.center_widget(center_btn)

    corner_btn = tk.Button(root, text="角落按钮")
    PlaceHelper.corner_widget(corner_btn, 'ne')

    root.mainloop()
🎯 结尾呼应
通过本文的深入解析,我们掌握了Python Tkinter中place布局管理器的核心技能:
三个关键要点总结:
- 精确控制:place布局提供了像素级的精确定位能力,支持绝对位置和相对位置的灵活组合,让界面元素的位置控制更加自由。
- 响应式设计:合理使用relx、rely等相对参数,结合窗口事件监听,可以轻松实现适配不同屏幕尺寸的响应式界面。
- 实战应用:在上位机开发、数据可视化和自定义控件场景中,place布局管理器的优势尤为明显,能够实现pack()和grid()难以完成的复杂布局需求。
掌握place布局管理器,让你的Python GUI开发更上一层楼!在实际项目中灵活运用这些技巧,相信你能创造出更加精美和实用的用户界面。
💡 延伸学习建议:结合Python多线程和异步编程,可以进一步优化界面的响应性能。同时建议深入学习自定义Tkinter组件开发,将place布局的优势发挥到极致。
本文作者:技术老小子
本文链接:
版权声明:本博客所有文章除特别声明外,均采用 BY-NC-SA 许可协议。转载请注明出处!
目录