
你是否遇到过这样的场景:C# WinForms应用运行一段时间后越来越卡,内存占用不断攀升,最后只能重启程序?或者在频繁打开关闭窗体后,发现任务管理器中的内存使用量居高不下?
这些都是典型的内存泄漏问题!作为一名有着10年C#开发经验的程序员,我见过太多因为窗体资源管理不当而导致的性能问题。今天,我将分享一套完整的WinForms资源管理解决方案,不仅能彻底解决内存泄漏,还能让你的应用性能提升30%以上!
本文将从实际项目痛点出发,提供可直接复制使用的代码模板,让你轻松驾驭WinForms的资源管理。
🔍 问题分析:WinForms内存泄漏的三大元凶
💥 元凶一:窗体生命周期管理混乱
C#// ❌ 错误做法:每次都new新窗体
private void btnOpen_Click(object sender, EventArgs e)
{
    UserForm userForm = new UserForm(); // 内存泄漏源头!
    userForm.Show();
}
**在工业物联网项目中,你是否遇到过这样的痛点:**需要读取上千个OPC UA节点数据,但传统的逐个读取方式让系统响应慢如蜗牛?一个包含3000个测点的生产线,单次数据采集竟然需要30秒!
今天就来分享一套高效批量OPC UA操作解决方案,让你的数据采集性能提升10倍以上,从技术小白到工业通信专家的必经之路!
🔍 问题分析:传统OPC UA操作的性能瓶颈
痛点1:串行读取效率低下
C#// ❌ 传统做法:逐个读取,性能极差
foreach(var nodeId in nodeIds)
{
    var value = session.ReadValue(nodeId); // 每次网络往返
    // 3000个节点 = 3000次网络请求 = 30秒+
}
痛点2:订阅管理混乱
大量节点的订阅创建和管理缺乏统一规范,容易造成内存泄漏和连接不稳定。
痛点3:错误处理不完善
单个节点读取失败影响全局,缺乏优雅的异常处理机制。
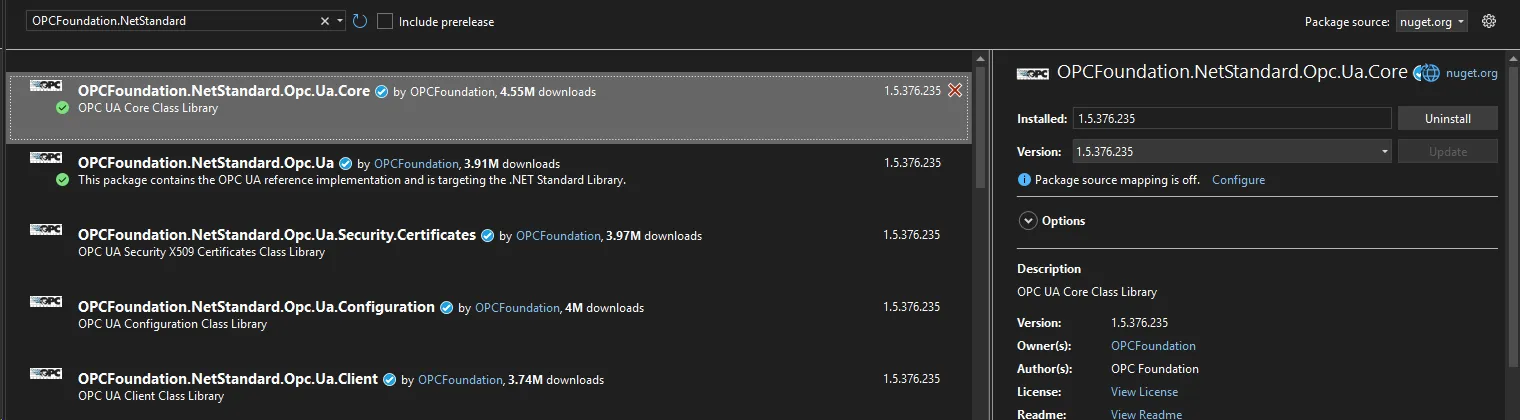
Nuget 安装包
C#OPCFoundation.NetStandard.Opc.Ua
💡 解决方案:五大核心优化策略
🔥 策略一:智能批量读取 - 化零为整的性能魔法
🏭 数据丢了,生产线才是真的停了
去年我接手一个化工厂的上位机改造项目,前任开发者留下来的系统跑了五年,SQLite数据库文件有将近12GB。某天夜班,工控机硬盘突发坏道,系统直接挂掉。运维打电话过来问我:备份在哪?
翻遍整台机器,没有。一条备份脚本都没有。
五年的设备运行记录、工艺参数历史、报警日志——全没了。那次事故最终导致工厂停产将近两天,损失不是我能估算的数字。
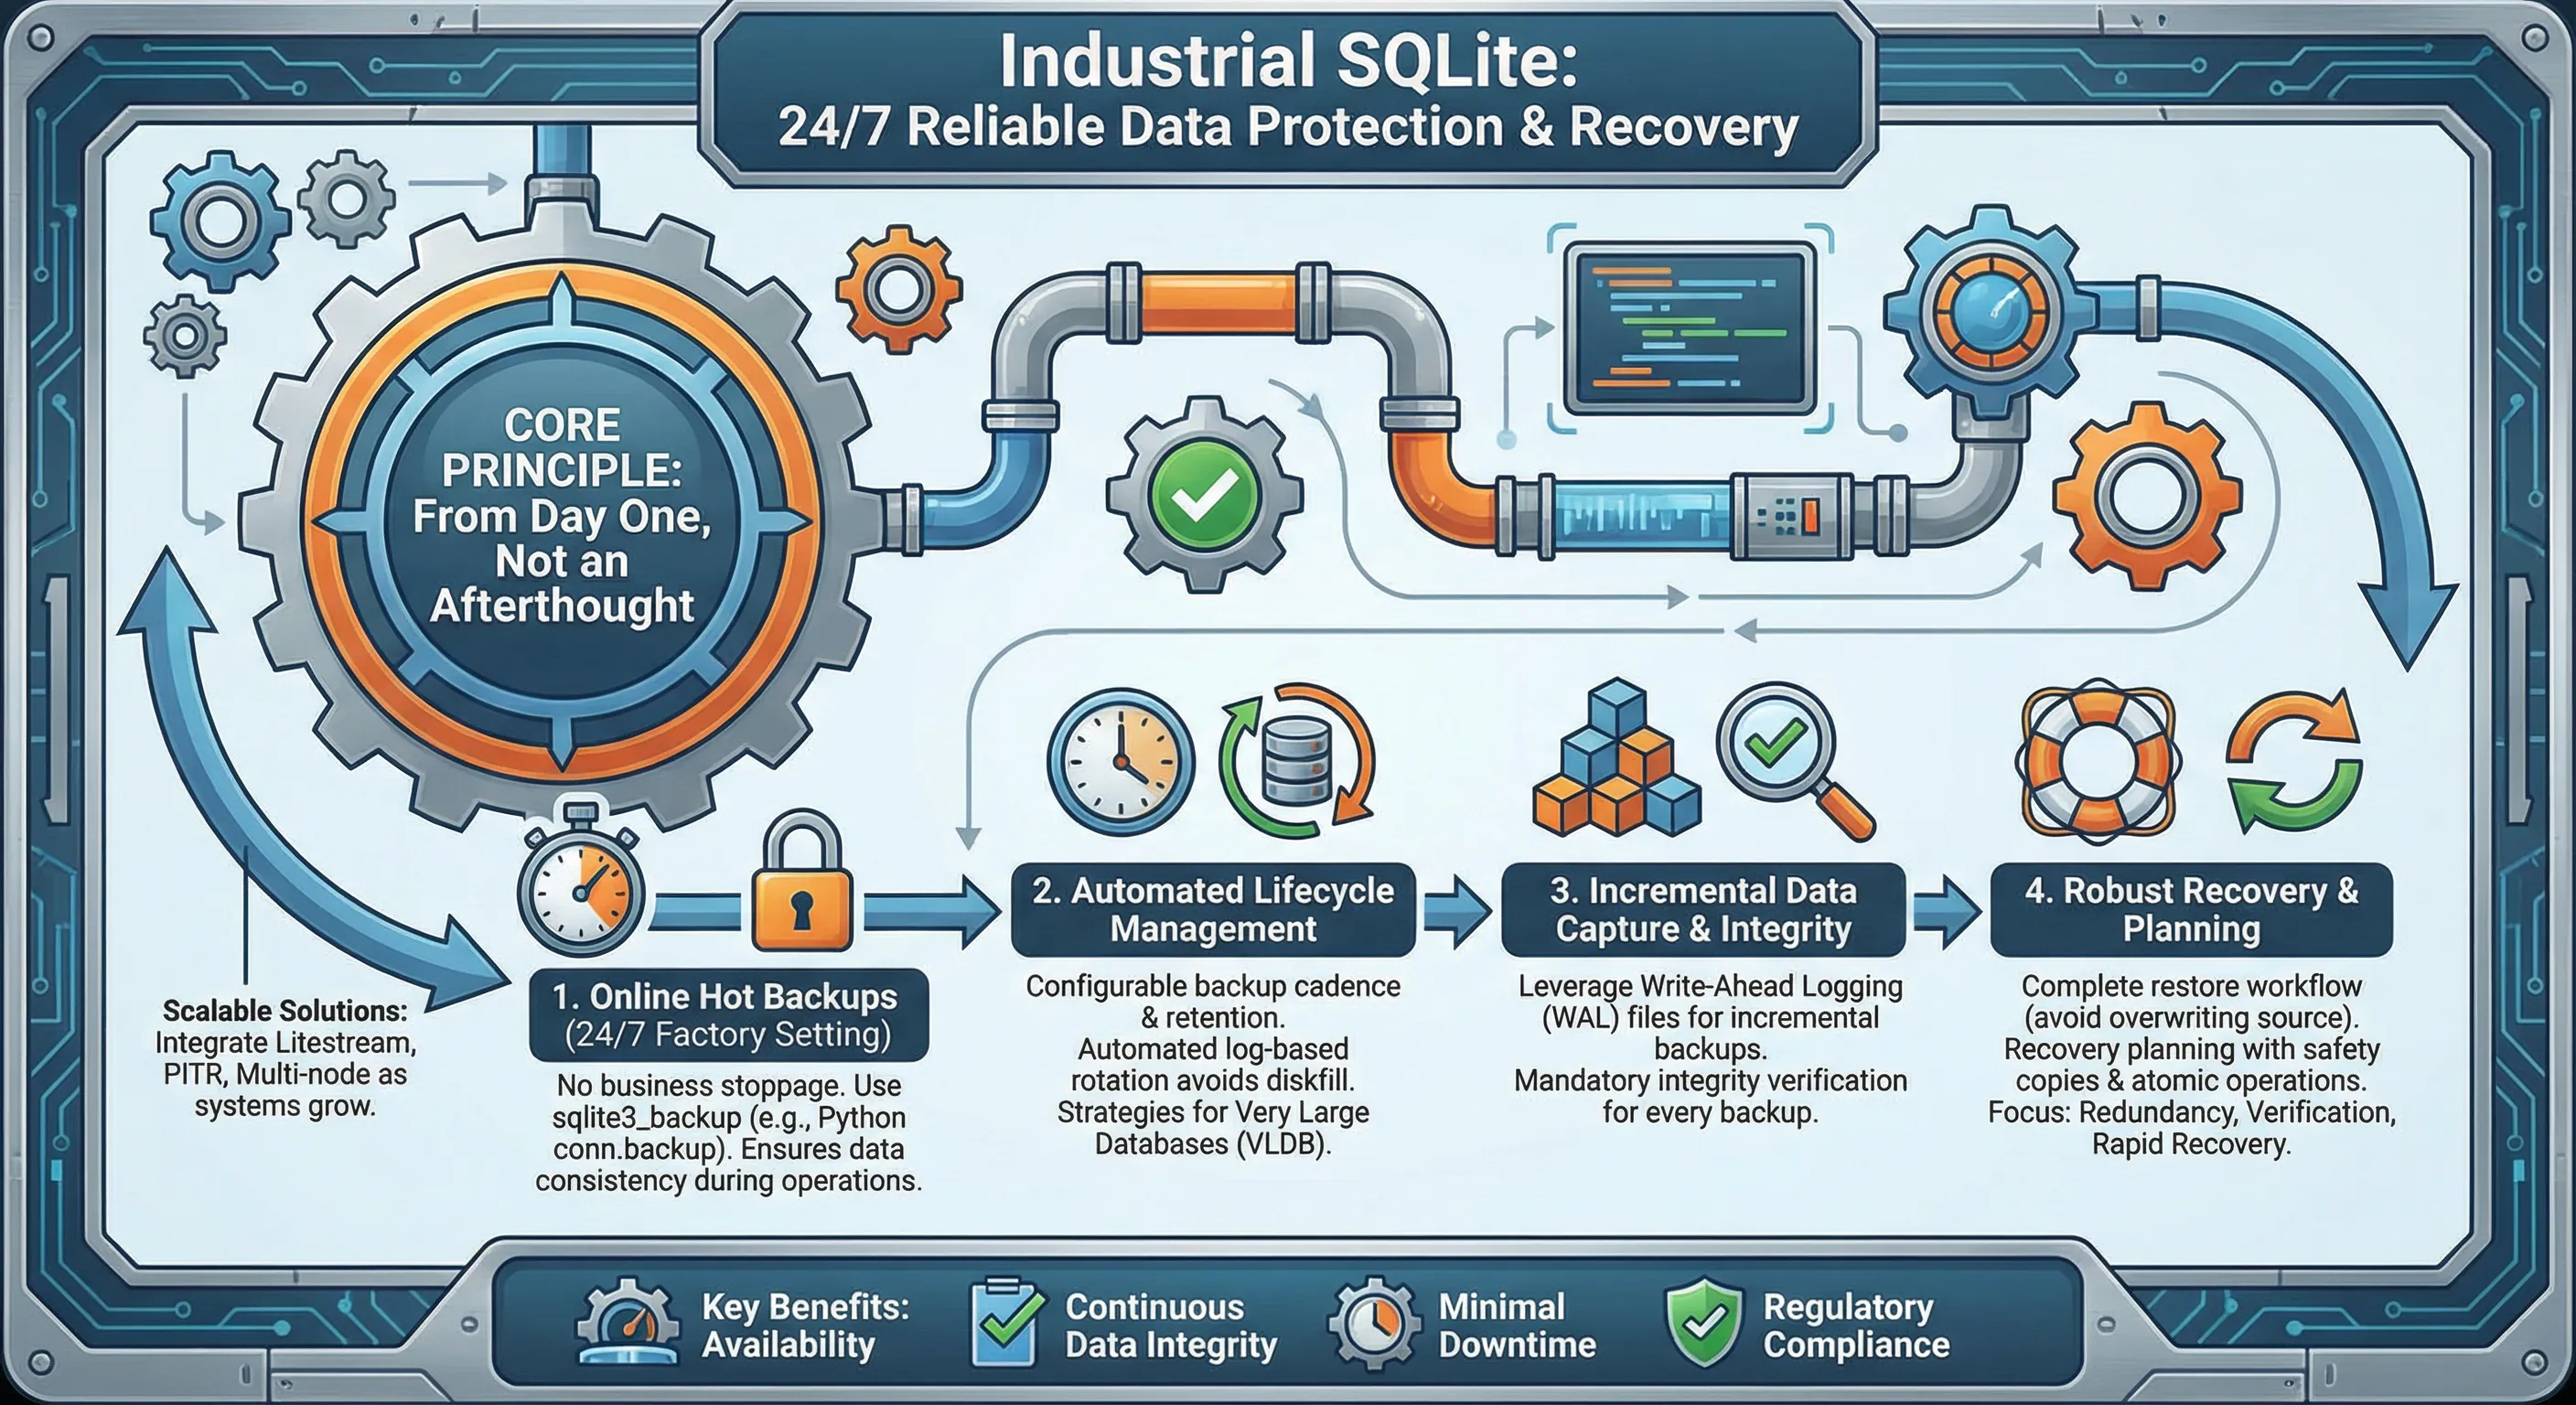
这件事给我的教训很深:备份不是"有空了再做"的事,是系统上线第一天就必须到位的基础设施。 工业场景尤其如此——设备数据往往不可再生,一旦丢失,没有任何办法补回来。
这篇文章,咱们就把工业SQLite数据库的备份与恢复这件事,从头到尾说清楚。代码全部可以直接跑,不是那种"示意性伪代码"。
🔍 工业备份的特殊挑战
普通Web应用的备份,停服、导出、完事。工业数据库不行。
原因有三个。第一,不能停服。 设备24小时上报数据,你不可能为了备份让PLC停止通信。第二,数据库文件可能很大。 跑了几年的工业数据库,几个GB到几十GB很正常,直接复制文件的时间窗口太长,期间数据库状态可能变化。第三,恢复时间要求苛刻。 工厂等不起,恢复必须快,最好能精确到某个时间点。
这三个约束,决定了工业备份策略必须比普通应用更精细。
SQLite提供了一个官方的热备份API——sqlite3_backup,Python的sqlite3模块直接封装了这个接口,叫做conn.backup()。它的核心优势是在数据库正常读写的同时完成备份,不需要锁表,不影响业务。这是工业场景备份的基础工具。
🏭 你的Python环境,真的"工业级"吗?
先问你一个问题——你上次因为环境问题卡壳,浪费了多少时间?
工业编程和普通Web开发不一样。它对稳定性、可复现性、跨平台一致性的要求,要严苛得多。你的环境搭得好不好,直接决定了项目能不能跑起来,跑起来之后稳不稳。
这篇文章,咱们就从头到尾,把Windows下的Python工业编程环境,彻彻底底地捋一遍。读完之后,你会得到:一套可落地的环境搭建方案、几个关键的避坑策略,还有能直接复用的配置模板。
🔍 问题根源:为什么"随便装个Python"行不通?
工业场景的特殊性
普通开发者装Python,python.org下载、一路Next、完事儿。但工业环境里,这套路子会埋下三颗雷:
第一颗:版本混乱。 Windows上同时跑Python 3.8(旧产线遗留)和Python 3.11(新项目),系统PATH一旦配错,pip install装的包压根不是你以为的那个环境。我见过不止一个同事,调试了半天,才发现自己一直在改"错误的"虚拟环境。
第二颗:依赖地狱。 工业库之间的依赖关系,比Web开发复杂得多。pyserial、opcua、modbus-tk、pywin32——这些库版本之间的兼容性,官方文档经常语焉不详。随便pip install,迟早撞上依赖冲突。
第三颗:环境不可复现。 开发机能跑,部署到产线工控机就报错。原因往往是:你本地装了某个编译依赖(比如Visual C++ Build Tools),但工控机上没有,然后某个需要编译的包就直接挂了。
这三个问题,不是技术能力问题,是工程习惯问题。解决它们,需要一套系统性的方案。
🛠️ 核心方案:四步构建工业级Python环境
第一步:用pyenv-win管理Python版本
先说结论:不要直接装Python,用版本管理工具。Windows下首选pyenv-win,它能让你在同一台机器上干净地切换任意Python版本。
powershell# 用PowerShell安装pyenv-win(需要管理员权限)
Invoke-WebRequest -UseBasicParsing -Uri "https://raw.githubusercontent.com/pyenv-win/pyenv-win/master/pyenv-win/install-pyenv-win.ps1" -OutFile "./install-pyenv-win.ps1"; &"./install-pyenv-win.ps1"

# 安装完成后,重启PowerShell,然后:
pyenv install 3.11.9   # 安装指定版本
pyenv install 3.8.18   # 旧项目兼容版本

# 设置全局默认版本
pyenv global 3.11.9

# 在特定项目目录下,设置局部版本(这个非常好用)
cd C:\projects\legacy_plc_project
pyenv local 3.8.18

# 验证
python --version  # 输出 Python 3.8.18
这个pyenv local命令会在项目根目录生成一个.python-version文件。以后任何人拉取这个项目,只要装了pyenv-win,python命令自动对应正确版本。再也不用口口相传"这个项目要用3.8"了。
⚠️ 踩坑预警:pyenv-win安装后,需要手动把
%USERPROFILE%\.pyenv\pyenv-win\bin和%USERPROFILE%\.pyenv\pyenv-win\shims添加到系统PATH,而且要放在其他Python路径前面。顺序错了,版本切换就是摆设。
🏗️ 当你的GUI代码开始"失控"
写Tkinter的人,大多数都经历过这个阶段——
一个文件,几百行,全是Button、Label、Frame堆在一起。起初还好,改个颜色、加个按钮,找得到。等到项目稍微复杂一点,那个文件就开始变成一头怪兽。你想加一个新功能,翻了十分钟代码,愣是不知道该往哪插。
这不是你的问题。Tkinter本身的学习曲线非常平缓,入门门槛低,但它几乎不强制你遵循任何架构规范。自由度太高,反而是个陷阱。
我在实际项目里见过一个单文件Tkinter应用,4000行,没有任何分层,所有逻辑、界面、数据访问全揉在一起。那个项目后来无人敢碰,只能推倒重来。代价很大。
这篇文章就是要解决这个问题——如何从一开始就把Tkinter项目的架构设计做对,或者如何把已经乱掉的项目重新整理清楚。
🧩 为什么Tkinter项目特别容易"腐烂"
Tkinter的组件本身就是对象,这一点很好。但问题在于,tk.Tk()实例和业务逻辑之间没有任何天然屏障。你可以在按钮回调里直接操作数据库,可以在数据处理函数里顺手改一下Label的文字——没人拦你。
这种"随便写"的自由,在小脚本里是优势,在中大型项目里就是定时炸弹。
具体来说,Tkinter项目腐烂的三个典型路径:
第一,回调函数膨胀。 一个按钮点击事件,开始只有三行,后来加了校验逻辑、加了网络请求、加了日志记录……最后那个回调函数有80行,谁也不敢动。
第二,组件引用到处传。 为了让某个子窗口能改主窗口的某个Label,你开始把self.root或者具体的组件对象到处传递。组件之间的依赖关系变成一张网,牵一发动全身。
第三,状态管理混乱。 程序的状态(当前用户、当前选中项、配置参数)散落在各个类的实例变量里,没有统一的地方管理,同步起来一团糟。
🏛️ MVC思想在Tkinter里的落地
解决上面这些问题,最经典的思路就是MVC(Model-View-Controller)。不过Tkinter里的MVC和Web框架里的MVC有些差别,咱们得结合实际来理解。
- Model(模型层):纯粹的数据和业务逻辑,完全不知道Tkinter的存在,不导入任何
tkinter模块。 - View(视图层):只负责界面的创建和展示,不处理任何业务逻辑,只是"显示"数据和"传递"用户操作。
- Controller(控制层):连接Model和View的桥梁,处理用户事件,调用Model,更新View。
这个分层说起来简单,真正落地需要一些具体的设计决策。下面用一个实际的例子来演示。
假设我们在做一个员工信息管理系统,有列表展示、新增、编辑、删除功能。