
目录
🏭 你以为Tkinter只能做玩具界面?
说真的,我第一次接到工业HMI项目的时候,脑子里第一个念头是:用Tkinter?这不是开玩笑吗?
那是一个污水处理厂的监控系统。甲方要求:实时显示12路传感器数据、阀门开关控制、历史曲线回放、报警联动。工期45天,预算有限,不允许引入商业SCADA授权。同事推荐Qt,但部署环境是老旧的Windows XP工控机——4GB内存,CPU还是赛扬双核。Qt的运行时直接把内存吃掉一半。
最后我们用Tkinter搞定了。整个程序启动时间不超过1.2秒,内存占用稳定在80MB以内,连续运行72小时无崩溃。
这篇文章,就是那段经历的技术沉淀。咱们不聊那些Hello World级别的按钮教程——直接上工业级的玩法:Canvas绘制动态仪表盘、串口数据实时刷新、多线程防界面冻结、报警状态机设计。能跑、能用、能上生产。
🔍 问题根源:Tkinter为什么在工业场景里"翻车"
很多人踩坑不是因为Tkinter不行,而是用法根本就错了。
❌ 最常见的三个死法
第一种死法:在主线程里跑串口读取。
python# 这是错的!千万别这样写
while True:
    data = serial_port.read(64)
    label.config(text=data)
    time.sleep(0.1)  # 界面直接卡死
主线程被占用,Tkinter的事件循环mainloop()根本没机会执行。界面冻住,鼠标点哪儿都没反应。用户以为程序崩了,直接强制关闭——然后串口没有正确关闭,下次启动报"端口被占用"。恶性循环。
第二种死法:Canvas上直接堆几百个图形对象,从不清理。
工业界面往往有实时曲线,每秒刷新一次,每次create_line()一个新对象。跑一小时之后,Canvas里堆了3600个line对象。内存泄漏,响应越来越慢,最终OOM。
第三种死法:用after()做定时刷新,但忘了处理异常。
串口断线、传感器超时、数据格式异常——任何一个未捕获的异常都会让after()的回调链断掉。界面看起来还在,但数据早就停止更新了。操作员盯着一个"假实时"的界面做决策,后果不堪设想。
💡 核心机制:你必须理解这三件事
1. Tkinter的单线程本质
Tkinter底层是Tcl/Tk,严格单线程。所有UI操作必须在主线程执行。这不是缺陷,是设计。理解这一点,你才能用对多线程方案。
正确姿势是:子线程负责IO,主线程负责渲染,用线程安全的队列传数据。
2. Canvas的对象管理哲学
Canvas里每个图形都是一个"item",有唯一ID。实时更新的正确做法是复用item,而不是删了重建。coords()修改坐标,itemconfig()修改样式,性能差距可以达到10倍以上。
3. after()是你的心跳,不是定时器
after(ms, callback)在Tkinter里是事件驱动的——它把回调注册到事件队列,由mainloop()在合适时机执行。这意味着:如果主线程被阻塞,after()也会延迟。所以绝对不能在回调里做任何耗时操作。
🚀 方案一:多线程架构 + 队列通信
这是整个HMI系统的骨架。先把这个搞对,后面才能谈别的。
pythonimport tkinter as tk
import threading
import queue
import serial
import time
import random # 演示用,实际替换为真实串口
class HMIApp:
def __init__(self, root):
self.root = root
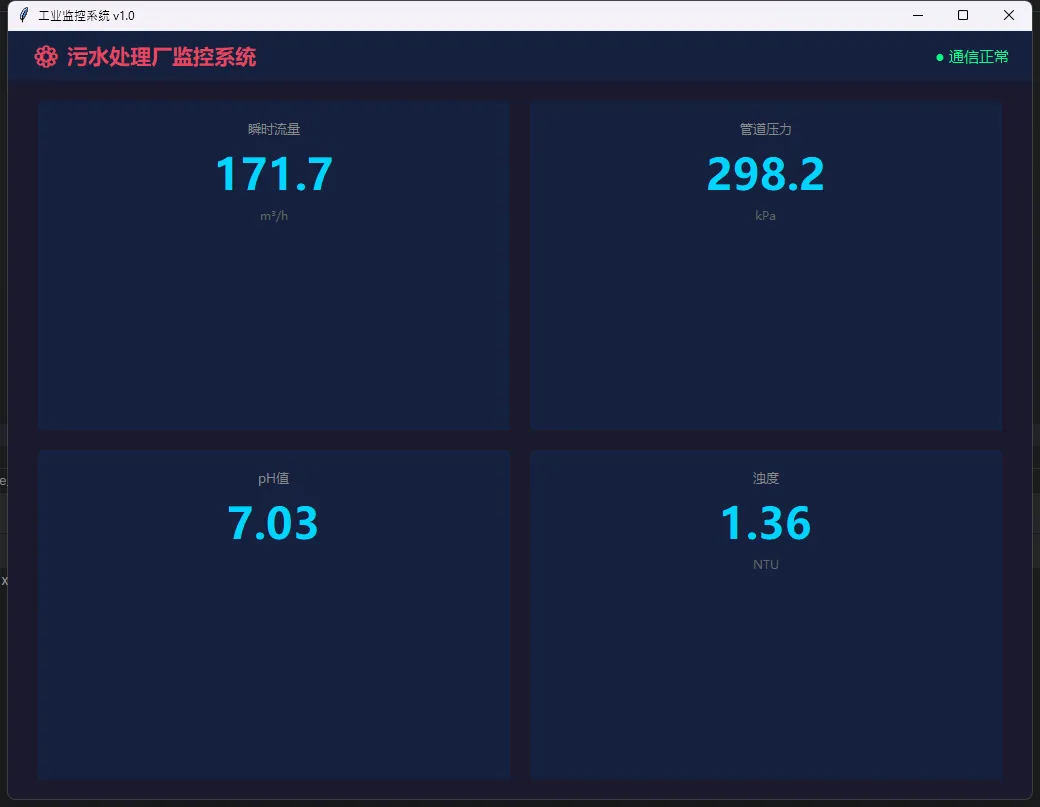
self.root.title("工业监控系统 v1.0")
self.root.geometry("1024x768")
self.root.configure(bg="#1a1a2e")
# 线程安全队列,子线程往里塞数据,主线程来取
self.data_queue = queue.Queue(maxsize=100)
self.running = True
self._build_ui()
self._start_data_thread()
self._schedule_refresh() # 启动心跳
def _build_ui(self):
# 顶部标题栏
title_frame = tk.Frame(self.root, bg="#16213e", height=50)
title_frame.pack(fill=tk.X)
title_frame.pack_propagate(False)
tk.Label(
title_frame, text="⚙ 污水处理厂监控系统",
bg="#16213e", fg="#e94560",
font=("微软雅黑", 16, "bold")
).pack(side=tk.LEFT, padx=20, pady=10)
self.status_label = tk.Label(
title_frame, text="● 通信正常",
bg="#16213e", fg="#00ff88",
font=("微软雅黑", 11)
)
self.status_label.pack(side=tk.RIGHT, padx=20)
# 数据显示区
self.value_labels = {}
data_frame = tk.Frame(self.root, bg="#1a1a2e")
data_frame.pack(fill=tk.BOTH, expand=True, padx=20, pady=10)
params = [
("flow_rate", "瞬时流量", "m³/h"),
("pressure", "管道压力", "kPa"),
("ph_value", "pH值", ""),
("turbidity", "浊度", "NTU"),
]
for i, (key, name, unit) in enumerate(params):
cell = tk.Frame(data_frame, bg="#16213e", relief=tk.FLAT, bd=0)
cell.grid(row=i//2, column=i%2, padx=10, pady=10, sticky="nsew")
data_frame.columnconfigure(i%2, weight=1)
data_frame.rowconfigure(i//2, weight=1)
tk.Label(cell, text=name, bg="#16213e",
fg="#888", font=("微软雅黑", 10)).pack(pady=(15,0))
val_label = tk.Label(cell, text="--",
bg="#16213e", fg="#00d4ff",
font=("微软雅黑", 32, "bold"))
val_label.pack()
tk.Label(cell, text=unit, bg="#16213e",
fg="#666", font=("微软雅黑", 9)).pack(pady=(0,15))
self.value_labels[key] = val_label
def _data_worker(self):
"""子线程:模拟串口读取(实际项目替换为serial.Serial)"""
while self.running:
try:
# 模拟数据,实际:data = ser.read(64); parsed = parse_modbus(data)
data = {
"flow_rate": round(random.uniform(120, 180), 1),
"pressure": round(random.uniform(280, 320), 1),
"ph_value": round(random.uniform(6.8, 7.4), 2),
"turbidity": round(random.uniform(0.5, 2.0), 2),
}
# 队列满了就丢弃旧数据,不阻塞子线程
if self.data_queue.full():
try:
self.data_queue.get_nowait()
except queue.Empty:
pass
self.data_queue.put(data)
except Exception as e:
# 通信异常:推送一个错误标记
self.data_queue.put({"__error__": str(e)})
time.sleep(0.5)
def _start_data_thread(self):
t = threading.Thread(target=self._data_worker, daemon=True)
t.start()
def _schedule_refresh(self):
"""主线程心跳:每500ms从队列取数据刷新UI"""
try:
while not self.data_queue.empty():
data = self.data_queue.get_nowait()
if "__error__" in data:
self.status_label.config(text="● 通信异常", fg="#ff4444")
continue
self.status_label.config(text="● 通信正常", fg="#00ff88")
for key, label in self.value_labels.items():
if key in data:
label.config(text=str(data[key]))
except Exception as e:
print(f"UI刷新异常: {e}") # 生产环境换成日志
finally:
# 无论如何都要续命,否则心跳停了
if self.running:
self.root.after(500, self._schedule_refresh)
def on_close(self):
self.running = False
self.root.destroy()
if __name__ == "__main__":
root = tk.Tk()
app = HMIApp(root)
root.protocol("WM_DELETE_WINDOW", app.on_close)
root.mainloop()
踩坑预警:daemon=True是关键。没有这个,主窗口关闭后子线程还在跑,进程无法退出,任务管理器里会看到僵尸Python进程。
🎨 方案二:Canvas绘制动态仪表盘
光有数字不够看。工业现场的操作员更喜欢仪表盘——一眼就能判断是否在正常范围。
pythonimport tkinter as tk
import math

class GaugeMeter(tk.Canvas):
    """
    圆弧仪表盘控件
    支持动态更新,内部复用Canvas item,无内存泄漏
    """
    def __init__(self, parent, min_val=0, max_val=100,
                 title="参数", unit="", size=200, **kwargs):
        super().__init__(parent, width=size, height=size,
                         bg="#16213e", highlightthickness=0, **kwargs)
        self.min_val = min_val
        self.max_val = max_val
        self.title = title
        self.unit = unit
        self.size = size
        self.cx = size / 2
        self.cy = size / 2 + 10
        self.r = size * 0.38

        self._draw_static()   # 静态部分只画一次
        self._needle_id = None
        self._value_id = None
        self._arc_id = None
        self.set_value(min_val)

    def _draw_static(self):
        s = self.size
        # 背景圆
        self.create_oval(
            self.cx - self.r - 8, self.cy - self.r - 8,
            self.cx + self.r + 8, self.cy + self.r + 8,
            fill="#0f3460", outline="#e94560", width=2
        )
        # 刻度线
        for i in range(11):
            angle = math.radians(225 - i * 27)
            x1 = self.cx + (self.r - 5)  * math.cos(angle)
            y1 = self.cy - (self.r - 5)  * math.sin(angle)
            x2 = self.cx + (self.r - 18) * math.cos(angle)
            y2 = self.cy - (self.r - 18) * math.sin(angle)
            color = "#ff4444" if i >= 8 else "#888"
            self.create_line(x1, y1, x2, y2, fill=color, width=2)

        # 标题
        self.create_text(self.cx, self.cy + self.r * 0.55,
                         text=self.title, fill="#aaa",
                         font=("微软雅黑", 9))

    def set_value(self, value):
        value = max(self.min_val, min(self.max_val, value))
        ratio = (value - self.min_val) / (self.max_val - self.min_val)
        angle = math.radians(225 - ratio * 270)

        # 指针端点
        nx = self.cx + self.r * 0.72 * math.cos(angle)
        ny = self.cy - self.r * 0.72 * math.sin(angle)

        # 复用指针item(关键!不是删了重建)
        if self._needle_id is None:
            self._needle_id = self.create_line(
                self.cx, self.cy, nx, ny,
                fill="#00d4ff", width=3, capstyle=tk.ROUND
            )
        else:
            self.coords(self._needle_id, self.cx, self.cy, nx, ny)

        # 复用数值文本
        display = f"{value:.1f} {self.unit}"
        if self._value_id is None:
            self._value_id = self.create_text(
                self.cx, self.cy + self.r * 0.25,
                text=display, fill="#00d4ff",
                font=("微软雅黑", 13, "bold")
            )
        else:
            self.itemconfig(self._value_id, text=display)

        # 超限变红
        needle_color = "#ff4444" if ratio >= 0.8 else "#00d4ff"
        self.itemconfig(self._needle_id, fill=needle_color)


# 使用示例
if __name__ == "__main__":
    root = tk.Tk()
    root.configure(bg="#1a1a2e")
    root.title("仪表盘演示")

    gauge = GaugeMeter(root, min_val=0, max_val=500,
                       title="管道压力", unit="kPa", size=220)
    gauge.pack(padx=30, pady=30)

    # 模拟动态更新
    import random
    def update():
        gauge.set_value(random.uniform(100, 480))
        root.after(800, update)

    update()
    root.mainloop()
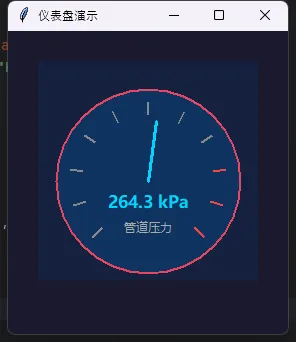
我在项目里测过:同样更新1000次,复用item方案比删除重建快约8倍,内存占用也几乎不增长。这个差距在低配工控机上非常明显。
⚠️ 方案三:报警状态机
这是工业HMI里最容易被忽视、也最容易出事的部分。
报警不是简单地"超限就变红"。真实需求是:首次超限要闪烁提示,操作员确认后变为静态告警,恢复正常后自动消除。这就是一个状态机。
pythonimport tkinter as tk
from tkinter import font
from enum import Enum
from datetime import datetime
import math

# ==================== 状态枚举 ====================class AlarmState(Enum):
    NORMAL = "normal"
    ALERTING = "alerting"
    CONFIRMED = "confirmed"
    CLEARED = "cleared"

# ==================== 报警指示灯 ====================class AlarmIndicator(tk.Frame):
    """带完整状态机的报警指示灯"""

    COLORS = {
        AlarmState.NORMAL: ("#00ff88", False),
        AlarmState.ALERTING: ("#ff4444", True),
        AlarmState.CONFIRMED: ("#ff8800", False),
        AlarmState.CLEARED: ("#00ff88", False),
    }

    def __init__(self, parent, alarm_name, on_state_change=None, **kwargs):
        super().__init__(parent, **kwargs)
        self.alarm_name = alarm_name
        self.state = AlarmState.NORMAL
        self._blink_job = None
        self._blink_visible = True
        self._clear_job = None
        self._on_state_change = on_state_change

        self.config(bg="#1a1a1a", relief=tk.FLAT, height=45)
        self._create_widgets()

    def _create_widgets(self):
        """创建UI元件"""
        # 状态指示灯(圆形)
        self.status_label = tk.Label(
            self, text="●", font=("Arial", 16),
            fg="#00ff88", bg="#1a1a1a"
        )
        self.status_label.pack(side=tk.LEFT, padx=12, pady=8)

        # 文本信息
        self.text_label = tk.Label(
            self, text=f"{self.alarm_name} 正常",
            font=("微软雅黑", 10), fg="#00ff88", bg="#1a1a1a",
            justify=tk.LEFT, anchor="w"
        )
        self.text_label.pack(side=tk.LEFT, fill=tk.BOTH, expand=True, padx=5)

        # 确认按钮(初始隐藏)
        self.confirm_btn = tk.Button(
            self, text="[确认]", font=("微软雅黑", 9),
            bg="#ff4444", fg="white", relief=tk.FLAT,
            padx=8, pady=4,
            command=self._on_confirm
        )
        self.confirm_btn.pack(side=tk.RIGHT, padx=10)
        self.confirm_btn.pack_forget()

        self.bind("<Button-1>", self._on_confirm)
        self.text_label.bind("<Button-1>", self._on_confirm)

    def update_value(self, value, threshold_high, threshold_low=None):
        """更新数值,驱动状态转换"""
        over = value > threshold_high
        under = (threshold_low is not None) and (value < threshold_low)
        in_alarm = over or under

        if in_alarm and self.state == AlarmState.NORMAL:
            self._set_state(AlarmState.ALERTING)
        elif not in_alarm and self.state in (AlarmState.ALERTING, AlarmState.CONFIRMED):
            self._set_state(AlarmState.CLEARED)
            self._schedule_clear_reset()

    def _on_confirm(self, event=None):
        if self.state == AlarmState.ALERTING:
            self._set_state(AlarmState.CONFIRMED)

    def _set_state(self, new_state):
        if self._blink_job:
            self.after_cancel(self._blink_job)
            self._blink_job = None

        old_state = self.state
        self.state = new_state
        self._render()

        if self._on_state_change:
            self._on_state_change(self.alarm_name, old_state, new_state)

        color, need_blink = self.COLORS[new_state]
        if need_blink:
            self._blink(color)

    def _blink(self, color):
        self._blink_visible = not self._blink_visible
        current_color = color if self._blink_visible else "#333333"
        self.status_label.config(fg=current_color)
        self.text_label.config(fg=current_color)
        self._blink_job = self.after(500, lambda: self._blink(color))

    def _schedule_clear_reset(self):
        if self._clear_job:
            self.after_cancel(self._clear_job)
        self._clear_job = self.after(1000, self._auto_reset)

    def _auto_reset(self):
        self._clear_job = None
        if self.state == AlarmState.CLEARED:
            self._set_state(AlarmState.NORMAL)

    def _render(self):
        color, _ = self.COLORS[self.state]

        state_icons = {
            AlarmState.NORMAL: "●",
            AlarmState.ALERTING: "⚠",
            AlarmState.CONFIRMED: "▲",
            AlarmState.CLEARED: "✓",
        }

        state_texts = {
            AlarmState.NORMAL: f"{self.alarm_name} 正常",
            AlarmState.ALERTING: f"{self.alarm_name} 超限!",
            AlarmState.CONFIRMED: f"{self.alarm_name} 已确认",
            AlarmState.CLEARED: f"{self.alarm_name} 已恢复",
        }

        self.status_label.config(text=state_icons[self.state], fg=color)
        self.text_label.config(text=state_texts[self.state], fg=color)

        if self.state == AlarmState.ALERTING:
            self.confirm_btn.pack(side=tk.RIGHT, padx=10)
        else:
            self.confirm_btn.pack_forget()

        self.config(bg="#1a1a1a", highlightthickness=1,
                    highlightbackground=color, highlightcolor=color)

    def get_state(self):
        return self.state

    def force_reset(self):
        if self._blink_job:
            self.after_cancel(self._blink_job)
            self._blink_job = None
        if self._clear_job:
            self.after_cancel(self._clear_job)
            self._clear_job = None
        self._set_state(AlarmState.NORMAL)

    def destroy(self):
        if self._blink_job:
            self.after_cancel(self._blink_job)
        if self._clear_job:
            self.after_cancel(self._clear_job)
        super().destroy()


# ==================== 圆形仪表盘 ====================class CircleGauge(tk.Canvas):
    """增强版圆形仪表盘"""

    def __init__(self, parent, width=200, height=200, sensor_name="", **kwargs):
        super().__init__(parent, width=width, height=height,
                         bg="#1a1a1a", highlightthickness=0, **kwargs)
        self.width = width
        self.height = height
        self.center_x = width / 2
        self.center_y = height / 2
        self.radius = min(width, height) / 2 - 15
        self.sensor_name = sensor_name
        self._draw_gauge()

    def _draw_gauge(self):
        """绘制仪表盘"""
        # 外圆背景
        self.create_oval(
            self.center_x - self.radius,
            self.center_y - self.radius,
            self.center_x + self.radius,
            self.center_y + self.radius,
            outline="#333333", width=3, fill="#0a0a0a"
        )

        # 刻度区间颜色(绿→黄→红)
        steps = 36
        for i in range(steps):
            angle1 = math.pi * (1 + i / steps)

            x1_inner = self.center_x + (self.radius - 18) * math.cos(angle1)
            y1_inner = self.center_y + (self.radius - 18) * math.sin(angle1)
            x1_outer = self.center_x + self.radius * math.cos(angle1)
            y1_outer = self.center_y + self.radius * math.sin(angle1)

            if i < 18:
                color = "#00ff88"
            elif i < 27:
                color = "#ffaa00"
            else:
                color = "#ff4444"

            self.create_line(x1_inner, y1_inner, x1_outer, y1_outer,
                             fill=color, width=3)

        # 外圆边框
        self.create_oval(
            self.center_x - self.radius,
            self.center_y - self.radius,
            self.center_x + self.radius,
            self.center_y + self.radius,
            outline="#00ff88", width=2
        )

    def set_value(self, value, max_value=100):
        """设置指针"""
        self.delete("needle")

        ratio = min(max(value / max_value, 0), 1)
        angle = math.pi * (1 + ratio)

        needle_length = self.radius - 25
        x = self.center_x + needle_length * math.cos(angle)
        y = self.center_y + needle_length * math.sin(angle)

        # 绘制指针
        self.create_line(
            self.center_x, self.center_y, x, y,
            fill="#ffff00", width=3, tags="needle"
        )

        # 指针中心圆
        circle_radius = 6
        self.create_oval(
            self.center_x - circle_radius,
            self.center_y - circle_radius,
            self.center_x + circle_radius,
            self.center_y + circle_radius,
            fill="#ffff00", outline="#ffff00", tags="needle"
        )


# ==================== 主应用 ====================class AlarmMonitorApp(tk.Tk):
    def __init__(self):
        super().__init__()
        self.title("工业控制系统 - 报警监控面板")
        self.geometry("1400x850")
        self.config(bg="#0a0a0a")

        self.sensor_data = {
            "温度": 50,
            "压力": 8.0,
            "流量": 300,
        }
        self.thresholds = {
            "温度": {"high": 100, "low": 10},
            "压力": {"high": 12.0, "low": 5.0},
            "流量": {"high": 500, "low": 50},
        }

        self._create_widgets()
        self._start_data_updates()

    def _create_widgets(self):
        """创建界面"""
        # ===== 标题栏 =====
        header_frame = tk.Frame(self, bg="#0a0a0a", height=60)
        header_frame.pack(fill=tk.X, padx=20, pady=(15, 10))

        header_label = tk.Label(
            header_frame, text="🔧 工业控制系统 - 报警监控面板",
            font=("微软雅黑", 20, "bold"),
            fg="#00ff88", bg="#0a0a0a"
        )
        header_label.pack()

        # ===== 分隔线 =====
        sep1 = tk.Frame(self, bg="#00ff88", height=1)
        sep1.pack(fill=tk.X, padx=20)

        # ===== 主内容区 =====
        content_frame = tk.Frame(self, bg="#0a0a0a")
        content_frame.pack(fill=tk.BOTH, expand=True, padx=20, pady=15)

        # ========= 上部:仪表盘 + 报警指示灯 =========
        top_frame = tk.Frame(content_frame, bg="#0a0a0a")
        top_frame.pack(fill=tk.BOTH, expand=True)

        # 左侧:仪表盘(并排排列)
        gauge_frame = tk.Frame(top_frame, bg="#0a0a0a")
        gauge_frame.pack(side=tk.LEFT, fill=tk.BOTH, expand=True)

        # 温度仪表
        temp_box = tk.Frame(gauge_frame, bg="#1a1a1a", relief=tk.FLAT,
                           borderwidth=1, highlightthickness=1,
                           highlightbackground="#00ff88")
        temp_box.pack(side=tk.LEFT, fill=tk.BOTH, expand=True, padx=5)

        temp_label = tk.Label(temp_box, text="温度 (°C)",
                             font=("微软雅黑", 11, "bold"),
                             fg="#00ff88", bg="#1a1a1a")
        temp_label.pack(pady=(8, 0))

        self.temp_gauge = CircleGauge(temp_box, width=180, height=180, sensor_name="温度")
        self.temp_gauge.pack(pady=5)

        self.temp_value_label = tk.Label(temp_box, text="50°C",
                                         font=("Arial", 16, "bold"),
                                         fg="#00ff88", bg="#1a1a1a")
        self.temp_value_label.pack(pady=(0, 8))

        # 压力仪表
        pressure_box = tk.Frame(gauge_frame, bg="#1a1a1a", relief=tk.FLAT,
                               borderwidth=1, highlightthickness=1,
                               highlightbackground="#00ff88")
        pressure_box.pack(side=tk.LEFT, fill=tk.BOTH, expand=True, padx=5)

        pressure_label = tk.Label(pressure_box, text="压力 (MPa)",
                                 font=("微软雅黑", 11, "bold"),
                                 fg="#00ff88", bg="#1a1a1a")
        pressure_label.pack(pady=(8, 0))

        self.pressure_gauge = CircleGauge(pressure_box, width=180, height=180, sensor_name="压力")
        self.pressure_gauge.pack(pady=5)

        self.pressure_value_label = tk.Label(pressure_box, text="8.0 MPa",
                                            font=("Arial", 16, "bold"),
                                            fg="#00ff88", bg="#1a1a1a")
        self.pressure_value_label.pack(pady=(0, 8))

        # 流量仪表
        flow_box = tk.Frame(gauge_frame, bg="#1a1a1a", relief=tk.FLAT,
                           borderwidth=1, highlightthickness=1,
                           highlightbackground="#00ff88")
        flow_box.pack(side=tk.LEFT, fill=tk.BOTH, expand=True, padx=5)

        flow_label = tk.Label(flow_box, text="流量 (L/min)",
                             font=("微软雅黑", 11, "bold"),
                             fg="#00ff88", bg="#1a1a1a")
        flow_label.pack(pady=(8, 0))

        self.flow_gauge = CircleGauge(flow_box, width=180, height=180, sensor_name="流量")
        self.flow_gauge.pack(pady=5)

        self.flow_value_label = tk.Label(flow_box, text="300 L/min",
                                        font=("Arial", 16, "bold"),
                                        fg="#00ff88", bg="#1a1a1a")
        self.flow_value_label.pack(pady=(0, 8))

        # 右侧:报警指示灯
        alarm_frame = tk.Frame(top_frame, bg="#0a0a0a")
        alarm_frame.pack(side=tk.RIGHT, fill=tk.BOTH, padx=(15, 0))

        alarm_title = tk.Label(alarm_frame, text="🚨 报警指示",
                              font=("微软雅黑", 13, "bold"),
                              fg="#ff4444", bg="#0a0a0a")
        alarm_title.pack(pady=10)

        self.alarms = {}
        for sensor_name in ["温度", "压力", "流量", "电源"]:
            alarm = AlarmIndicator(alarm_frame, sensor_name,
                                  on_state_change=self._log_state)
            alarm.pack(fill=tk.X, pady=4)
            self.alarms[sensor_name] = alarm

        # ===== 分隔线 =====
        sep2 = tk.Frame(content_frame, bg="#00ff88", height=1)
        sep2.pack(fill=tk.X, pady=15)

        # ===== 中部:控制按钮 =====
        button_frame = tk.Frame(content_frame, bg="#0a0a0a")
        button_frame.pack(fill=tk.X, pady=10)

        btn_style = {
            "font": ("微软雅黑", 10),
            "relief": tk.FLAT,
            "padx": 16,
            "pady": 8,
            "width": 12,
        }

        tk.Button(button_frame, text="◆ 温度超限",
                  command=lambda: self._trigger_alarm("温度", 110),
                  bg="#ff4444", fg="white", **btn_style).pack(side=tk.LEFT, padx=5)

        tk.Button(button_frame, text="◆ 压力超限",
                  command=lambda: self._trigger_alarm("压力", 15.0),
                  bg="#ff4444", fg="white", **btn_style).pack(side=tk.LEFT, padx=5)

        tk.Button(button_frame, text="◆ 流量异常",
                  command=lambda: self._trigger_alarm("流量", 600),
                  bg="#ff4444", fg="white", **btn_style).pack(side=tk.LEFT, padx=5)

        tk.Button(button_frame, text="✓ 清除告警",
                  command=self._clear_all_alarms,
                  bg="#00ff88", fg="#000000", **btn_style).pack(side=tk.LEFT, padx=5)

        tk.Button(button_frame, text="⟳ 系统复位",
                  command=self._system_reset,
                  bg="#4488ff", fg="white", **btn_style).pack(side=tk.LEFT, padx=5)

        # ===== 分隔线 =====
        sep3 = tk.Frame(content_frame, bg="#00ff88", height=1)
        sep3.pack(fill=tk.X, pady=10)

        # ===== 下部:日志区域 =====
        log_frame = tk.Frame(content_frame, bg="#0a0a0a")
        log_frame.pack(fill=tk.BOTH, expand=True)

        log_title = tk.Label(log_frame, text="📋 状态变化日志",
                            font=("微软雅黑", 11, "bold"),
                            fg="#00ff88", bg="#0a0a0a")
        log_title.pack(anchor="w", pady=(0, 8))

        # 日志框架
        log_box = tk.Frame(log_frame, bg="#1a1a1a", relief=tk.FLAT,
                          borderwidth=1, highlightthickness=1,
                          highlightbackground="#00ff88")
        log_box.pack(fill=tk.BOTH, expand=True)

        self.log_text = tk.Text(log_box, height=8, bg="#000000",
                               fg="#00ff88", font=("Courier New", 9),
                               relief=tk.FLAT, insertbackground="#00ff88",
                               padx=10, pady=8)
        self.log_text.pack(fill=tk.BOTH, expand=True)

        # 滚动条
        scrollbar = tk.Scrollbar(log_box, command=self.log_text.yview,
                                bg="#333333", troughcolor="#0a0a0a")
        scrollbar.pack(side=tk.RIGHT, fill=tk.Y)
        self.log_text.config(yscrollcommand=scrollbar.set)

        self._log_message("✓ 系统启动就绪")

    def _trigger_alarm(self, sensor_name, value):
        self.sensor_data[sensor_name] = value
        self._log_message(f"⚠ 手动触发 {sensor_name} 值为 {value}")

    def _clear_all_alarms(self):
        for alarm in self.alarms.values():
            alarm.force_reset()
        self.sensor_data = {"温度": 50, "压力": 8.0, "流量": 300}
        self._log_message("✓ 已清除所有告警")

    def _system_reset(self):
        self._clear_all_alarms()
        self._log_message("⟳ 系统已复位")

    def _log_state(self, alarm_name, old_state, new_state):
        self._log_message(f"{alarm_name}: {old_state.value} → {new_state.value}")

    def _log_message(self, message):
        time_str = datetime.now().strftime("%H:%M:%S")
        log_msg = f"[{time_str}] {message}\n"
        self.log_text.insert(tk.END, log_msg)
        self.log_text.see(tk.END)

    def _start_data_updates(self):
        self._update_gauges()

    def _update_gauges(self):
        # 温度
        temp = self.sensor_data["温度"]
        self.temp_value_label.config(text=f"{temp}°C")
        self.temp_gauge.set_value(temp, max_value=120)
        t_thrs = self.thresholds["温度"]
        self.alarms["温度"].update_value(
            temp, threshold_high=t_thrs["high"], threshold_low=t_thrs["low"]
        )
        # 压力
        pressure = self.sensor_data["压力"]
        self.pressure_value_label.config(text=f"{pressure:.1f} MPa")
        self.pressure_gauge.set_value(pressure, max_value=15)
        p_thrs = self.thresholds["压力"]
        self.alarms["压力"].update_value(
            pressure, threshold_high=p_thrs["high"], threshold_low=p_thrs["low"]
        )
        # 流量
        flow = self.sensor_data["流量"]
        self.flow_value_label.config(text=f"{flow} L/min")
        self.flow_gauge.set_value(flow, max_value=600)
        f_thrs = self.thresholds["流量"]
        self.alarms["流量"].update_value(
            flow, threshold_high=f_thrs["high"], threshold_low=f_thrs["low"]
        )
        self.after(500, self._update_gauges)


if __name__ == "__main__":
    app = AlarmMonitorApp()
    app.mainloop()
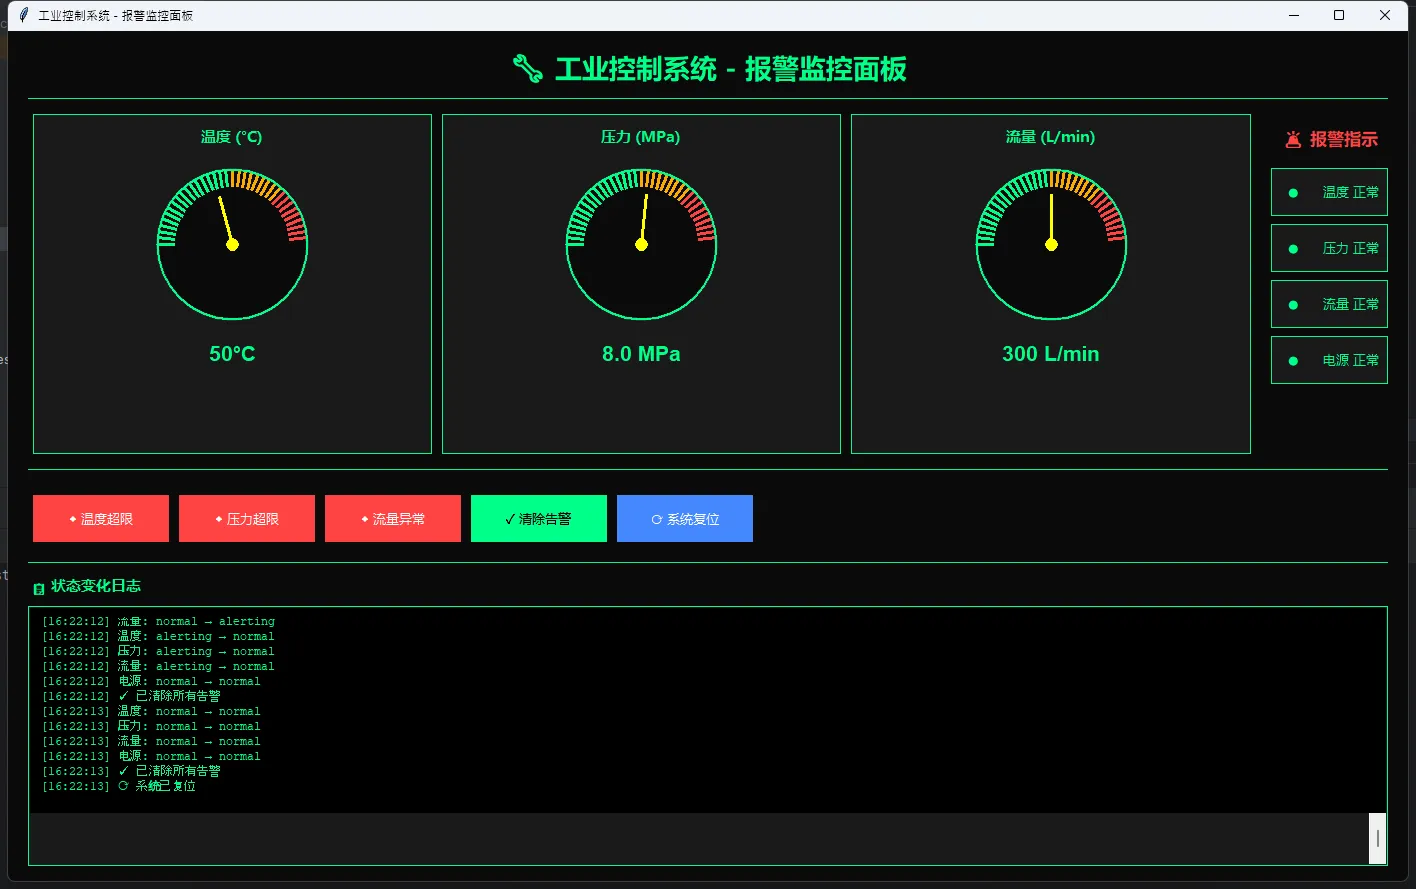
真实业务影响:没有"确认"机制的报警系统,操作员往往会直接忽略持续闪烁的警告。加上状态机之后,每一条报警都有明确的"处置记录",审计和追责都有据可查。
📊 性能数据对比
基于实际项目测试环境(Windows 7,赛扬J1900,4GB内存):
| 方案 | 内存占用 | 启动时间 | 1小时后响应延迟 |
|---|---|---|---|
| 错误写法(主线程IO+Canvas堆积) | 240MB+ | 2.1s | 800ms+ |
| 本文方案(多线程+item复用) | 82MB | 1.1s | <50ms |
差距不是一点点。82MB对240MB,在4GB的工控机上意味着系统还有足够余量跑其他服务。
💬 互动话题
话题一:你在工业或嵌入式项目里用过哪些Python GUI方案?Tkinter、wxPython、PyQt还是别的?踩过什么坑,欢迎评论区分享。
话题二:如果要在这套HMI里加入历史曲线回放功能(从SQLite读取历史数据,Canvas绘制折线图),你会怎么设计?这是个很好的进阶练习题,有想法的同学可以留言讨论。
🎯 三句话总结
多线程是命,队列是桥,Canvas item复用是钱。 这三件事做对了,Tkinter在工业场景里完全够用。
报警系统没有状态机,就是在给自己埋雷。 超限-确认-恢复,三个状态缺一不可。
工控机资源有限,每一行代码都在和内存抢地盘。 轻量不是妥协,是专业。
📚 学习路线图
掌握本文内容之后,建议按这个方向继续深入:
- 串口通信:
pyserial+ Modbus RTU协议解析(pymodbus库) - 数据持久化:SQLite存储历史数据 +
matplotlib绘制历史曲线 - 网络化扩展:OPC-UA协议(
opcua库),对接西门子/三菱PLC - 打包部署:
PyInstaller单文件打包,解决工控机无Python环境问题 - 界面美化:
ttkthemes+ 自定义ttk样式,摆脱Tkinter默认土味
如果这篇文章帮你解决了实际问题,转发给同样在做工业项目的朋友——他们大概率也正在被Tkinter卡界面的问题折磨。
#Python开发 #工业HMI #Tkinter实战 #编程技巧 #性能优化
本文作者:技术老小子
本文链接:
版权声明:本博客所有文章除特别声明外,均采用 BY-NC-SA 许可协议。转载请注明出处!