
Press Ctrl+ and K to search
目录
还在为复杂的工业监控系统架构头疼吗?传统的事件处理方式让你的代码变得臃肿难维护?今天我们来看看如何用Wolverine消息框架轻松构建一个企业级的工业设备监控系统。
在现代工业4.0时代,设备监控系统需要处理海量的实时数据、复杂的业务规则和多样化的用户交互。传统的紧耦合架构往往让系统变得脆弱且难以扩展。而消息驱动架构正是解决这一痛点的利器!
本文将通过一个完整的WinForms工业监控系统案例,带你深入了解Wolverine框架的核心特性,掌握CQRS模式的实际应用,让你的C#项目架构更加优雅和健壮。
💡 问题分析:传统架构的痛点
🔥 传统监控系统面临的挑战
在实际项目中,我们经常遇到这样的问题:
- 紧耦合:UI层直接调用业务逻辑,代码难以测试和维护
- 性能瓶颈:同步处理导致界面卡顿,用户体验差
- 扩展困难:新增功能需要修改多处代码,违反开闭原则
- 错误传播:一个模块的异常可能导致整个系统崩溃
c#// ❌ 传统的紧耦合写法
private void btnUpdateDevice_Click(object sender, EventArgs e)
{
    // 直接在UI中处理业务逻辑
    var device = GetDeviceFromUI();
    ValidateDevice(device);
    SaveToDatabase(device);
    UpdateUI(device);
    SendNotification(device);
    LogOperation(device);
    // ... 更多逻辑
}
🛠️ 解决方案:Wolverine消息驱动架构
🌟 核心架构设计
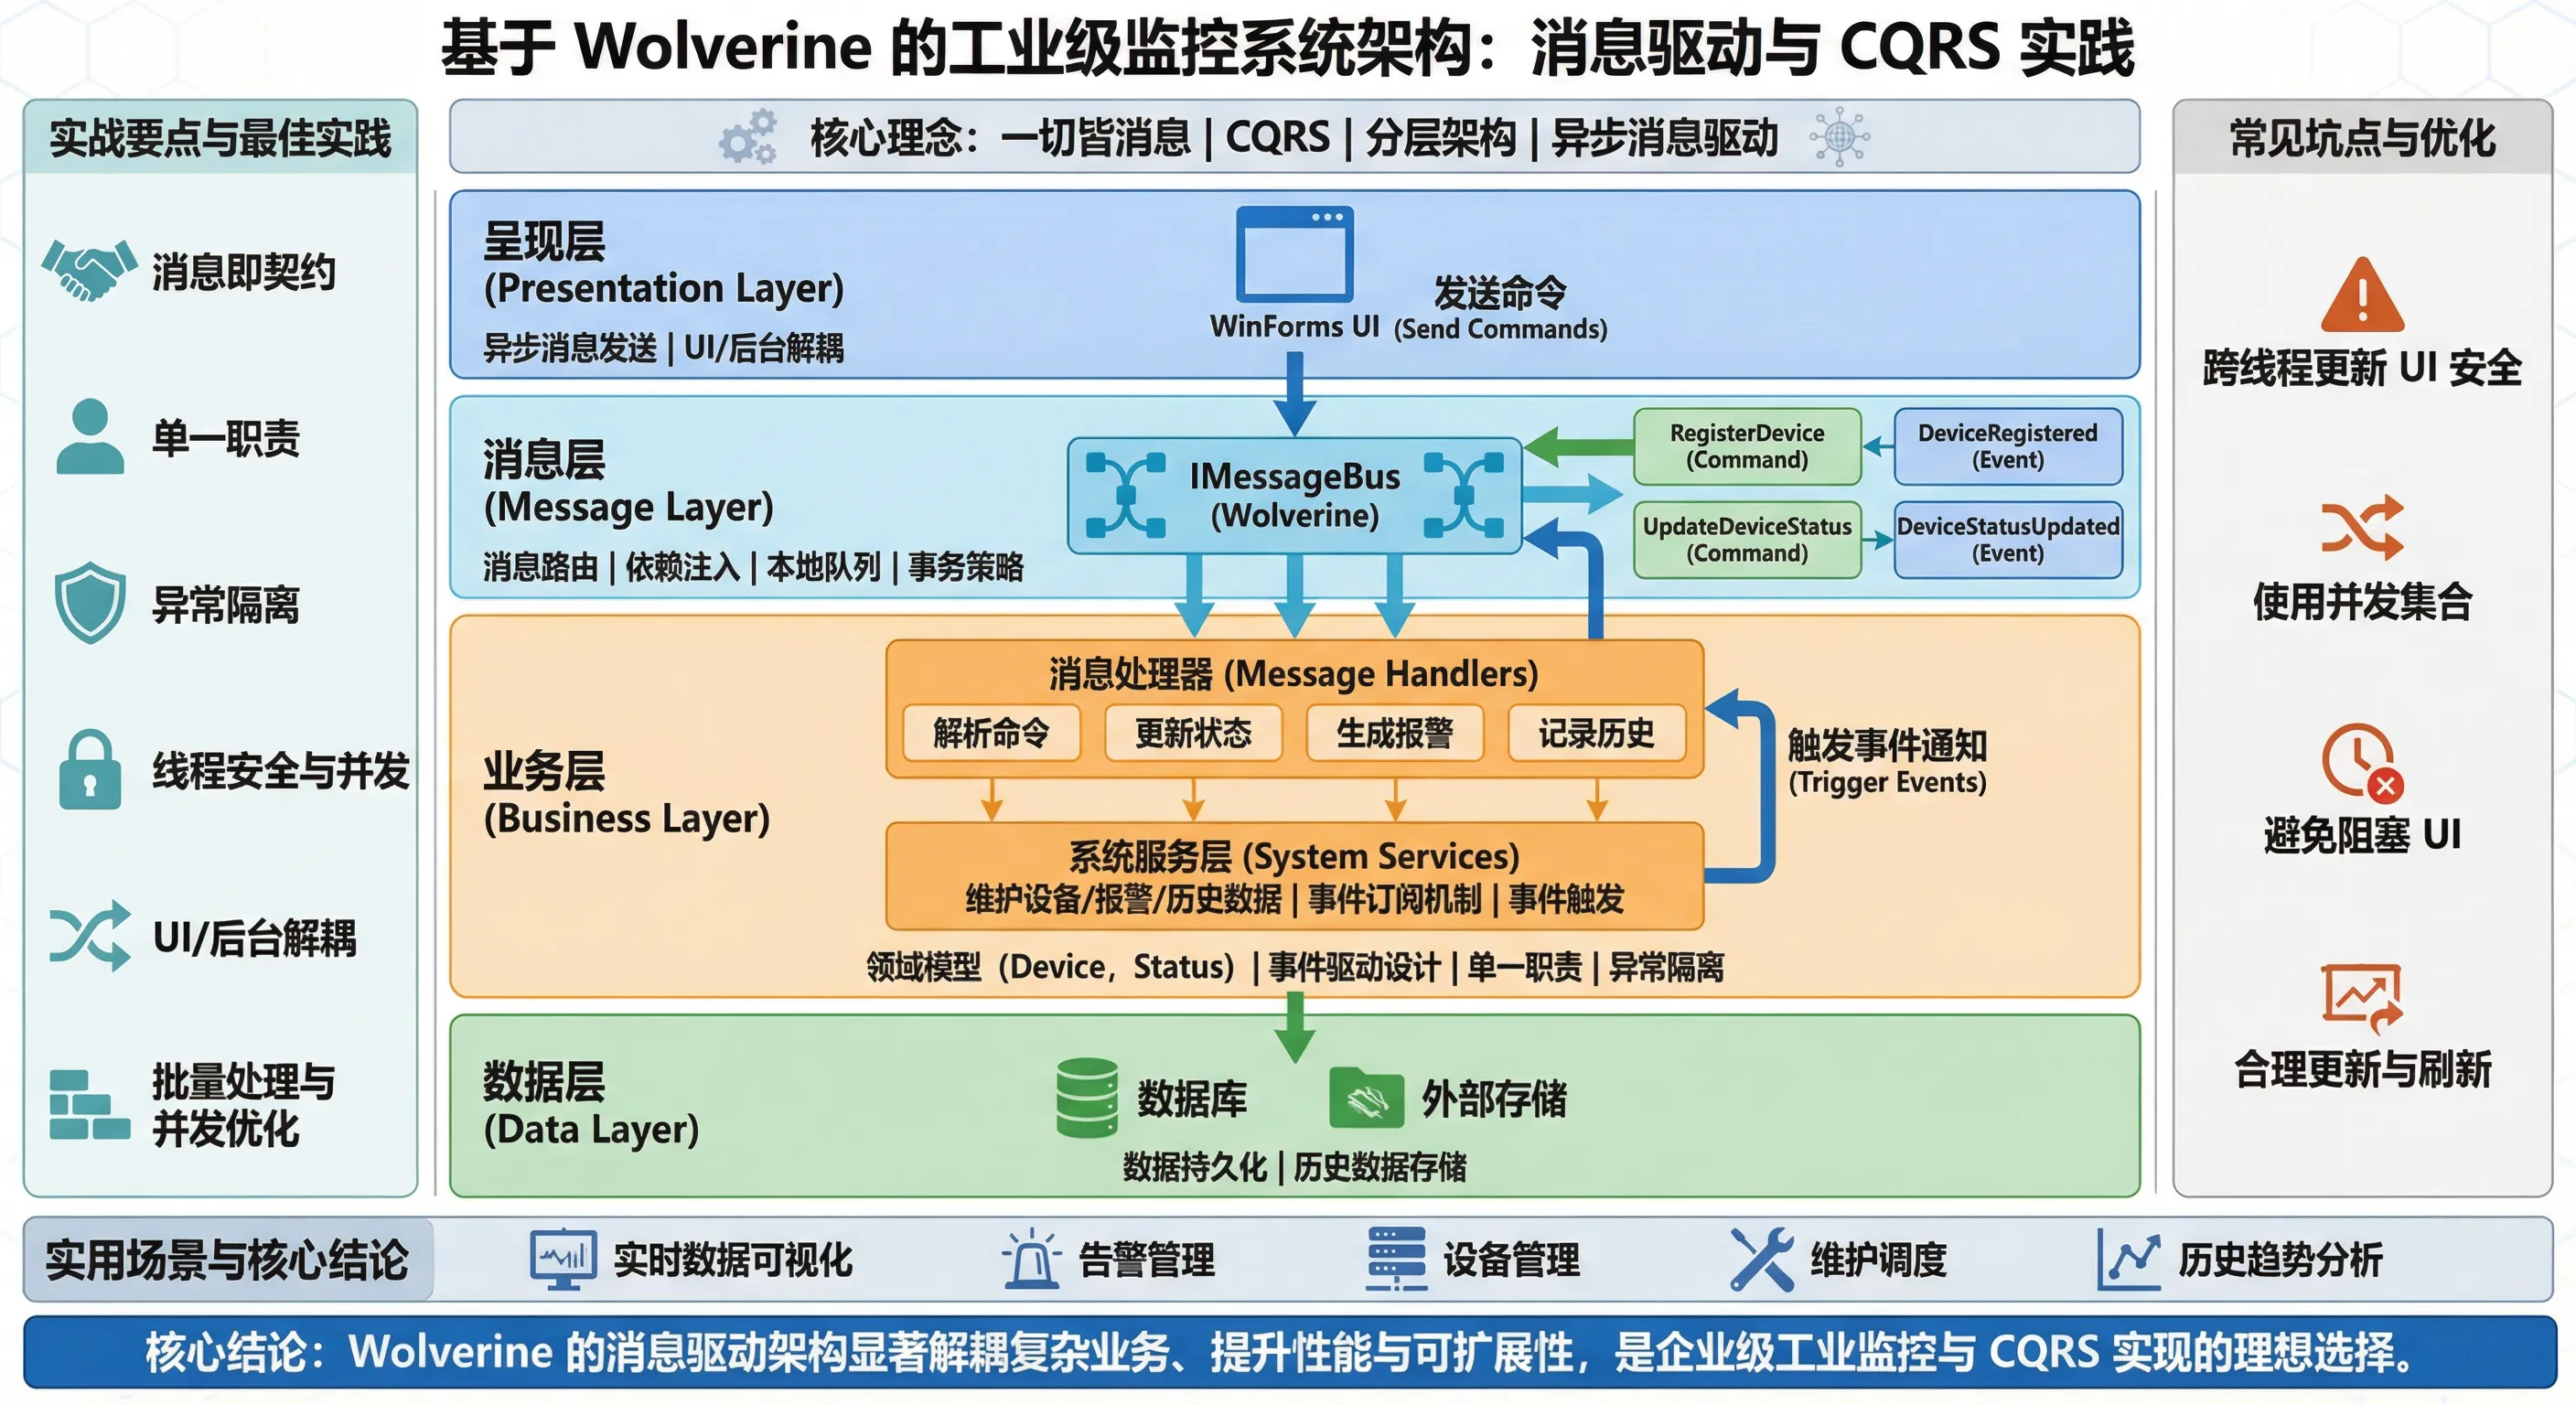
Wolverine是.NET生态中的消息处理框架,它让我们能够以声明式的方式处理复杂的业务流程。核心思想是:一切皆消息。
c#public record RegisterDevice(string DeviceId, string DeviceName, string Location, string DeviceType);
public record DeviceRegistered(string DeviceId, string DeviceName, string Location, DateTime RegisteredAt);

public record UpdateDeviceStatus(string DeviceId, DeviceStatus Status, double Temperature, double Pressure, double Vibration);
public record DeviceStatusUpdated(string DeviceId, DeviceStatus Status, double Temperature, double Pressure, double Vibration, DateTime UpdatedAt);
🔧 代码实战:完整系统搭建
📊 第一步:定义领域模型
c#public class Device
{
    public string DeviceId { get; set; } = string.Empty;
    public string DeviceName { get; set; } = string.Empty;
    public string Location { get; set; } = string.Empty;
    public string DeviceType { get; set; } = string.Empty;
    public DeviceStatus Status { get; set; }
    public double Temperature { get; set; }
    public double Pressure { get; set; }
    public double Vibration { get; set; }
    public DateTime LastUpdated { get; set; }
    public DateTime RegisteredAt { get; set; }
}

public enum DeviceStatus
{
    Running,
    Stopped,
    Warning,
    Error,
    Maintenance
}
🎮 第二步:消息处理器实现
c#public class IndustrialMessageHandlers
{
    private readonly IndustrialSystemService _systemService;
    private readonly ILogger<IndustrialMessageHandlers> _logger;

    public IndustrialMessageHandlers(IndustrialSystemService systemService, ILogger<IndustrialMessageHandlers> logger)
    {
        _systemService = systemService;
        _logger = logger;
    }

    // ✨ 关键特性:方法签名即为消息路由规则
    public DeviceStatusUpdated Handle(UpdateDeviceStatus command)
    {
        _logger.LogInformation("处理设备状态更新: {DeviceId}", command.DeviceId);

        var device = _systemService.GetDevice(command.DeviceId);
        if (device == null)
            throw new DeviceNotFoundException($"设备 {command.DeviceId} 不存在");

        // 更新设备状态
        device.Status = command.Status;
        device.Temperature = command.Temperature;
        device.Pressure = command.Pressure;
        device.Vibration = command.Vibration;
        device.LastUpdated = DateTime.Now;

        _systemService.UpdateDevice(device);

        // 🔥 智能报警检查
        CheckAndCreateAlarms(device);

        return new DeviceStatusUpdated(
            command.DeviceId,
            command.Status,
            command.Temperature,
            command.Pressure,
            command.Vibration,
            DateTime.Now);
    }

    private void CheckAndCreateAlarms(Device device)
    {
        var alarms = new List<(AlarmLevel level, string message, string type)>();

        // 温度报警检查
        if (device.Temperature > 90)
            alarms.Add((AlarmLevel.Critical, $"设备温度严重超标: {device.Temperature:F1}°C", "Temperature"));
        else if (device.Temperature > 80)
            alarms.Add((AlarmLevel.Warning, $"设备温度超标: {device.Temperature:F1}°C", "Temperature"));

        // 压力报警检查
        if (device.Pressure > 120)
            alarms.Add((AlarmLevel.Critical, $"设备压力严重超标: {device.Pressure:F1} PSI", "Pressure"));
        else if (device.Pressure > 100)
            alarms.Add((AlarmLevel.Warning, $"设备压力超标: {device.Pressure:F1} PSI", "Pressure"));

        // 创建报警
        foreach (var (level, message, type) in alarms)
        {
            CreateAlarm(device.DeviceId, level, message, type);
        }
    }
}
🎯 第三步:系统服务层
c#public class IndustrialSystemService
{
    private readonly ConcurrentDictionary<string, Device> _devices = new();
    private readonly ConcurrentDictionary<string, Alarm> _alarms = new();
    private readonly ConcurrentDictionary<string, DeviceDataHistory> _deviceHistories = new();

    // 🔔 事件驱动通知
    public event Action<Device>? DeviceUpdated;
    public event Action<Alarm>? AlarmCreated;
    public event Action<string, DeviceDataHistory>? DeviceDataUpdated;

    public void UpdateDevice(Device device)
    {
        _devices.TryUpdate(device.DeviceId, device, _devices[device.DeviceId]);

        // 更新历史数据
        if (_deviceHistories.TryGetValue(device.DeviceId, out var history))
        {
            history.AddDataPoint(device.Temperature, device.Pressure, device.Vibration, device.LastUpdated);
            DeviceDataUpdated?.Invoke(device.DeviceId, history);
        }

        DeviceUpdated?.Invoke(device);
    }
}
🖥️ 第四步:WinForms界面集成
c#public partial class Form1 : Form
{
    private readonly IMessageBus _messageBus;
    private readonly IndustrialSystemService _systemService;

    public Form1(IMessageBus messageBus, IndustrialSystemService systemService)
    {
        InitializeComponent();

        _messageBus = messageBus;
        _systemService = systemService;

        SubscribeToEvents();
        InitializeSampleDevices();
    }

    // ✨ 异步消息发送
    private async void btnUpdateStatus_Click(object sender, EventArgs e)
    {
        try
        {
            var selectedItem = comboBoxDeviceId.SelectedItem.ToString();
            var deviceId = selectedItem.Split(' ')[0];

            var command = new UpdateDeviceStatus(
                deviceId,
                (DeviceStatus)Enum.Parse(typeof(DeviceStatus), comboBoxStatus.Text),
                (double)numericUpDownTemperature.Value,
                (double)numericUpDownPressure.Value,
                (double)numericUpDownVibration.Value);

            // 🚀 发送消息到Wolverine处理管道
            await _messageBus.InvokeAsync(command);

            toolStripStatusLabel1.Text = $"设备 {deviceId} 状态更新成功";
        }
        catch (Exception ex)
        {
            MessageBox.Show($"更新设备状态失败: {ex.Message}", "错误", MessageBoxButtons.OK, MessageBoxIcon.Error);
        }
    }

    // 🔄 事件订阅处理
    private void OnDeviceUpdated(Device device)
    {
        if (InvokeRequired)
        {
            Invoke(new Action<Device>(OnDeviceUpdated), device);
            return;
        }

        // 更新UI绑定数据
        var existingDevice = _devicesBindingList.FirstOrDefault(d => d.DeviceId == device.DeviceId);
        if (existingDevice == null)
        {
            _devicesBindingList.Add(device);
        }
        else
        {
            var index = _devicesBindingList.IndexOf(existingDevice);
            _devicesBindingList[index] = device;
        }

        UpdateMonitoringPanel();
    }
}
⚙️ 第五步:依赖注入配置
c#static void Main()
{
    var builder = Host.CreateDefaultBuilder();

    builder.ConfigureServices(services =>
    {
        services.AddSingleton<IndustrialSystemService>();
        services.AddSingleton<IndustrialMessageHandlers>();
        services.AddTransient<Form1>();
    });

    // 🎯 Wolverine框架配置
    builder.UseWolverine(opts =>
    {
        opts.ServiceName = "IndustrialMonitoringSystem";

        // 本地队列配置
        opts.LocalQueue("default").Sequential();

        // 自动发现消息处理器
        opts.Discovery.IncludeType<IndustrialMessageHandlers>();

        // 自动应用事务
        opts.Policies.AutoApplyTransactions();
    });

    using var host = builder.Build();
    host.Start();

    using var serviceScope = host.Services.CreateScope();
    var mainForm = serviceScope.ServiceProvider.GetRequiredService<Form1>();

    Application.Run(mainForm);
}
🎨 实际应用场景
📈 实时数据可视化
系统集成了ScottPlot图表组件,实现设备参数的实时监控:
c#private void UpdateTemperatureChart(DeviceDataHistory history)
{
    var temperatureData = history.GetTemperatureHistory();
    if (temperatureData.Length == 0) return;

    var times = temperatureData.Select(d => d.Timestamp.ToOADate()).ToArray();
    var values = temperatureData.Select(d => d.Value).ToArray();

    // 清除现有数据并添加新数据
    if (_temperatureScatter != null)
        formsPlotTemperature.Plot.Remove(_temperatureScatter);

    _temperatureScatter = formsPlotTemperature.Plot.Add.Scatter(times, values);
    _temperatureScatter.LineWidth = 2;

    // 添加警戒线
    formsPlotTemperature.Plot.Add.HorizontalLine(80, Color.Orange); // 警告线
    formsPlotTemperature.Plot.Add.HorizontalLine(90, Color.Red);    // 危险线

    formsPlotTemperature.Refresh();
}
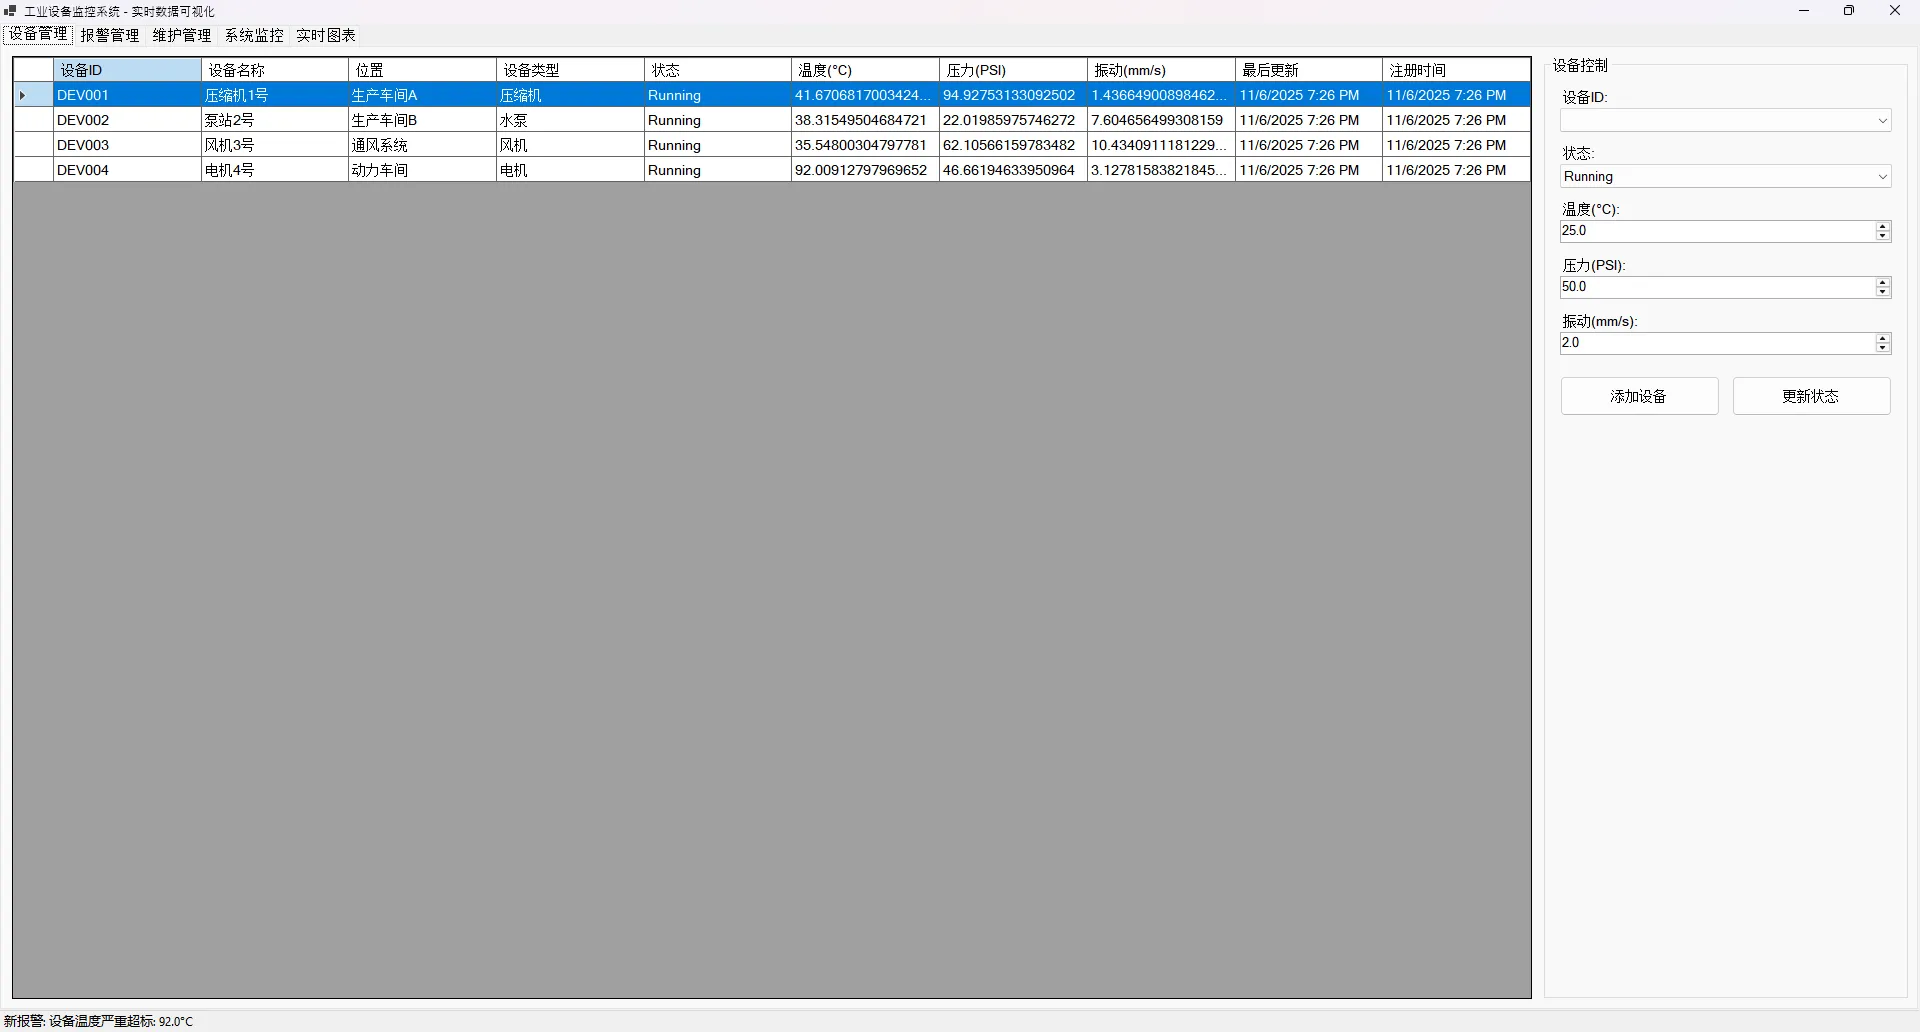
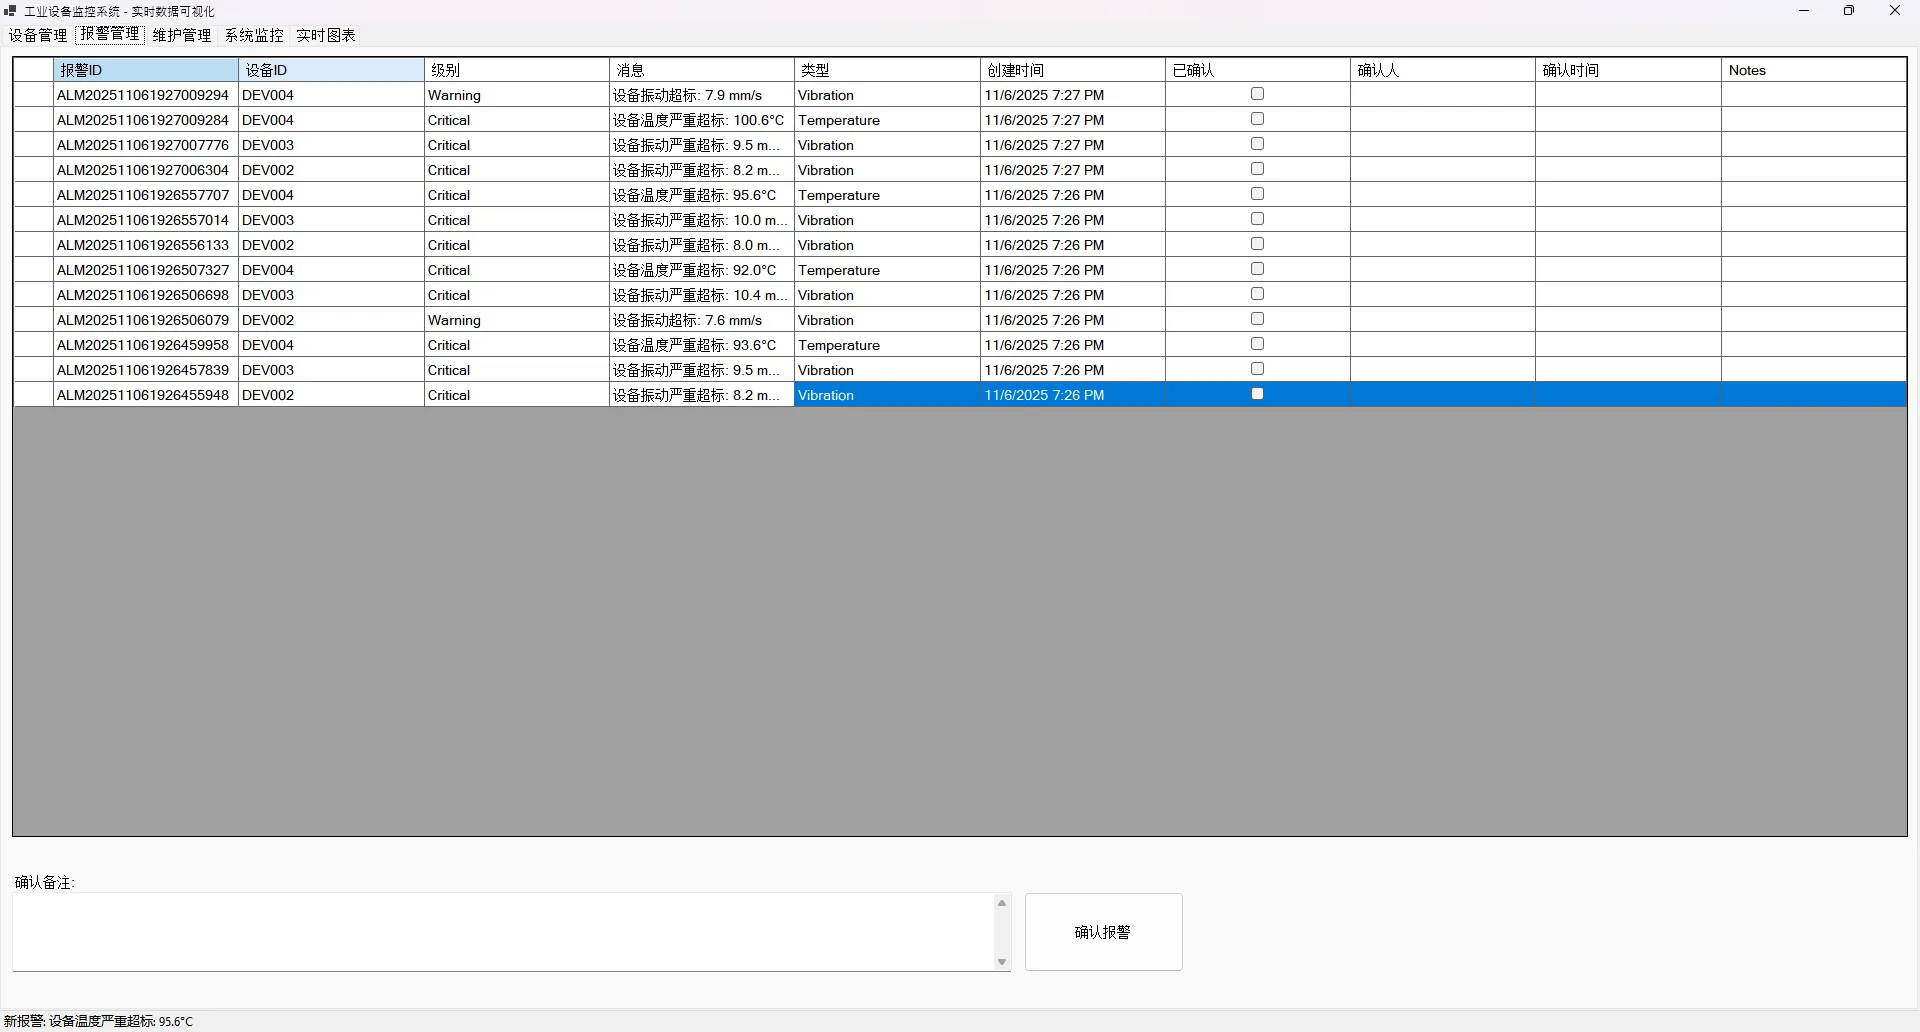
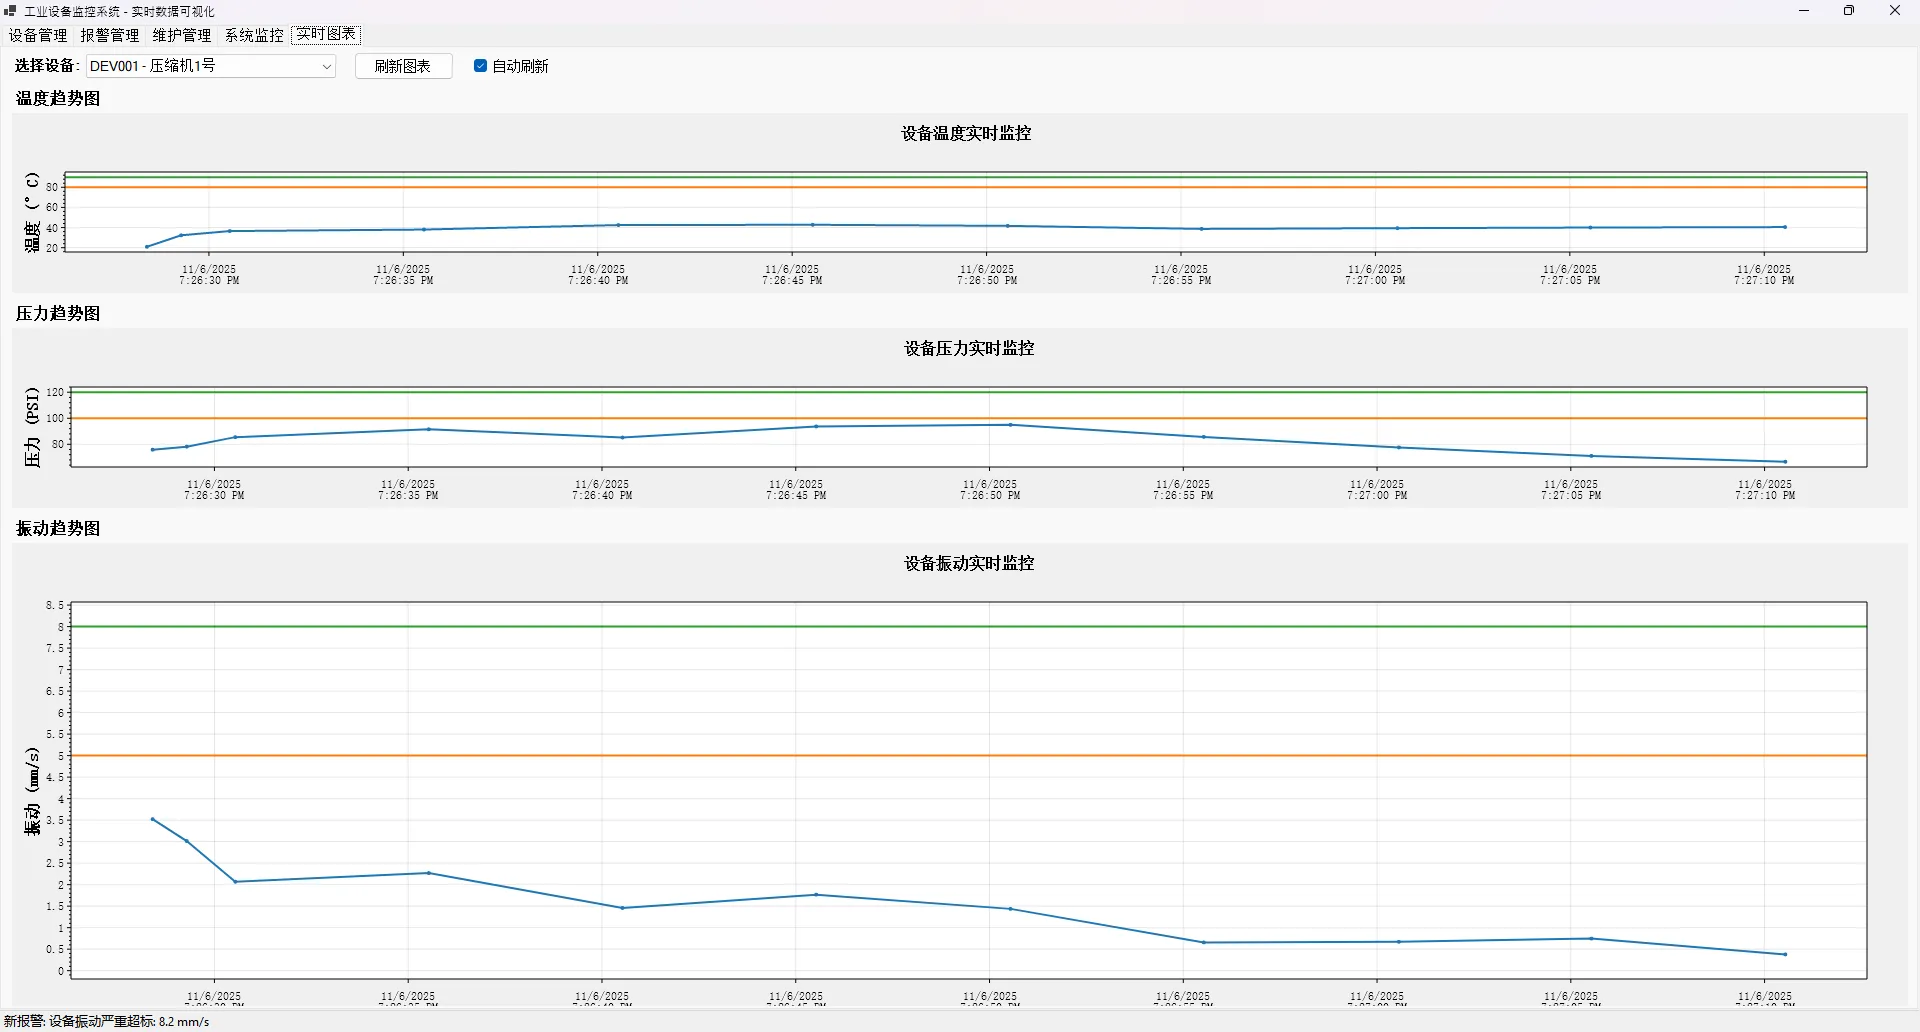
⚠️ 常见坑点提醒
🚨 线程安全问题
c#// ❌ 错误:直接修改UI绑定集合
private void OnDeviceUpdated(Device device)
{
    _devicesBindingList.Add(device); // 可能引发跨线程异常
}

// ✅ 正确:检查并切换到UI线程
private void OnDeviceUpdated(Device device)
{
    if (InvokeRequired)
    {
        Invoke(new Action<Device>(OnDeviceUpdated), device);
        return;
    }
    _devicesBindingList.Add(device);
}
🔒 并发集合选择
c#// ✅ 使用线程安全的集合
private readonly ConcurrentDictionary<string, Device> _devices = new();

// ✅ 在需要遍历时创建副本
private Device[] GetRunningDevicesSafely()
{
    lock (_devicesBindingList)
    {
        return _devicesBindingList.Where(d => d.Status == DeviceStatus.Running).ToArray();
    }
}
🏆 性能优化技巧
⚡ 批量处理优化
c#private async Task SimulateDeviceUpdates()
{
    var runningDevices = GetRunningDevicesSafely();

    // 使用并行处理提升性能
    var updateTasks = runningDevices.Select(async device =>
    {
        var command = GenerateUpdateCommand(device);
        await _messageBus.InvokeAsync(command);
        await Task.Delay(50); // 避免过快更新
    });

    await Task.WhenAll(updateTasks);
}
💎 收藏级代码模板
📝 消息处理器模板
c#public class [BusinessName]MessageHandlers
{
    private readonly I[BusinessName]Service _service;
    private readonly ILogger<[BusinessName]MessageHandlers> _logger;

    public [BusinessName]MessageHandlers(I[BusinessName]Service service, ILogger<[BusinessName]MessageHandlers> logger)
    {
        _service = service;
        _logger = logger;
    }

    public [ResponseMessage] Handle([CommandMessage] command)
    {
        _logger.LogInformation("处理命令: {CommandType}", typeof([CommandMessage]).Name);

        try
        {
            // 业务逻辑处理
            var result = _service.ProcessCommand(command);

            return new [ResponseMessage](/* 响应参数 */);
        }
        catch (Exception ex)
        {
            _logger.LogError(ex, "处理命令失败: {Command}", command);
            throw;
        }
    }
}
🎯 总结与思考
通过这个完整的工业监控系统案例,我们深入体验了Wolverine消息框架的强大之处:
🔥 三大核心优势
- 架构解耦:消息驱动让各模块职责更加清晰,代码更易维护
- 性能提升:异步处理避免了UI线程阻塞,用户体验显著改善
- 扩展性强:新增功能只需添加新的消息处理器,遵循开闭原则
💡 最佳实践总结
- 消息即契约:用record类型定义清晰的消息契约
- 单一职责:每个处理器只负责一种消息类型
- 异常隔离:合理的异常处理避免系统级故障
🤔 思考问题
- 在你的项目中,还有哪些场景可以应用消息驱动模式?
- Wolverine与MediatR相比,你认为各自的优势在哪里?
如果这篇文章对你的C#项目架构有启发,请转发给更多同行!让我们一起推动.NET生态的技术交流与成长。
关注我,获取更多C#实战技巧和架构设计经验分享!
相关信息
我用夸克网盘给你分享了「AppWolverineWinform.zip」,点击链接或复制整段内容,打开「夸克APP」即可获取。
/6cbd3YouNZ:/
链接:https://pan.quark.cn/s/10162fd5d1ec
提取码:ScgK
如果对你有用的话,可以打赏哦
打赏


本文作者:技术老小子
本文链接:
版权声明:本博客所有文章除特别声明外,均采用 BY-NC-SA 许可协议。转载请注明出处!
目录