
Press Ctrl+ and K to search
目录
作为一名从WinForm转向WPF的C#开发者,你是否曾为数据绑定的方向性感到困惑?在WinForm中,我们习惯了手动更新UI控件,而WPF的双向绑定、单向绑定等概念让初学者摸不着头脑。
本文将深入剖析WPF中四种绑定模式的实际应用,通过对比WinForm的传统做法,帮你彻底理解数据绑定方向的选择逻辑。掌握这些知识点后,你将能够:
- 正确选择绑定模式,避免性能浪费
- 解决数据同步问题,提升用户体验
- 写出更优雅、可维护的WPF代码
🔍 问题分析:为什么绑定方向如此重要?
WinForm时代的痛点回顾
在WinForm中,我们通常这样更新UI:
c#// WinForm传统做法
private void UpdateUI()
{
    textBox1.Text = user.Name;
    textBox2.Text = user.Email;
    // 需要手动同步每个控件
}

private void btnSave_Click(object sender, EventArgs e)
{
    user.Name = textBox1.Text;
    user.Email = textBox2.Text;
    // 手动获取控件值
}
这种方式存在三大问题:
- 代码冗余:大量重复的赋值代码
- 同步困难:数据变化时需要手动更新UI
- 维护成本高:字段增加时需要修改多处代码
WPF绑定方向的核心概念
WPF提供了四种绑定模式来解决这些问题:
| 绑定模式 | 数据流向 | 适用场景 | 性能影响 |
|---|---|---|---|
| OneTime | 源 → 目标(一次性) | 静态显示 | 最佳 |
| OneWay | 源 → 目标 | 只读显示 | 良好 |
| OneWayToSource | 源 ← 目标 | 只写操作 | 良好 |
| TwoWay | 源 ↔ 目标 | 交互编辑 | 一般 |
💡 解决方案:四种绑定模式的实战应用
🔥 方案一:OneTime绑定 - 静态数据的最佳选择
适用场景:显示不会变化的数据,如配置信息、常量等。
c#<Window x:Class="AppDataBindType.MainWindow"
        xmlns="http://schemas.microsoft.com/winfx/2006/xaml/presentation"
        xmlns:x="http://schemas.microsoft.com/winfx/2006/xaml"
        xmlns:d="http://schemas.microsoft.com/expression/blend/2008"
        xmlns:mc="http://schemas.openxmlformats.org/markup-compatibility/2006"
        xmlns:local="clr-namespace:AppDataBindType"
        mc:Ignorable="d"
        Title="MainWindow" Height="450" Width="800">
    <StackPanel>
        <TextBlock Text="{Binding Version, Mode=OneTime}" />
        <TextBlock Text="{Binding CompanyName, Mode=OneTime}" />
    </StackPanel>
</Window>
c#public class AppConfig
{
    public string Version { get; set; } = "1.0.0";
    public string CompanyName { get; set; } = "TechCorp";
}

实际应用场景:
- 应用版本号显示
- 公司信息展示
- 帮助文档内容
⚠️ 常见坑点提醒:
OneTime绑定后,即使源数据变化,UI也不会更新。适合真正的静态数据。
🎯 方案二:OneWay绑定 - 只读显示的标准做法
适用场景:需要实时显示变化但用户不能编辑的数据。
c#using System;
using System.Collections.Generic;
using System.ComponentModel;
using System.Linq;
using System.Runtime.CompilerServices;
using System.Text;
using System.Threading.Tasks;

namespace AppDataBindType
{
    public class SystemStatus : INotifyPropertyChanged
    {
        private string _cpuUsage;
        private DateTime _lastUpdate;

        public string CpuUsage
        {
            get => _cpuUsage;
            set
            {
                _cpuUsage = value;
                OnPropertyChanged();
            }
        }

        public DateTime LastUpdate
        {
            get => _lastUpdate;
            set
            {
                _lastUpdate = value;
                OnPropertyChanged();
            }
        }

        public event PropertyChangedEventHandler PropertyChanged;

        protected virtual void OnPropertyChanged([CallerMemberName] string propertyName = null)
        {
            PropertyChanged?.Invoke(this, new PropertyChangedEventArgs(propertyName));
        }
    }
}
xml<!-- XAML中的OneWay绑定 -->
<StackPanel>
    <TextBlock Text="{Binding CpuUsage, Mode=OneWay, StringFormat='CPU使用率: {0}%'}" />
    <TextBlock Text="{Binding LastUpdate, Mode=OneWay, StringFormat='更新时间: {0:HH:mm:ss}'}" />
</StackPanel>

实际应用场景:
- 系统监控面板
- 日志显示区域
- 计算结果展示
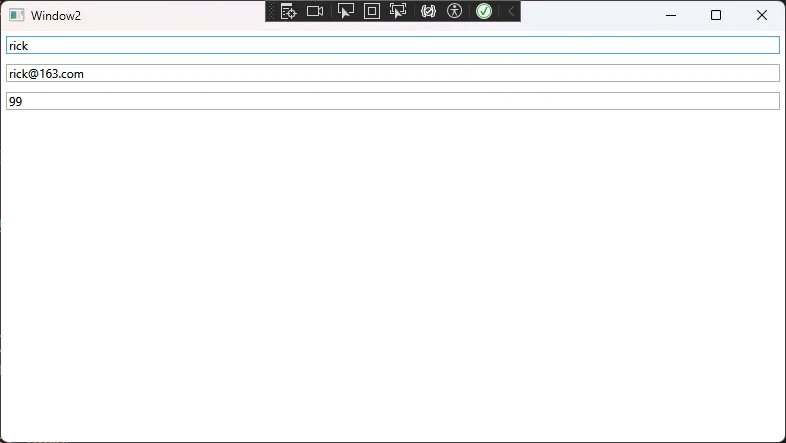
🔄 方案三:TwoWay绑定 - 用户交互的核心
适用场景:用户可以编辑的数据,需要双向同步。
c#using System;
using System.Collections.Generic;
using System.ComponentModel;
using System.Linq;
using System.Runtime.CompilerServices;
using System.Text;
using System.Text.RegularExpressions;
using System.Threading.Tasks;

namespace AppDataBindType
{
    // 用户信息编辑模型
    public class UserEditViewModel : INotifyPropertyChanged
    {
        private string _name;
        private string _email;
        private int _age;

        public string Name
        {
            get => _name;
            set
            {
                if (_name != value)
                {
                    _name = value;
                    OnPropertyChanged();
                    // 可以在这里添加验证逻辑
                    ValidateName();
                }
            }
        }

        public string Email
        {
            get => _email;
            set
            {
                if (_email != value)
                {
                    _email = value;
                    OnPropertyChanged();
                    ValidateEmail();
                }
            }
        }

        public int Age
        {
            get => _age;
            set
            {
                if (_age != value)
                {
                    _age = value;
                    OnPropertyChanged();
                }
            }
        }

        private void ValidateName()
        {
            // 实时验证逻辑
            if (string.IsNullOrWhiteSpace(Name))
            {
                // 触发验证错误提示
            }
        }

        private void ValidateEmail()
        {
            // 邮箱格式验证
            var emailPattern = @"^[^@\s]+@[^@\s]+\.[^@\s]+$";
            if (!Regex.IsMatch(Email ?? "", emailPattern))
            {
                // 触发验证错误提示
            }
        }

        public event PropertyChangedEventHandler PropertyChanged;

        protected virtual void OnPropertyChanged([CallerMemberName] string propertyName = null)
        {
            PropertyChanged?.Invoke(this, new PropertyChangedEventArgs(propertyName));
        }
    }
}
xml<!-- XAML中的TwoWay绑定 -->
<Grid>
    <Grid.RowDefinitions>
        <RowDefinition Height="Auto"/>
        <RowDefinition Height="Auto"/>
        <RowDefinition Height="Auto"/>
    </Grid.RowDefinitions>

    <TextBox Grid.Row="0" Text="{Binding Name, Mode=TwoWay, UpdateSourceTrigger=PropertyChanged}"
             Margin="5" />
    <TextBox Grid.Row="1" Text="{Binding Email, Mode=TwoWay, UpdateSourceTrigger=PropertyChanged}"
             Margin="5" />
    <TextBox Grid.Row="2" Text="{Binding Age, Mode=TwoWay, UpdateSourceTrigger=PropertyChanged}"
             Margin="5" />
</Grid>
⚠️ 关键技巧:
- 使用
UpdateSourceTrigger=PropertyChanged实现实时更新 - 在属性setter中添加验证逻辑
- 避免在getter中执行耗时操作
🎨 方案四:OneWayToSource绑定 - 特殊场景的利器
适用场景:控件状态反向影响数据模型。
c#using System;
using System.Collections.Generic;
using System.ComponentModel;
using System.Linq;
using System.Runtime.CompilerServices;
using System.Text;
using System.Threading.Tasks;

namespace AppDataBindType
{
    // 滑块控制模型
    public class VolumeControlViewModel : INotifyPropertyChanged
    {
        private double _currentVolume;
        private bool _isMuted;

        // 这个属性只接收来自UI的数据
        public double CurrentVolume
        {
            get => _currentVolume;
            set
            {
                _currentVolume = value;
                OnPropertyChanged();
                // 根据音量自动调整静音状态
                if (value > 0 && _isMuted)
                {
                    IsMuted = false;
                }
            }
        }

        public bool IsMuted
        {
            get => _isMuted;
            set
            {
                _isMuted = value;
                OnPropertyChanged();
            }
        }

        public event PropertyChangedEventHandler PropertyChanged;

        protected virtual void OnPropertyChanged([CallerMemberName] string propertyName = null)
        {
            PropertyChanged?.Invoke(this, new PropertyChangedEventArgs(propertyName));
        }
    }
}
xml<!-- OneWayToSource绑定示例 -->
<StackPanel>
    <Slider Minimum="0" Maximum="100"
            Value="{Binding CurrentVolume, Mode=OneWayToSource}" />
    <CheckBox Content="静音" IsChecked="{Binding IsMuted, Mode=TwoWay}" />
    <TextBlock Text="{Binding CurrentVolume, StringFormat='当前音量: {0:F0}%'}" />
</StackPanel>

实际应用场景:
- 用户偏好设置收集
- 控件状态监控
- 交互行为追踪
🎯 总结:掌握绑定方向,提升开发效率
通过本文的深入讲解,我们掌握了WPF数据绑定的核心要点:
- OneTime绑定:静态数据的性能之选,避免不必要的监听开销
- OneWay绑定:实时显示的标准做法,平衡性能与用户体验
- TwoWay绑定:交互编辑的必备技能,配合验证逻辑更完美
- OneWayToSource绑定:特殊场景的精准工具,解决反向数据流问题
从WinForm的手动同步到WPF的自动绑定,不仅仅是语法的改变,更是开发思维的转换。正确选择绑定模式,不仅能提升应用性能,还能让代码更加优雅和可维护。
金句总结:
- "选择正确的绑定模式,就是在正确的时间做正确的事"
- "TwoWay不是万能药,OneWay也有大用途"
- "性能优化从选择合适的绑定模式开始"
💭 互动讨论:
- 在你的项目中,哪种绑定模式使用最频繁?遇到过什么性能问题吗?
- 从WinForm转向WPF,你觉得最大的思维转换是什么?
觉得这篇文章对你的WPF学习有帮助吗?请转发给更多正在学习WPF的同行,让我们一起在C#开发的道路上精进技术!
关注我,获取更多C#开发实战技巧和最佳实践分享!
如果对你有用的话,可以打赏哦
打赏


本文作者:技术老小子
本文链接:
版权声明:本博客所有文章除特别声明外,均采用 BY-NC-SA 许可协议。转载请注明出处!
目录