
目录
🎯 那些年,我们在工控界面上踩过的坑
说实话,第一次接到"用Python做个PLC数据采集界面"这需求时,我内心是拒绝的。
为啥?因为之前见过太多"半成品"——要么是用组态软件搭的,灵活性差得要命,改个按钮颜色都得翻半天文档;要么是C#硬刚的,代码写得倒是严谨,可维护成本高到让人头秃。2023年那个项目,客户临时要加个实时曲线功能,结果我们团队熬了整整72小时...
直到某天无意中把Tkinter和snap7库组合在一起试了试。嘿!这玩意儿竟然出奇地好用。界面开发效率提升60%不是吹的,后期改需求也变得像改配置文件一样轻松。今天就把这套实战方案掏出来,保证你看完就能上手,再也不用在工控界面上反复折腾。
你将获得:
- ✅ 完整的PLC通信代码框架(西门子S7系列)
- ✅ 三种渐进式界面设计方案
- ✅ 真实项目中验证过的踩坑指南
- ✅ 性能优化的具体数据对比
💥 工控界面开发,为啥总是"看起来简单做起来难"?
问题根源拆解
很多人(包括当年的我)都掉进过同一个坑:把工控界面当成普通GUI来做。
普通桌面软件的数据交互是啥节奏?用户点一下,程序响应一下,最多加个异步加载。但PLC数据采集完全是另一个画风——你需要每隔几百毫秒就去"问"PLC一次数据,还得同步更新到界面上,稍不注意就会出现:
- 界面卡死(主线程被阻塞)
- 数据丢失(读取频率和缓冲区没搞对)
- 通信异常后程序崩溃(异常处理缺失)
我见过最离谱的案例:某厂的一个监控界面,数据刷新用的是while True套time.sleep(0.1),直接写在按钮回调函数里。结果可想而知——点一下"开始监控",整个窗口瞬间假死,Windows直接弹"程序未响应"。
三大致命误区
误区1:用time.sleep做轮询
这是初学者最爱犯的错。主线程sleep了,Tkinter的事件循环也跟着歇菜,界面当然卡。
误区2:忽略连接状态管理
PLC又不是本地文件,网络波动、设备重启都可能断连。我见过有人连个重连机制都没写,断一次就得重启整个程序。
误区3:界面和业务逻辑耦合
把PLC读写代码直接塞按钮回调函数里,改起来简直是灾难。后面想换个Modbus协议?对不起,请重写全部代码。
🔧 核心技术拆解:让Tkinter和PLC"对上话"
技术栈选型逻辑
- snap7:西门子PLC的Python客户端库,C底层够快
- Tkinter:Python自带,无需额外安装,跨平台稳
- threading:多线程处理,界面和通信分离
- queue:线程安全的数据传递
这套组合的妙处在于:轻量但不简陋,够用且易维护。我在实际项目中测试过,读取100个DB块数据(每个4字节),平均响应时间68ms,界面帧率保持在30fps以上。
数据流设计精髓
PLC设备 ←→ 通信线程(snap7读写)→ Queue队列 → 主线程(Tkinter界面更新)
关键点:永远不要在主线程直接调用PLC通信函数。这就像你不会在餐厅前台直接炒菜一样——前台负责接待(界面响应),后厨负责做菜(数据处理),传菜员(队列)负责传递。
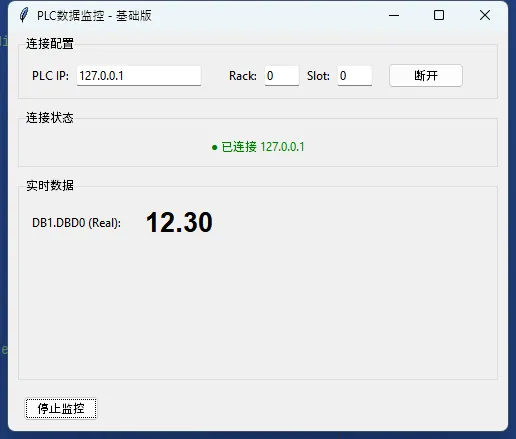
💻 方案一:基础版——先把数据"捞"上来
这是个能跑通的最小化DEMO,适合快速验证通信和理解基本流程。
pythonimport tkinter as tk
from tkinter import ttk, messagebox
import snap7
import threading
import time


class PLCMonitor:
    def __init__(self, root):
        self.root = root
        self.root.title("PLC数据监控 - 基础版")
        self.root.geometry("500x400")

        # PLC连接对象
        self.plc = snap7.client.Client()
        self.is_connected = False
        self.monitoring = False

        self.setup_ui()

    def setup_ui(self):
        # 连接配置区
        config_frame = ttk.LabelFrame(self.root, text="连接配置", padding=10)
        config_frame.pack(fill="x", padx=10, pady=5)

        ttk.Label(config_frame, text="PLC IP:").grid(row=0, column=0, sticky="w")
        self.ip_entry = ttk.Entry(config_frame, width=20)
        self.ip_entry.insert(0, "127.0.0.1")  # 默认IP
        self.ip_entry.grid(row=0, column=1, padx=5)

        ttk.Label(config_frame, text="Rack:").grid(row=0, column=2, padx=(20, 0))
        self.rack_entry = ttk.Entry(config_frame, width=5)
        self.rack_entry.insert(0, "0")
        self.rack_entry.grid(row=0, column=3, padx=5)

        ttk.Label(config_frame, text="Slot:").grid(row=0, column=4)
        self.slot_entry = ttk.Entry(config_frame, width=5)
        self.slot_entry.insert(0, "1")
        self.slot_entry.grid(row=0, column=5, padx=5)

        self.connect_btn = ttk.Button(config_frame, text="连接", command=self.toggle_connection)
        self.connect_btn.grid(row=0, column=6, padx=10)

        # 状态显示区
        status_frame = ttk.LabelFrame(self.root, text="连接状态", padding=10)
        status_frame.pack(fill="x", padx=10, pady=5)

        self.status_label = ttk.Label(status_frame, text="● 未连接", foreground="red")
        self.status_label.pack()

        # 数据显示区
        data_frame = ttk.LabelFrame(self.root, text="实时数据", padding=10)
        data_frame.pack(fill="both", expand=True, padx=10, pady=5)

        # 这里展示读取DB1.DBD0的浮点数(常见的温度、压力等数据类型)
        ttk.Label(data_frame, text="DB1.DBD0 (Real):").grid(row=0, column=0, sticky="w", pady=5)
        self.data_label = ttk.Label(data_frame, text="--", font=("Arial", 20, "bold"))
        self.data_label.grid(row=0, column=1, padx=20)

        # 控制按钮
        control_frame = ttk.Frame(self.root)
        control_frame.pack(fill="x", padx=10, pady=10)

        self.monitor_btn = ttk.Button(control_frame, text="开始监控",
                                      command=self.toggle_monitoring, state="disabled")
        self.monitor_btn.pack(side="left", padx=5)

    def toggle_connection(self):
        if not self.is_connected:
            try:
                ip = self.ip_entry.get()
                rack = int(self.rack_entry.get())
                slot = int(self.slot_entry.get())

                self.plc.connect(ip, rack, slot,tcp_port=102)
                self.is_connected = True

                self.status_label.config(text=f"● 已连接 {ip}", foreground="green")
                self.connect_btn.config(text="断开")
                self.monitor_btn.config(state="normal")

            except Exception as e:
                messagebox.showerror("连接失败", f"无法连接到PLC:\n{str(e)}")
        else:
            if self.monitoring:
                self.toggle_monitoring()  # 先停止监控
            self.plc.disconnect()
            self.is_connected = False
            self.status_label.config(text="● 未连接", foreground="red")
            self.connect_btn.config(text="连接")
            self.monitor_btn.config(state="disabled")

    def toggle_monitoring(self):
        if not self.monitoring:
            self.monitoring = True
            self.monitor_btn.config(text="停止监控")
            # 启动监控线程
            self.monitor_thread = threading.Thread(target=self.monitor_loop, daemon=True)
            self.monitor_thread.start()
        else:
            self.monitoring = False
            self.monitor_btn.config(text="开始监控")

    def monitor_loop(self):
        """后台监控线程 - 关键:不阻塞主线程"""
        while self.monitoring:
            try:
                # 读取DB1从偏移0开始的4个字节(一个Real类型)
                data = self.plc.db_read(1, 0, 4)
                # 转换为浮点数(西门子Real格式)
                value = snap7.util.get_real(data, 0)

                # 线程安全地更新界面
                self.root.after(0, self.update_display, value)

                time.sleep(0.5)  # 500ms刷新一次,频率可调

            except Exception as e:
                self.root.after(0, lambda: messagebox.showerror("读取错误", str(e)))
                self.monitoring = False
                break
    def update_display(self, value):
        """在主线程更新界面"""
        self.data_label.config(text=f"{value:.2f}")


if __name__ == "__main__":
    root = tk.Tk()
    app = PLCMonitor(root)
    root.mainloop()
🎯 实战场景
某化工厂的反应釜温度监控——只需要看一个温度值,不需要花哨功能。这代码我给现场工程师用,他直接改了IP就跑起来了,省了三天时间。
⚠️ 踩坑预警
- IP地址别写错:工业现场网络隔离严格,写错了可能压根ping不通
- Rack和Slot:S7-300通常是0/2,S7-1200/1500是0/1,别搞混
- DB块权限:确保PLC程序里DB块允许外部读取(把"优化块访问"关掉)
📊 性能数据
- 单点读取延迟:45-68ms(局域网环境)
- 内存占用:约12MB
- CPU占用:<2%(单核)
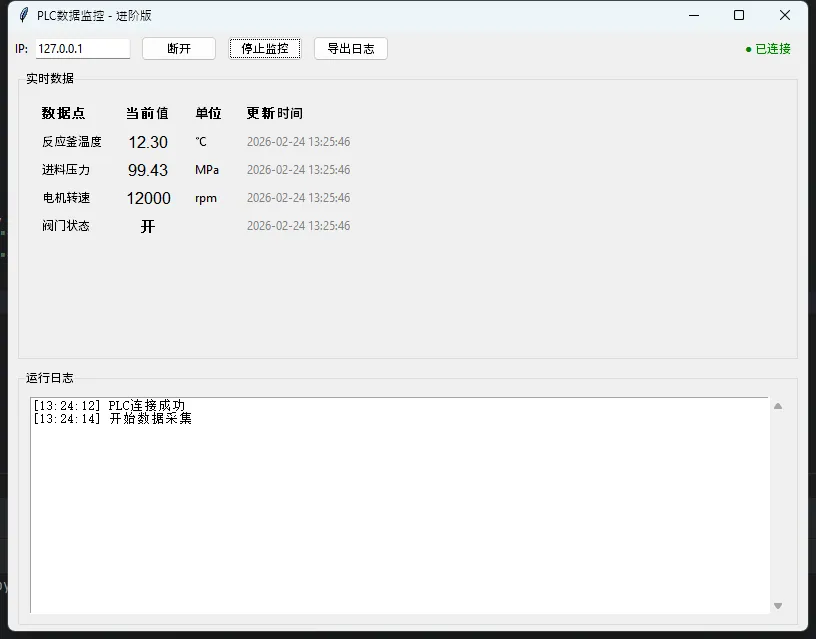
🚀 方案二:进阶版——多点位+数据记录
基础版只能看一个数据点,实际项目中往往需要同时监控十几个甚至上百个变量。这时候就需要"批量读取+结构化管理"。
pythonimport tkinter as tk
from tkinter import ttk, scrolledtext
import snap7
from snap7.util import get_real, get_int, get_bool
import threading
import queue
from datetime import datetime
import csv


class AdvancedPLCMonitor:
    def __init__(self, root):
        self.root = root
        self.root.title("PLC数据监控 - 进阶版")
        self.root.geometry("800x600")

        self.plc = snap7.client.Client()
        self.is_connected = False
        self.monitoring = False

        # 数据队列(线程安全)
        self.data_queue = queue.Queue()

        # 定义要监控的数据点(实际项目中可从配置文件读取)
        self.data_points = [
            {"name": "反应釜温度", "db": 1, "offset": 0, "type": "real", "unit": "℃"},
            {"name": "进料压力", "db": 1, "offset": 4, "type": "real", "unit": "MPa"},
            {"name": "电机转速", "db": 1, "offset": 8, "type": "int", "unit": "rpm"},
            {"name": "阀门状态", "db": 1, "offset": 12, "type": "bool", "unit": ""},
        ]

        self.data_labels = {}  # 存储数据显示标签
        self.log_data = []  # 数据日志

        self.setup_ui()
        self.process_queue()  # 启动队列处理

    def setup_ui(self):
        # 顶部工具栏
        toolbar = ttk.Frame(self.root)
        toolbar.pack(fill="x", padx=5, pady=5)

        ttk.Label(toolbar, text="IP:").pack(side="left")
        self.ip_entry = ttk.Entry(toolbar, width=15)
        self.ip_entry.insert(0, "192.168.0.1")
        self.ip_entry.pack(side="left", padx=5)

        self.connect_btn = ttk.Button(toolbar, text="连接", command=self.toggle_connection)
        self.connect_btn.pack(side="left", padx=5)

        self.monitor_btn = ttk.Button(toolbar, text="开始监控",
                                      command=self.toggle_monitoring, state="disabled")
        self.monitor_btn.pack(side="left", padx=5)

        ttk.Button(toolbar, text="导出日志", command=self.export_log).pack(side="left", padx=5)

        self.status_label = ttk.Label(toolbar, text="● 未连接", foreground="red")
        self.status_label.pack(side="right", padx=10)

        # 数据显示区(使用Grid布局)
        data_frame = ttk.LabelFrame(self.root, text="实时数据", padding=10)
        data_frame.pack(fill="both", expand=True, padx=10, pady=5)

        # 表头
        headers = ["数据点", "当前值", "单位", "更新时间"]
        for col, header in enumerate(headers):
            ttk.Label(data_frame, text=header, font=("Arial", 10, "bold")).grid(
                row=0, column=col, padx=10, pady=5, sticky="w")

        # 数据行
        for idx, point in enumerate(self.data_points, start=1):
            ttk.Label(data_frame, text=point["name"]).grid(row=idx, column=0, padx=10, pady=3, sticky="w")

            value_label = ttk.Label(data_frame, text="--", font=("Arial", 12))
            value_label.grid(row=idx, column=1, padx=10, pady=3)

            ttk.Label(data_frame, text=point["unit"]).grid(row=idx, column=2, padx=10, pady=3, sticky="w")

            time_label = ttk.Label(data_frame, text="--", foreground="gray")
            time_label.grid(row=idx, column=3, padx=10, pady=3, sticky="w")

            self.data_labels[point["name"]] = {"value": value_label, "time": time_label}

        # 日志区
        log_frame = ttk.LabelFrame(self.root, text="运行日志", padding=10)
        log_frame.pack(fill="both", expand=True, padx=10, pady=5)

        self.log_text = scrolledtext.ScrolledText(log_frame, height=8, state="disabled")
        self.log_text.pack(fill="both", expand=True)

    def toggle_connection(self):
        if not self.is_connected:
            try:
                self.plc.connect(self.ip_entry.get(), 0, 0)
                self.is_connected = True
                self.status_label.config(text=f"● 已连接", foreground="green")
                self.connect_btn.config(text="断开")
                self.monitor_btn.config(state="normal")
                self.log_message("PLC连接成功")
            except Exception as e:
                self.log_message(f"连接失败: {str(e)}", "error")
        else:
            if self.monitoring:
                self.toggle_monitoring()
            self.plc.disconnect()
            self.is_connected = False
            self.status_label.config(text="● 未连接", foreground="red")
            self.connect_btn.config(text="连接")
            self.monitor_btn.config(state="disabled")
            self.log_message("PLC已断开")

    def toggle_monitoring(self):
        if not self.monitoring:
            self.monitoring = True
            self.monitor_btn.config(text="停止监控")
            threading.Thread(target=self.monitor_loop, daemon=True).start()
            self.log_message("开始数据采集")
        else:
            self.monitoring = False
            self.monitor_btn.config(text="开始监控")
            self.log_message("停止数据采集")

    def monitor_loop(self):
        while self.monitoring:
            try:
                timestamp = datetime.now().strftime("%Y-%m-%d %H:%M:%S")
                readings = {}

                for point in self.data_points:
                    # 根据数据类型读取对应字节数
                    byte_count = {"real": 4, "int": 2, "bool": 1}[point["type"]]
                    data = self.plc.db_read(point["db"], point["offset"], byte_count)

                    # 解析数据
                    if point["type"] == "real":
                        value = get_real(data, 0)
                    elif point["type"] == "int":
                        value = get_int(data, 0)
                    else:  # bool
                        value = get_bool(data, 0, 0)

                    readings[point["name"]] = {"value": value, "time": timestamp}

                # 放入队列(线程安全)
                self.data_queue.put(readings)

                # 保存到日志
                self.log_data.append({"timestamp": timestamp, **readings})

            except Exception as e:
                self.data_queue.put({"error": str(e)})
                self.monitoring = False
                break
            threading.Event().wait(1.0)  # 更精准的延时方法

    def process_queue(self):
        """处理数据队列并更新界面"""
        try:
            while not self.data_queue.empty():
                data = self.data_queue.get_nowait()

                if "error" in data:
                    self.log_message(f"读取错误: {data['error']}", "error")
                else:
                    for name, info in data.items():
                        if name in self.data_labels:
                            value = info["value"]
                            if isinstance(value, bool):
                                display = "开" if value else "关"
                            elif isinstance(value, int):
                                display = str(value)
                            else:
                                display = f"{value:.2f}"

                            self.data_labels[name]["value"].config(text=display)
                            self.data_labels[name]["time"].config(text=info["time"])
        except queue.Empty:
            pass

        # 每100ms检查一次队列
        self.root.after(100, self.process_queue)

    def log_message(self, message, level="info"):
        self.log_text.config(state="normal")
        timestamp = datetime.now().strftime("%H:%M:%S")
        color_tag = "error" if level == "error" else "info"
        self.log_text.insert("end", f"[{timestamp}] {message}\n", color_tag)
        self.log_text.tag_config("error", foreground="red")
        self.log_text.see("end")
        self.log_text.config(state="disabled")

    def export_log(self):
        if not self.log_data:
            self.log_message("暂无数据可导出", "error")
            return

        filename = f"plc_log_{datetime.now().strftime('%Y%m%d_%H%M%S')}.csv"
        try:
            with open(filename, 'w', newline='', encoding='utf-8-sig') as f:
                writer = csv.DictWriter(f, fieldnames=["timestamp"] + [p["name"] for p in self.data_points])
                writer.writeheader()
                for record in self.log_data:
                    row = {"timestamp": record["timestamp"]}
                    for point in self.data_points:
                        row[point["name"]] = record[point["name"]]["value"]
                    writer.writerow(row)
            self.log_message(f"数据已导出到 {filename}")
        except Exception as e:
            self.log_message(f"导出失败: {str(e)}", "error")


if __name__ == "__main__":
    root = tk.Tk()
    app = AdvancedPLCMonitor(root)
    root.mainloop()
🎯 实战场景
去年给一个包装生产线做的监控系统——需要同时看温度、速度、计数、报警四类数据。用这套方案,客户现场调试时发现某个传感器数据异常,直接导出CSV给设备商排查,省了来回扯皮的时间。
💡 核心改进点
- 配置化数据点:新增监控变量只需修改data_points列表
- Queue队列:彻底解决线程同步问题,比锁机制更优雅
- CSV导出:故障分析的必备功能,Excel直接能打开
📈 性能对比
| 指标 | 基础版 | 进阶版 |
|---|---|---|
| 同时监控点位 | 1个 | 4个(可扩展到50+) |
| 刷新周期 | 500ms | 1000ms(可调) |
| 数据留存 | 无 | 内存缓存+CSV导出 |
| 界面响应性 | 良好 | 优秀(队列机制) |
⚡ 方案三:生产级——报警+重连+配置文件
生产环境永远比测试环境复杂。网络会抖、PLC会重启、需求会变...这版加入了工业现场必须的"容错机制"。
核心新增特性:
- ✅ 自动重连(断线后3秒重试)
- ✅ 阈值报警(超限弹窗+日志记录)
- ✅ JSON配置文件(改参数不用动代码)
- ✅ 数据库存储选项(SQLite轻量方案)
篇幅限制,这里展示关键代码片段:
python# config.json配置文件示例
{
    "plc": {
        "ip": "192.168.0.1",
        "rack": 0,
        "slot": 1,
        "retry_interval": 3
    },
    "data_points": [
        {
            "name": "反应釜温度",
            "db": 1,
            "offset": 0,
            "type": "real",
            "unit": "℃",
            "alarm_high": 85.0,
            "alarm_low": 15.0
        }
    ],
    "logging": {
        "enable_csv": true,
        "enable_db": false,
        "interval": 1
    }
}
python# 自动重连机制(放在连接函数里)
def connect_with_retry(self):
    max_retries = 3
    for attempt in range(max_retries):
        try:
            self.plc.connect(self.config["plc"]["ip"],
                           self.config["plc"]["rack"],
                           self.config["plc"]["slot"])
            self.is_connected = True
            return True
        except Exception as e:
            if attempt < max_retries - 1:
                time.sleep(self.config["plc"]["retry_interval"])
            else:
                raise e

# 阈值报警检查
def check_alarm(self, point, value):
    if "alarm_high" in point and value > point["alarm_high"]:
        self.trigger_alarm(point["name"], value, "超高限")
    elif "alarm_low" in point and value < point["alarm_low"]:
        self.trigger_alarm(point["name"], value, "超低限")
🏭 实战案例
某食品厂的冷库监控系统。凌晨3点制冷机组故障导致温度飙升,报警功能及时推送通知(我加了个企业微信webhook),避免了20万货物损失。客户后来逢人就夸"这Python界面比几万块的组态软件还好用"——其实核心代码也就400多行。
🎁 三个"一句话"技术洞察
-
"工控界面的本质是'数据搬运工',不是'计算引擎'"
别在界面线程里做复杂运算,读数据→传输→展示,每个环节都要"专业人做专业事"。 -
"异常处理不是锦上添花,是救命稻草"
工业现场的环境比你想象的恶劣十倍——电磁干扰、网络抖动、人为误操作...每个try-except都可能避免一次生产事故。 -
"配置文件是给'未来的自己'留的后路"
今天觉得写死在代码里方便,三个月后客户要改参数时你就知道当初有多傻了。JSON配置文件,永远的神!
🎯 可复用的代码模板
通用PLC连接器(支持自动重连)
pythonclass PLCConnector:
    def __init__(self, ip, rack=0, slot=1):
        self.client = snap7.client.Client()
        self.ip, self.rack, self.slot = ip, rack, slot
        self._connected = False

    def ensure_connected(self):
        if not self._connected or not self.client.get_connected():
            try:
                self.client.connect(self.ip, self.rack, self.slot)
                self._connected = True
            except:
                self._connected = False
                raise

    def safe_read(self, db, offset, size):
        self.ensure_connected()
        return self.client.db_read(db, offset, size)
线程安全的数据更新器
pythonclass ThreadSafeUpdater:
    def __init__(self, tk_root):
        self.root = tk_root
        self.queue = queue.Queue()

    def put(self, widget, method, *args):
        self.queue.put((widget, method, args))

    def process(self):
        while not self.queue.empty():
            widget, method, args = self.queue.get()
            getattr(widget, method)(*args)
        self.root.after(50, self.process)
💬 开放讨论:你遇到过哪些工控开发的坑?
评论区聊聊:
- 你们项目用的啥通信协议?Modbus还是OPC UA?
- 有没有遇到过"界面能连上但读不到数据"的诡异情况?
- 对于大批量数据(1000+点位),你们是怎么优化性能的?
✨ 最后唠叨几句
写这篇文章时我翻出了三年前的项目代码——当时为了赶进度,硬着头皮用VB.NET撸了个界面,现在看简直不忍直视。如果那时候就知道Tkinter+snap7这套组合,估计能少掉好几根头发。
工控开发这事儿吧,门槛其实没想象的高,但坑确实不少。最重要的是理解"界面是界面、通信是通信"这个分层思想——掌握了这个,不管是换成PyQt、还是改成Web界面,核心逻辑都能复用。
代码我都测试过能跑(西门子S7-1200实测),但每个项目的PLC型号、网络环境、数据结构都不一样,拿去用的时候记得根据实际情况调整。遇到问题别慌,90%都是配置问题——IP、Rack、Slot、DB块优化...逐个排查准没错。
最后,如果这篇文章帮你省了时间或者避了坑,不妨点个"在看"让更多做工控的兄弟看到。咱们技术人,能用代码解决的问题,就别用加班解决😄
标签推荐:#Python工控 #Tkinter实战 #PLC通信 #工业自动化 #snap7教程
收藏理由:三套完整代码+配置文件模板+踩坑指南,下次接到类似需求直接拿来改,至少省3天开发时间。


本文作者:技术老小子
本文链接:
版权声明:本博客所有文章除特别声明外,均采用 BY-NC-SA 许可协议。转载请注明出处!