
目录
你是否遇到过这样的场景:客户要求在Windows窗体上实现自定义绘图效果,比如绘制统计图表、自定义控件外观,或者实现图片的特殊处理?传统的控件已经无法满足需求,这时候你就需要掌握GDI+ 这个强大的图形绘制技术了。
作为.NET Framework的重要组成部分,GDI+(Graphics Device Interface Plus)为WinForm开发者提供了丰富的2D图形绘制能力。从简单的线条绘制到复杂的图像处理,GDI+都能轻松胜任。本文将从零开始,带你掌握GDI+的核心概念和实战技巧,让你的WinForm应用更加生动精彩!
💡 什么是GDI+?为什么要学它?
🔍 问题分析
很多C#开发者在面临以下场景时会感到困扰:
- 自定义控件外观:系统控件样式单一,无法满足UI设计需求
- 动态图表绘制:需要根据数据实时生成图表和统计图
- 图像处理需求:对图片进行缩放、裁剪、滤镜等操作
- 游戏开发基础:简单2D游戏的图形渲染
传统的控件拖拽式开发已经无法满足这些个性化需求,这时候掌握GDI+就显得尤为重要。
🎨 GDI+核心优势
GDI+ 是微软为.NET平台专门设计的图形API,相比传统GDI具有以下优势:
- 面向对象设计:更符合C#编程习惯
- 抗锯齿支持:图形更加平滑美观
- 丰富的绘制功能:支持渐变、纹理、Alpha混合
- 图像格式支持:原生支持PNG、JPEG、GIF等多种格式
🚀 GDI+基础概念详解
📐 Graphics类:绘图的核心
Graphics类是GDI+的核心,它代表了一个绘图表面。获取Graphics对象的三种常见方式:
c#// 在Paint事件中获取
private void Form1_Paint(object sender, PaintEventArgs e)
{
    Graphics g = e.Graphics;
    // 在这里进行绘制操作
}
c#// 通过控件创建
Graphics g = this.CreateGraphics();
// 使用完后记得释放资源
g.Dispose();
c#// 通过图像创建(用于离线绘制)
Bitmap bitmap = new Bitmap(800, 600);
Graphics g = Graphics.FromImage(bitmap);
// 绘制完成后保存图像
bitmap.Save("output.png");
g.Dispose();
bitmap.Dispose();
⚠️ 重要提醒:Graphics对象是稀缺的系统资源,使用完毕后一定要调用Dispose()方法释放,或者使用using语句自动释放。
🖌️ Pen和Brush:绘图的画笔
Pen(钢笔) 用于绘制线条和形状边框:
c#private void Form1_Paint(object sender, PaintEventArgs e)
{
    var g = e.Graphics;
    // 创建不同样式的画笔
    Pen redPen = new Pen(Color.Red, 2);           // 红色,宽度2
    Pen dashedPen = new Pen(Color.Blue, 1);
    dashedPen.DashStyle = DashStyle.Dash;         // 设置虚线样式

    // 绘制矩形边框
    g.DrawRectangle(redPen, 10, 10, 100, 50);

    // 记得释放资源
    redPen.Dispose();
    dashedPen.Dispose();
}

Brush(画刷) 用于填充封闭区域:
c#private void Form1_Paint(object sender, PaintEventArgs e)
{
    var g = e.Graphics;
    // 实心画刷
    SolidBrush solidBrush = new SolidBrush(Color.LightBlue);

    // 渐变画刷
    LinearGradientBrush gradientBrush = new LinearGradientBrush(
        new Point(0, 0), new Point(100, 100),
        Color.Red, Color.Blue);

    // 填充矩形
    g.FillRectangle(solidBrush, 10, 10, 100, 50);

    g.FillRectangle(gradientBrush, 120, 10, 100, 50);

    // 释放资源
    solidBrush.Dispose();
    gradientBrush.Dispose();
}
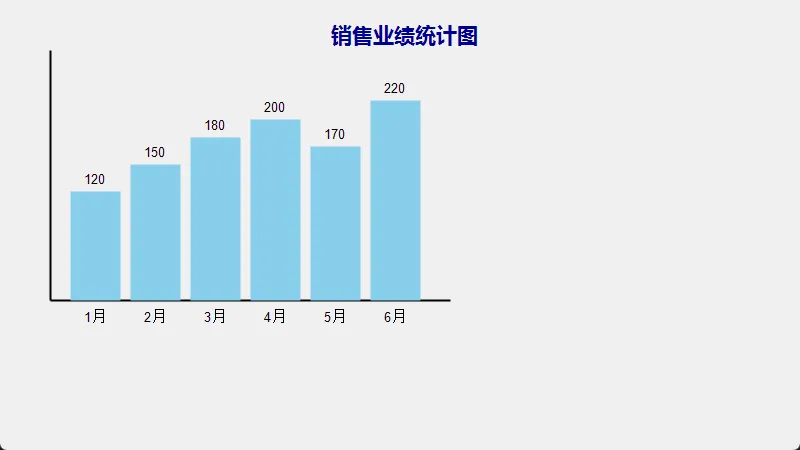
🎯 实战案例1:绘制动态数据图表
📊 需求场景
为销售管理系统绘制动态柱状图,根据实时数据展示各月份销售额。
c#using System.Drawing.Drawing2D;

namespace AppWinformDraw
{
    public partial class Form1 : Form
    {
        private int[] salesData = { 120, 150, 180, 200, 170, 220 };
        private string[] months = { "1月", "2月", "3月", "4月", "5月", "6月" };
        public Form1()
        {
            InitializeComponent();
            this.SetStyle(ControlStyles.AllPaintingInWmPaint |
                   ControlStyles.UserPaint |
                   ControlStyles.DoubleBuffer, true);
        }

        private void Form1_Paint(object sender, PaintEventArgs e)
        {
            Graphics g = e.Graphics;
            g.SmoothingMode = SmoothingMode.AntiAlias; // 开启抗锯齿

            // 绘制坐标轴
            DrawAxes(g);

            // 绘制柱状图
            DrawBars(g);

            // 绘制标题
            DrawTitle(g);
        }

        private void DrawAxes(Graphics g)
        {
            using (Pen axisPen = new Pen(Color.Black, 2))
            {
                // X轴
                g.DrawLine(axisPen, 50, 300, 450, 300);
                // Y轴
                g.DrawLine(axisPen, 50, 50, 50, 300);
            }
        }

        private void DrawBars(Graphics g)
        {
            int maxValue = salesData.Max();
            int barWidth = 50;
            int spacing = 10;

            using (SolidBrush barBrush = new SolidBrush(Color.SkyBlue))
            using (SolidBrush textBrush = new SolidBrush(Color.Black))
            using (Font font = new Font("Arial", 10))
            {
                for (int i = 0; i < salesData.Length; i++)
                {
                    int x = 70 + i * (barWidth + spacing);
                    int barHeight = (int)(salesData[i] * 200.0 / maxValue);
                    int y = 300 - barHeight;

                    // 绘制柱子
                    g.FillRectangle(barBrush, x, y, barWidth, barHeight);

                    // 绘制数值标签
                    string valueText = salesData[i].ToString();
                    SizeF textSize = g.MeasureString(valueText, font);
                    g.DrawString(valueText, font, textBrush,
                        x + (barWidth - textSize.Width) / 2, y - 20);

                    // 绘制月份标签
                    SizeF monthSize = g.MeasureString(months[i], font);
                    g.DrawString(months[i], font, textBrush,
                        x + (barWidth - monthSize.Width) / 2, 310);
                }
            }
        }

        private void DrawTitle(Graphics g)
        {
            using (Font titleFont = new Font("微软雅黑", 16, FontStyle.Bold))
            using (SolidBrush titleBrush = new SolidBrush(Color.DarkBlue))
            {
                string title = "销售业绩统计图";
                SizeF titleSize = g.MeasureString(title, titleFont);
                float x = (this.Width - titleSize.Width) / 2;
                g.DrawString(title, titleFont, titleBrush, x, 20);
            }
        }
    }
}
🎨 代码亮点解析
- 双缓冲技术:通过
SetStyle开启双缓冲,避免绘制时的闪烁 - 抗锯齿:使用
SmoothingMode.AntiAlias让图形更加平滑 - 资源管理:使用
using语句自动释放GDI+资源 - 动态计算:根据数据动态计算柱子高度和位置
- 注意,实际业务中,一般不会自己手动绘制,有对应的三方控件实现。
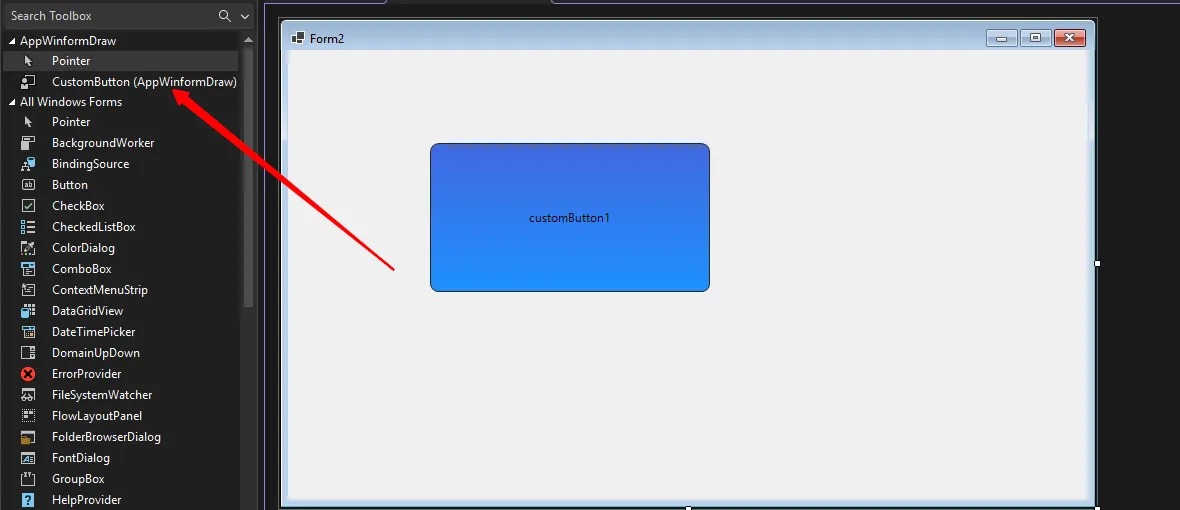
🎯 实战案例2:自定义按钮控件
🎨 需求场景
创建一个具有圆角、渐变背景和鼠标悬停效果的自定义按钮。
c#using System;
using System.Collections.Generic;
using System.Drawing.Drawing2D;
using System.Linq;
using System.Text;
using System.Threading.Tasks;

namespace AppWinformDraw
{
    public class CustomButton : Control
    {
        private bool isMouseOver = false;
        private bool isPressed = false;

        public CustomButton()
        {
            this.SetStyle(ControlStyles.AllPaintingInWmPaint |
                         ControlStyles.UserPaint |
                         ControlStyles.ResizeRedraw |
                         ControlStyles.SupportsTransparentBackColor, true);
            this.Size = new Size(100, 35);
            this.BackColor = Color.Transparent;
        }

        protected override void OnPaint(PaintEventArgs e)
        {
            Graphics g = e.Graphics;
            g.SmoothingMode = SmoothingMode.AntiAlias;

            // 绘制按钮背景
            DrawBackground(g);

            // 绘制按钮文本
            DrawText(g);

            // 绘制边框
            DrawBorder(g);
        }

        private void DrawBackground(Graphics g)
        {
            Rectangle rect = new Rectangle(0, 0, Width - 1, Height - 1);
            using (GraphicsPath path = GetRoundRectPath(rect, 8))
            {
                Color startColor, endColor;

                if (isPressed)
                {
                    startColor = Color.FromArgb(100, 100, 100);
                    endColor = Color.FromArgb(150, 150, 150);
                }
                else if (isMouseOver)
                {
                    startColor = Color.FromArgb(70, 130, 180);
                    endColor = Color.FromArgb(100, 149, 237);
                }
                else
                {
                    startColor = Color.FromArgb(65, 105, 225);
                    endColor = Color.FromArgb(30, 144, 255);
                }

                using (LinearGradientBrush brush = new LinearGradientBrush(
                    rect, startColor, endColor, LinearGradientMode.Vertical))
                {
                    g.FillPath(brush, path);
                }
            }
        }

        private void DrawText(Graphics g)
        {
            if (!string.IsNullOrEmpty(Text))
            {
                using (SolidBrush brush = new SolidBrush(ForeColor))
                {
                    StringFormat sf = new StringFormat();
                    sf.Alignment = StringAlignment.Center;
                    sf.LineAlignment = StringAlignment.Center;

                    Rectangle textRect = new Rectangle(0, 0, Width, Height);
                    g.DrawString(Text, Font, brush, textRect, sf);
                }
            }
        }

        private void DrawBorder(Graphics g)
        {
            Rectangle rect = new Rectangle(0, 0, Width - 1, Height - 1);
            using (GraphicsPath path = GetRoundRectPath(rect, 8))
            using (Pen pen = new Pen(Color.FromArgb(40, 40, 40), 1))
            {
                g.DrawPath(pen, path);
            }
        }

        private GraphicsPath GetRoundRectPath(Rectangle rect, int radius)
        {
            GraphicsPath path = new GraphicsPath();
            int diameter = radius * 2;

            // 左上角
            path.AddArc(rect.X, rect.Y, diameter, diameter, 180, 90);
            // 右上角
            path.AddArc(rect.Right - diameter, rect.Y, diameter, diameter, 270, 90);
            // 右下角
            path.AddArc(rect.Right - diameter, rect.Bottom - diameter, diameter, diameter, 0, 90);
            // 左下角
            path.AddArc(rect.X, rect.Bottom - diameter, diameter, diameter, 90, 90);

            path.CloseAllFigures();
            return path;
        }

        protected override void OnMouseEnter(EventArgs e)
        {
            isMouseOver = true;
            Invalidate();
            base.OnMouseEnter(e);
        }

        protected override void OnMouseLeave(EventArgs e)
        {
            isMouseOver = false;
            isPressed = false;
            Invalidate();
            base.OnMouseLeave(e);
        }

        protected override void OnMouseDown(MouseEventArgs e)
        {
            isPressed = true;
            Invalidate();
            base.OnMouseDown(e);
        }

        protected override void OnMouseUp(MouseEventArgs e)
        {
            isPressed = false;
            Invalidate();
            base.OnMouseUp(e);
        }
    }
}
🎨 技术要点
- GraphicsPath:用于创建复杂的几何形状,实现圆角效果
- 状态管理:通过鼠标事件管理按钮的不同视觉状态
- 渐变效果:使用LinearGradientBrush创建专业的渐变背景
- 性能优化:只在状态改变时调用Invalidate()重绘
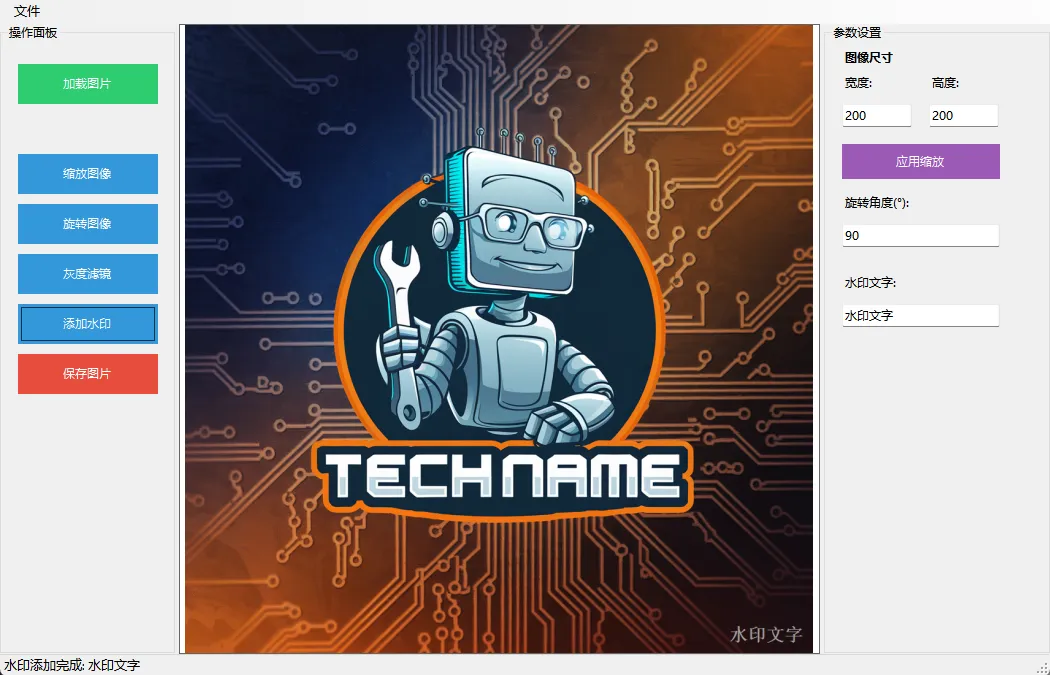
🎯 实战案例3:图像处理工具
🖼️ 需求场景
实现图像的缩放、旋转和滤镜效果处理。
c#using System;
using System.Collections.Generic;
using System.Drawing.Drawing2D;
using System.Drawing.Imaging;
using System.Linq;
using System.Text;
using System.Threading.Tasks;

namespace AppWinformDraw
{
    public class ImageProcessor
    {
        public static Bitmap ResizeImage(Image originalImage, int newWidth, int newHeight)
        {
            Bitmap resizedImage = new Bitmap(newWidth, newHeight);

            using (Graphics g = Graphics.FromImage(resizedImage))
            {
                // 设置高质量绘制模式
                g.InterpolationMode = InterpolationMode.HighQualityBicubic;
                g.SmoothingMode = SmoothingMode.HighQuality;
                g.PixelOffsetMode = PixelOffsetMode.HighQuality;
                g.CompositingQuality = CompositingQuality.HighQuality;

                // 绘制缩放后的图像
                g.DrawImage(originalImage, 0, 0, newWidth, newHeight);
            }

            return resizedImage;
        }

        public static Bitmap RotateImage(Image originalImage, float angle)
        {
            double radians = angle * Math.PI / 180;
            double cos = Math.Abs(Math.Cos(radians));
            double sin = Math.Abs(Math.Sin(radians));
            int newWidth = (int)(originalImage.Width * cos + originalImage.Height * sin);
            int newHeight = (int)(originalImage.Width * sin + originalImage.Height * cos);

            Bitmap rotatedImage = new Bitmap(newWidth, newHeight);

            using (Graphics g = Graphics.FromImage(rotatedImage))
            {
                g.InterpolationMode = InterpolationMode.HighQualityBicubic;
                g.SmoothingMode = SmoothingMode.HighQuality;

                g.TranslateTransform(newWidth / 2f, newHeight / 2f);
                g.RotateTransform(angle);
                g.DrawImage(originalImage,
                    -originalImage.Width / 2f,
                    -originalImage.Height / 2f);
            }

            return rotatedImage;
        }

        public static Bitmap ApplyGrayscaleFilter(Image originalImage)
        {
            Bitmap grayscaleImage = new Bitmap(originalImage.Width, originalImage.Height);

            // 创建颜色矩阵实现灰度转换
            ColorMatrix colorMatrix = new ColorMatrix(new float[][]
            {
            new float[] {0.299f, 0.299f, 0.299f, 0, 0},
            new float[] {0.587f, 0.587f, 0.587f, 0, 0},
            new float[] {0.114f, 0.114f, 0.114f, 0, 0},
            new float[] {0, 0, 0, 1, 0},
            new float[] {0, 0, 0, 0, 1}
            });

            ImageAttributes attributes = new ImageAttributes();
            attributes.SetColorMatrix(colorMatrix);

            using (Graphics g = Graphics.FromImage(grayscaleImage))
            {
                g.DrawImage(originalImage,
                    new Rectangle(0, 0, originalImage.Width, originalImage.Height),
                    0, 0, originalImage.Width, originalImage.Height,
                    GraphicsUnit.Pixel, attributes);
            }

            return grayscaleImage;
        }

        public static Bitmap AddWatermark(Image originalImage, string watermarkText)
        {
            Bitmap watermarkedImage = new Bitmap(originalImage);

            using (Graphics g = Graphics.FromImage(watermarkedImage))
            {
                g.SmoothingMode = SmoothingMode.AntiAlias;

                using (Font watermarkFont = new Font("Arial", 20, FontStyle.Bold))
                using (SolidBrush watermarkBrush = new SolidBrush(Color.FromArgb(128, Color.White)))
                {
                    // 计算水印位置(右下角)
                    SizeF textSize = g.MeasureString(watermarkText, watermarkFont);
                    float x = originalImage.Width - textSize.Width - 10;
                    float y = originalImage.Height - textSize.Height - 10;
                    // 绘制水印文本
                    g.DrawString(watermarkText, watermarkFont, watermarkBrush, x, y);
                }
            }

            return watermarkedImage;
        }
    }
}
⚠️ 常见坑点与最佳实践
🔧 性能优化要点
- 及时释放资源
c#// ❌ 错误做法 - 忘记释放资源
Graphics g = this.CreateGraphics();
g.DrawString("Hello", this.Font, Brushes.Black, 0, 0);
// 忘记调用 g.Dispose()

// ✅ 正确做法 - 使用using语句
using (Graphics g = this.CreateGraphics())
{
    g.DrawString("Hello", this.Font, Brushes.Black, 0, 0);
} // 自动释放资源
- 避免在循环中创建对象
c#// ❌ 错误做法
for (int i = 0; i < 1000; i++)
{
    Pen pen = new Pen(Color.Red); // 每次循环都创建新对象
    g.DrawLine(pen, 0, i, 100, i);
    pen.Dispose();
}

// ✅ 正确做法
using (Pen pen = new Pen(Color.Red))
{
    for (int i = 0; i < 1000; i++)
    {
        g.DrawLine(pen, 0, i, 100, i); // 重复使用同一个对象
    }
}
- 合理使用缓存
c#// 缓存经常使用的画刷和画笔
private static readonly SolidBrush CachedBrush = new SolidBrush(Color.Blue);
private static readonly Pen CachedPen = new Pen(Color.Red, 2);
🎯 核心要点总结
通过本文的学习,我们掌握了GDI+的三个核心要点:
- 基础概念掌握:理解Graphics、Pen、Brush等核心类的作用和用法,这是所有绘图操作的基础
- 实战应用能力:学会绘制图表、自定义控件、图像处理等实用技能,满足实际项目需求
- 性能优化意识:掌握资源管理、对象复用等最佳实践,避免内存泄漏和性能问题
GDI+为WinForm开发者打开了图形编程的大门。无论是企业级应用的数据可视化,还是个性化界面的定制开发,掌握这些技能都会让你的作品脱颖而出。记住:好的用户体验往往来自于这些看似细微的视觉细节!
💬 互动讨论:你在项目中遇到过哪些有趣的绘图需求?或者在使用GDI+时踩过什么坑?欢迎在评论区分享你的经验!
🔥 觉得文章对你有帮助?请点赞收藏并转发给更多C#开发同行,让我们一起提升开发技能!
注
通过网盘分享的文件:AppWinformDraw.zip 链接: https://pan.baidu.com/s/1Gw9HPC4erU9DDwgNyJWWng?pwd=ibm6 提取码: ibm6 --来自百度网盘超级会员v9的分享
本文作者:技术老小子
本文链接:
版权声明:本博客所有文章除特别声明外,均采用 BY-NC-SA 许可协议。转载请注明出处!