你是否在Python开发中遇到过这样的困扰:不同形状的数组无法直接进行运算?或者为了让两个数组能够相加,不得不写大量的循环代码?今天我们就来深入解析NumPy的数组广播机制,这个被誉为NumPy最强大特性之一的功能,将彻底改变你处理数值计算的方式。
广播机制不仅能让你告别繁琐的循环代码,更能让你的程序运行速度提升数倍。无论你是刚接触NumPy的新手,还是想要优化代码性能的资深开发者,掌握广播机制都将让你的Python开发技能更上一层楼。
🔍 问题分析:为什么需要数组广播?
传统方法的痛点
在没有广播机制之前,我们处理不同形状数组的运算时,往往需要手动扩展数组或使用循环:
Pythonimport numpy as np

# 传统方法:手动循环处理
matrix = np.array([[1, 2, 3],
                   [4, 5, 6],
                   [7, 8, 9]])

scalar = 10

# 错误的做法:需要手动循环
result = np.zeros_like(matrix)
for i in range(matrix.shape[0]):
    for j in range(matrix.shape[1]):
        result[i, j] = matrix[i, j] + scalar

print("传统方法结果:")
print(result)

在Python开发中,特别是上位机开发和数据分析领域,线性代数运算是不可避免的核心技能。无论你是在处理传感器数据、图像处理,还是机器学习算法,NumPy的线性代数功能都能让你的代码更高效、更专业。
本文将从实战角度出发,详细解析Python NumPy中的线性代数运算,帮助你掌握从基础矩阵操作到高级数值计算的全套技能。我们不仅会讲解理论知识,更重要的是提供大量可直接应用于实际项目的编程技巧和最佳实践。
🔍 问题分析:为什么选择NumPy进行线性代数运算?
💪 性能优势
NumPy底层使用C语言实现,相比纯Python代码,运算速度提升10-100倍:
Pythonimport numpy as np
import time
# 纯Python矩阵乘法
def python_matrix_multiply(A, B):
rows_A, cols_A = len(A), len(A[0])
rows_B, cols_B = len(B), len(B[0])
result = [[0 for _ in range(cols_B)] for _ in range(rows_A)]
for i in range(rows_A):
for j in range(cols_B):
for k in range(cols_A):
result[i][j] += A[i][k] * B[k][j]
return result
# 测试数据
size = 500
A_py = [[1 for _ in range(size)] for _ in range(size)]
B_py = [[2 for _ in range(size)] for _ in range(size)]
A_np = np.ones((size, size))
B_np = np.ones((size, size)) * 2
# 性能对比
start = time.time()
result_py = python_matrix_multiply(A_py, B_py)
python_time = time.time() - start
start = time.time()
result_np = np.dot(A_np, B_np)
numpy_time = time.time() - start
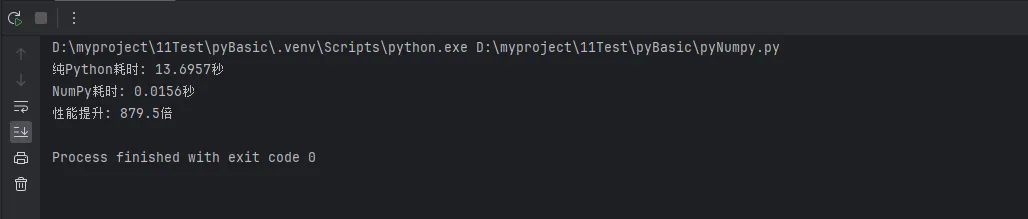
print(f"纯Python耗时: {python_time:.4f}秒")
print(f"NumPy耗时: {numpy_time:.4f}秒")
print(f"性能提升: {python_time/numpy_time:.1f}倍")
在Python数据分析和上位机开发中,统计计算是绕不开的核心环节。无论是处理传感器数据、分析生产指标,还是进行质量控制,统计函数都扮演着关键角色。NumPy作为Python科学计算的基石,提供了丰富而高效的统计函数库。本文将从实战角度深入解析NumPy统计函数的核心功能,帮助开发者在实际项目中游刃有余地处理各类统计需求。
🎯 问题分析:为什么需要掌握NumPy统计函数?
在实际的Python开发工作中,我们经常遇到这些场景:
🔸 数据质量监控
- 需要快速计算大批量数据的均值、方差,判断数据稳定性
- 要找出异常值,进行数据清洗
🔸 生产过程控制
- 实时统计设备运行参数的分布情况
- 计算产品质量指标的置信区间
🔸 性能分析优化
- 分析算法执行时间的统计特征
- 评估系统负载的波动范围
传统的Python内置统计方法在处理大数据时性能不足,而NumPy的向量化计算能够显著提升效率,这就是我们选择NumPy统计函数的核心原因。
💡 解决方案:NumPy统计函数体系
🚀 基础描述统计
NumPy提供了完整的描述统计函数族,让我们从最常用的开始:
Pythonimport numpy as np

# 创建示例数据集
data = np.array([23, 45, 56, 78, 32, 67, 89, 12, 34, 56, 78, 90, 43, 21, 65])
print(f"原始数据: {data}")

# 基础统计量
print(f"均值: {np.mean(data):.2f}")
print(f"中位数: {np.median(data):.2f}")
print(f"标准差: {np.std(data):.2f}")
print(f"方差: {np.var(data):.2f}")

作为Python开发者,你是否在处理数值计算时遇到过性能瓶颈?是否为复杂的数学运算而苦恼?NumPy的数学函数模块正是解决这些问题的利器。本文将从实际开发角度出发,深入剖析NumPy数学函数的核心功能,通过丰富的代码实例,帮助你掌握高效的数值计算技巧。无论你是数据分析新手,还是希望提升计算性能的资深开发者,这篇文章都将为你的Python开发之路提供强有力的支持。
🔍 问题分析:为什么选择NumPy数学函数?
在日常的Python开发中,我们经常遇到以下挑战:
📊 性能瓶颈问题
Python原生的math模块虽然功能完整,但在处理大量数据时性能表现不佳:
Pythonimport math
import time
import numpy as np
# 原生Python方法处理10万个数据
data_list = list(range(100000))
start_time = time.time()
result_python = [math.sin(x) for x in data_list]
python_time = time.time() - start_time
# NumPy方法处理相同数据
data_array = np.array(data_list)
start_time = time.time()
result_numpy = np.sin(data_array)
numpy_time = time.time() - start_time
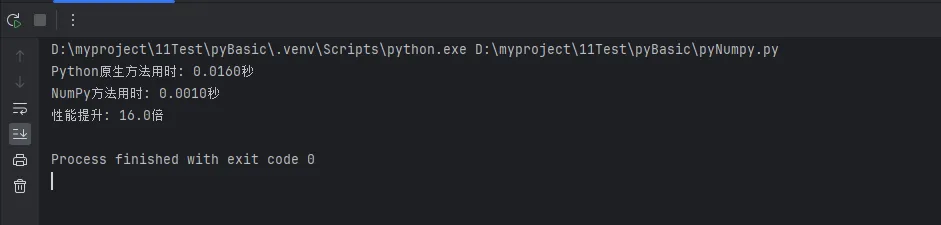
print(f"Python原生方法用时: {python_time:.4f}秒")
print(f"NumPy方法用时: {numpy_time:.4f}秒")
print(f"性能提升: {python_time/numpy_time:.1f}倍")
🎯 功能局限性
原生Python在处理多维数组运算时代码复杂,而NumPy提供了更优雅的解决方案:
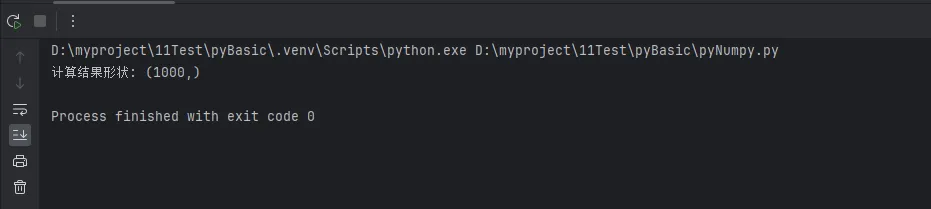
Pythonimport numpy as np

# 复杂的多维数学运算
matrix_2d = np.random.rand(1000, 1000)

# NumPy一行代码完成复杂运算
result = np.sqrt(np.sum(np.square(matrix_2d), axis=1))
print(f"计算结果形状: {result.shape}")
在Python开发的实际工作中,特别是在Windows环境下进行数据分析和上位机开发时,我们经常面临这样的挑战:如何高效地从大型数组中提取特定数据?如何灵活地改变数据的形状以适应不同的计算需求?如何处理多维数据结构?
这些看似复杂的问题,实际上都指向了NumPy中三个核心概念:数组索引、切片操作和形状变换。很多Python初学者在这里容易卡壳,不是因为概念本身复杂,而是缺乏系统的实战指导。
本文将从实际应用场景出发,通过丰富的代码示例和Windows环境下的编程技巧,带你彻底掌握NumPy数组的索引、切片与形状操作。无论你是数据分析新手,还是正在从事科学计算、图像处理的工程师,这些技能都将成为你Python开发路上的重要基石。
🔍 问题分析:为什么这三大技能如此重要?
在深入学习之前,让我们先理解一个核心问题:为什么数组索引、切片和形状操作是NumPy编程的必备技能?
实际应用场景分析
Pythonimport numpy as np
import time
# 场景1:传感器数据处理
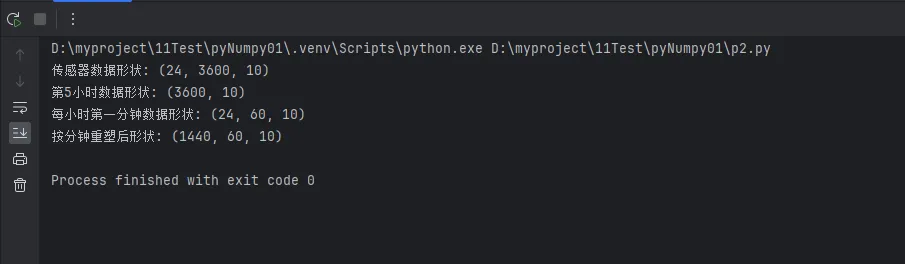
# 假设我们有一个温度传感器,每秒采集10个数据点,连续24小时
sensor_data = np.random.normal(25, 5, (24, 3600, 10)) # 24小时 × 3600秒 × 10个点
print(f"传感器数据形状: {sensor_data.shape}")
# 需求:提取第5小时的所有数据 - 这需要索引技能
hour_5_data = sensor_data[4] # 索引从0开始
print(f"第5小时数据形状: {hour_5_data.shape}")
# 需求:提取每小时的第一分钟数据 - 这需要切片技能
first_minute_data = sensor_data[:, :60, :]
print(f"每小时第一分钟数据形状: {first_minute_data.shape}")
# 需求:将数据重塑为按分钟统计 - 这需要形状变换技能
minute_data = sensor_data.reshape(24*60, 60, 10)
print(f"按分钟重塑后形状: {minute_data.shape}")